Netwrix Threat Manager Configuration Window
The Netwrix Threat Manager Configuration window is a global setting to enable integration between Threat Prevention and Threat Manager. This window is only available to Threat Prevention administrators.
Threat Manager App Token
The Threat Manager App Token authenticates connection between Threat Prevention and Threat Manager. You generate this token in Threat Manager:
- In Threat Manager, navigate to the Configuration > App Tokens page.
- Generate a new app token.
- Copy the token.
Event Sink Tab
The Event Sink tab connects Threat Prevention to Threat Manager through a uniform resource identifier (URI) and the Threat Manager App Token. This window sends policy event data to Threat Manager.
Step 1 – Generate the Threat Manager App Token in Threat Manager.
Step 2 – In Threat Prevention, click Configuration > Netwrix Threat Manager Configuration on the menu. The Netwrix Threat Manager Configuration window opens with the Event Sink tab displayed by default.
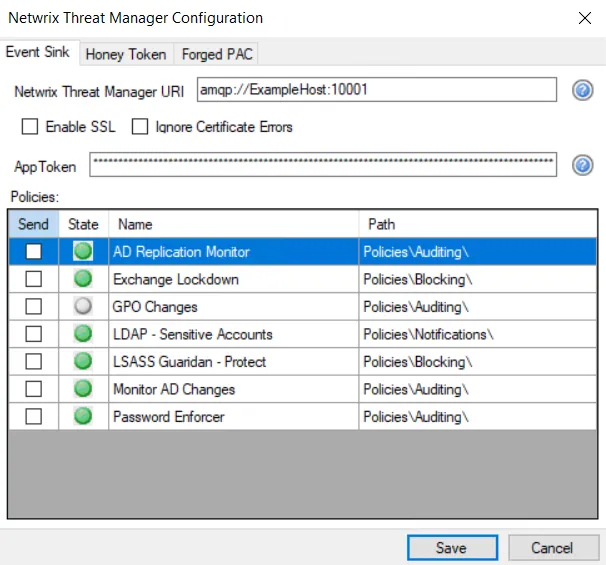
Step 3 – In the Netwrix Threat Manager URI box, enter the Threat Manager hostname or IP address and port in the following format. The default port for Threat Manager is 10001.
- amqp://[HOSTNAME | IPADDRESS]:[PORT]
- For an example with the host name – amqp://ExampleHost:10001
- For an example with the host address – amqp://192.168.9.52:10001
Don't use localhost for the hostname or 127.0.0.1 for the IP address.
Step 4 – You can enable SSL for the Advanced Message Queuing Protocol (AMQP) event stream.
As Threat Manager supports TLS/SSL, you can also enable SSL in Threat Prevention to communicate securely with Threat Manager.
- If Threat Manager has TLS enabled, select the Enable SSL checkbox to enable the Agent to send events to Threat Manager. Otherwise, the Agent throws an error when connecting.
- Select the Ignore Certificate Errors checkbox to ignore certificate errors that may arise when the Agent connects to Threat Manager. If this checkbox isn't selected, the Agent will fail to connect when there are certificate errors.
Step 5 – In the App Token box, enter the App Token generated on the App Tokens page in Threat Manager.
Step 6 – The Policies area lists all policies that exist in Threat Prevention. It displays the following for each policy:
- Send – When you select this checkbox, the policy sends the event data to Threat Manager directly from the Agent. You can also set this option using the Send to Netwrix Threat Manager checkbox on the Actions tab of a policy.
- State – Displays whether the policy is enabled or disabled The State column doesn't control the state of the policy. You can enable or disable a policy either on the General tab of the respective policy or through the Policies Node Right-Click Menu.
- Name – Shows the display name of the policy
- Path – Displays the path of the policy within the structure of the Policies node in the left pane.
Step 7 – Click Save.
Threat Prevention now sends all real-time event data from the selected policies to Threat Manager.
You can also use the Threat Manager URI configuration to send Threat Prevention policy data to the Activity Monitor host and port (example: amqp://localhost:4499). Threat Prevention can only send to either Threat Manager or the Activity Monitor.
Honey Token Tab
On the Honey Token tab, you specify a samAccountName, which Threat Prevention substitutes with the replacement samAccountName that you provide. Threat Prevention sends the information on this tab to the Threat Prevention Agent. If the Agent sees an LDAP query using information from the Honey Token of fake accounts, it alters the LDAP query results to return the Replacement samAccountName. This ensures the account looks like a real privileged account to lure the perpetrator to it.
Step 1 – Configure the Source samAccountName and Replacement samAccountName in a Threat Manager Honey Token threat.
To set up a honey token, see the Configure Honeytoken Threats topic in the Netwrix Threat Manager Documentation.
Step 2 – In Threat Prevention, click Configuration > Netwrix Threat Manager Configuration on the menu. The Netwrix Threat Manager Configuration window opens.
Step 3 – Ensure the Event Sink tab is properly set up to send event data to Threat Manager.
Step 4 – Click the Honey Token tab.

Step 5 – Check the Enable LDAP substitution checkbox to enable the options on the tab.
Step 6 – Enter the exact match of settings configured for the Threat Manager Honey Token threat for the following options:
- Exact Match or Substring
- Source samAccountName
- Replacement samAccountName
Step 7 – Click Save.
The Honey Token is now enabled and integrated with Threat Manager.
Forged PAC Tab
The Forged PAC tab provides the option to include Forged PAC information in the events Threat Prevention sends to Threat Manager.
Step 1 – Under the Analytics node in the left pane, select the Forged PAC analytic.
Step 2 – On the Forged PAC analytics window, select the gear icon on the upper-right corner of the window to open the Configure Analytics window.
Step 3 – Add or remove the RIDs of groups to monitor on the Settings tab. See the Forged PAC Analytic Type topic for additional information.
Step 4 – On the Policy tab, configure the following:
- General Tab – Use the toggle to Enable the policy
- Event Type Tab – Keep the default settings or set as desired for the Authentication event filters
- Actions Tab – Select Send to Threat Manager
Step 5 – After you set the configurations, click Save. The Configure Analytics window closes.
Step 6 – In Threat Prevention, click Configuration > Netwrix Threat Manager Configuration on the menu. The Netwrix Threat Manager Configuration window opens.

Step 7 – Ensure the Event Sink tab is properly set up to send event data to Threat Manager.
Step 8 – On the Forged PAC tab, select the Include Forged PAC information in events checkbox. Click Save.
When Threat Prevention triggers a Forged PAC analytic, it sends the event data to Threat Manager.