Email Tab
Threat Prevention sends alert notifications via email through an SMTP gateway to individuals or groups.
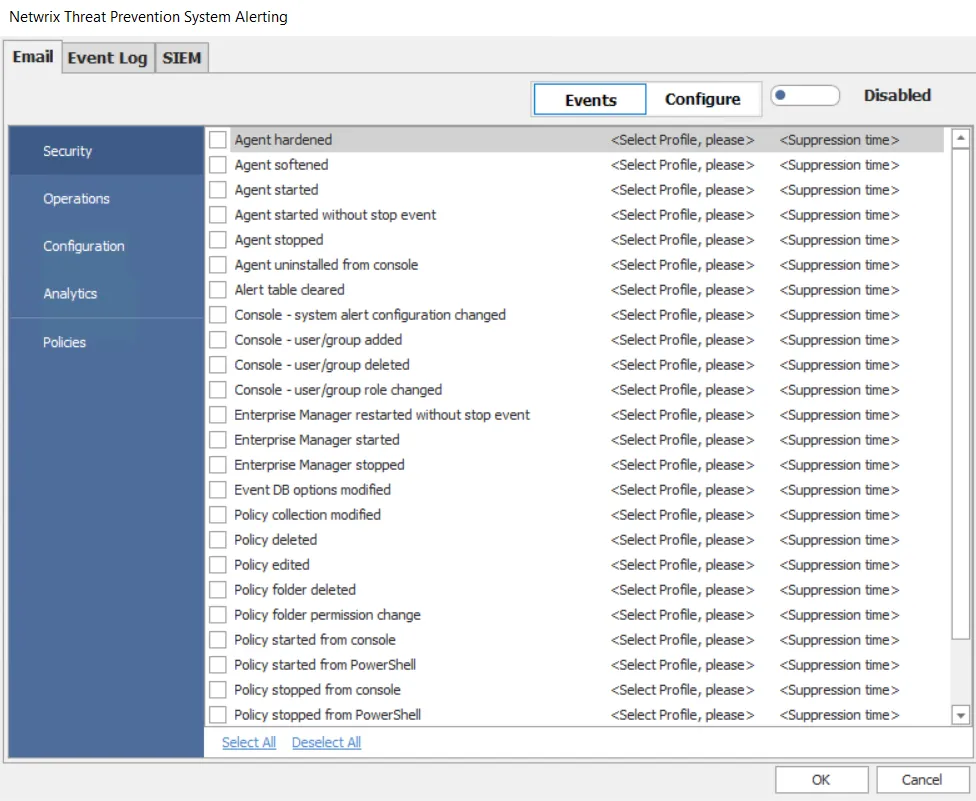
Step 1 – Click Configuration > Alerts on the menu. The Netwrix Threat Prevention System Alerting window opens. The Email tab displays by default.
Step 2 – Configure the following before enabling email alerting:
- Configure SMTP Host Information
- Create Message Profiles
Step 3 – Once configured, click Events on the Email tab. Decide what events receive notifications and assign one or more message profiles to the event.
Step 4 – Click the button next to Disabled to toggle the setting to Enabled.
Step 5 – Select an event category (Security, Operations, Configuration, Analytics, Policies) in the left pane.
Step 6 – Check the checkbox for the event/incident/policy for which you want to trigger email notifications.
Step 7 – Click the Select Profile, please option for an event/incident/policy and select a Message Profile from the dropdown menu to assign it to the event/incident/policy. When Threat Prevention generates an alert for the event/incident/policy, it sends an email to all recipients specified in the Message Profile.
- For policies, you can assign multiple profiles by either checking the profiles you want or selecting the Select All option. Click OK in the dropdown menu to confirm the selection.
You can assign a profile to as many events as required.
Step 8 – For the Security, Operations, and Configuration event categories, the Suppression time option is also available for each event. Use it to prevent Threat Prevention from generating alerts for an event for a specified time period. This limits the volume of repeat alerts for the respective event.
Click Suppression time for an event and select an option from the dropdown menu:
- A duration ( 1 min, 2 min, 5 min, 10 min, 30 min, 60 min) – Once Threat Prevention generates an alert for the event, it doesn't generate another alert for it during the next X minutes (X is the duration you selected) even if the event occurs.
- Disabled – Threat Prevention doesn't suppress alerts
Example
You select a suppression time of 30 minutes for an event. Next, Threat Prevention generates an alert for that event. If the event occurs again within the next 30 minutes, Threat Prevention does not generate another alert.
Use the suppression time feature to prevent situations where an event, such as Agent Latency, generates numerous alerts that cause the Enterprise Manager and Administration Console to freeze.
Step 9 – For Analytics, choose whether to enable Ongoing Attack Alerts. When checked, Threat Prevention sends periodic reminders of an ongoing attack if it continues after Threat Prevention sends the initial notification.
Step 10 – Click OK to save the settings.
Threat Prevention now sends email notifications for the selected events/incident/policies to the recipients of the selected Message Profiles.
Configure SMTP Host Information
Remember, this is a one-time setting to enable email alerts from the Administration Console.
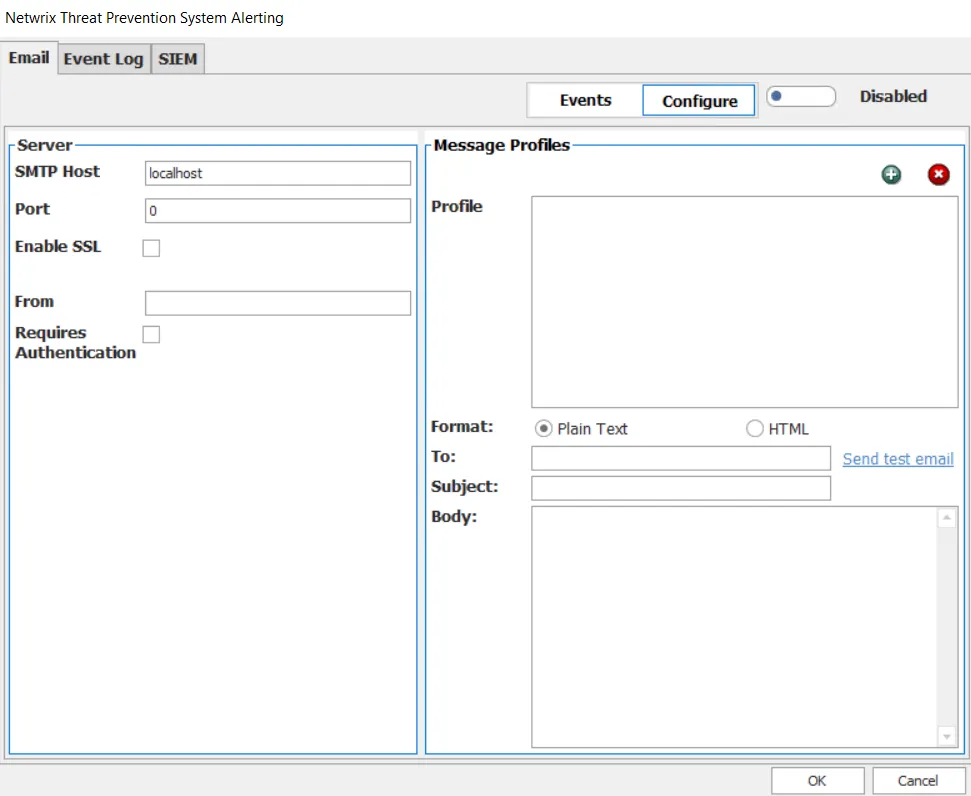
Step 1 – Click Configuration > Alerts on the menu. The Netwrix Threat Prevention System Alerting window opens.
Step 2 – On the Email tab, click Configure.
Step 3 – In the Server section, provide the SMTP Host as either the IP address or the hostname of the SMTP gateway. Example: 192.168.189.56 or SIM1.netwrix.com
Step 4 – In the Port box, provide the appropriate port number.
Step 5 – Check the Enable SSL checkbox to use SSL communications for email.
Step 6 – In the From box, enter the email address to use as the sender for the email. Example: Threat Prevention@Netwrix.com
Step 7 – If the SMTP gateway requires authentication, check the Requires Authentication checkbox and provide a username and password in the boxes that appear.
Step 8 – Click OK to save the settings.
Create Message Profiles
You associate Message Profiles with events for email alerting.
When you modify the Message Profile for an alert, all policies referencing the alert use the updated information.
Step 1 – Click Configuration > Alerts on the menu. The Netwrix Threat Prevention System Alerting window opens.
Step 2 – On the Email tab, click Configure.
Step 3 – In the Message Profiles area, click the Add (+) button to create a Message Profile. The default profile name (New Email Notification) appears.
Provide a unique and descriptive name for this new email notification profile.
Step 4 – Choose between Plain Text and HTML email options. The Email Template window displays when you select either radio button.

Changing the message template provides the option to load the default message template. Choose between:
- Yes – Loads the default message template for the selected format. This overwrites the current message template.
- No – Leads the current message body
Step 5 – In the To box, provide an email address for each recipient of the email alert. This can be individuals, distribution lists, or a combination. To send alerts to multiple recipients, separate the addresses with either a comma (,) or a semi-colon (;). Example: IT@netwrix.com; ITdl@netwrix.com
Step 6 – Click the Send Test Email link to send a test email. It sends an unformatted sample message to all recipients. Threat Prevention informs you if it successfully sends the message, but can't tell if the recipient received it.
Step 7 – In the Subject box, keep the default subject line for the email or provide one that is more suitable for the alerts these recipients receive.
Step 8 – The Body box contains the default message, which includes all event data types available for notification. To customize it for specific alerts, remove the Event Data Fields you don't want. Customization can also include reformatting the message as desired. The default message is:
- Plain Text – An event has occurred in which you are on the notification list.
- HTML – The following Event has occurred at %TIME_STAMP% for which you requested notification
The available Event Data Fields and their associated tokens are:
| Event Data Field | Token |
|---|---|
| Time Stamp | %TIME_STAMP% |
| Event Source Type | %EVENT_SOURCE_TYPE% |
| Domain Name | %EVENT_SOURCE_NAME% |
| Policy Name | %SETTING_NAME% |
| Event Name | %EVENT_NAME% |
| Event Name Translated | %EVENTNAMETRANSLATED% |
| Originating Server | % ORIGINATING_SERVER% |
| Originating Server IP | %ORIGINATING_SERVERIP% |
| Target Host | %TARGETHOST% |
| Target Host IP | %TARGETHOSTIP% |
| Class Name | %CLASS_NAME% |
| DN | %DN% |
| Affected Object SID | %AFFECTED_OBJECT_SID% |
| Affected Object Account Name | %AFFECTED_OBJECT_ACCOUNT_NAME% |
| Operation Successful | %SUCCESS% |
| Operation Status | %STATUS% |
| Blocked Event | %BLOCKED_EVENT% |
| Perpetrator | %PERPETRATOR% |
| Perpetrator Name | %PERPETRATOR_NAME% |
| Perpetrator Sid | %PERPETRATOR_SID% |
| Originating Client | %ORIGINATING_CLIENT% |
| Originating Client Host | %ORIGINATINGCLIENTHOST% |
| Originating Client IP | %ORIGINATINGCLIENTIP% |
| Originating Client Protocol | %ORIGINATINGCLIENTPROTOCOL% |
| Originating Client MAC | %ORIGINATINGCLIENTMAC% |
| Events Count | %EVENTS_COUNT% |
| Attribute Values | %ATTRIBUTE_VALUE% |
| Old Attribute Values | %OLD_ATTRIBUTE_VALUE% |
| Attribute Operations | %OPERATION% |
The tokens used within the message Body, the information between and including the % symbols (e.g. %TIME_STAMP%), must be present to retrieve that event data from the database. You can remove tokens, but partial tokens don't retrieve data from the database.
Step 9 – Click OK to save the settings.
Now that you've created at least one Message Profile, you can assign it to an event either through the System Alerting window's Email tab, or assign it to a policy on the Actions Tab of the policy configuration or the Actions Tab of the template configuration.