Export Report
The Export option lets you export report results in a specified format. You can download, email, or schedule reports as desired.
Click Investigate in the application header bar to open the Investigations interface. Then create a new investigation or click a folder in the navigation pane to access a saved investigation. An investigation is located in the folder where it was saved.
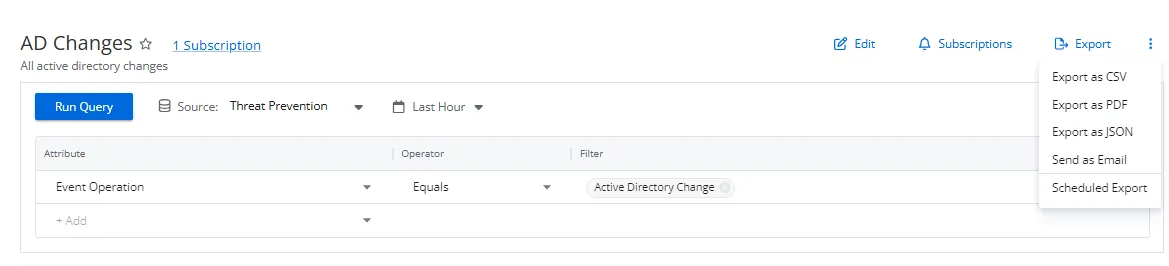
After running an investigation query, click Export. Then select one of the following from the dropdown menu:
-
Export as CSV – Generates and downloads the report as a CSV file to your Downloads folder
-
Export as PDF – Generates and downloads the report as a PDF file to your Downloads folder
-
Export as JSON – Generates and downloads the report as a JSON file to your Downloads folder
-
Send as Email – Opens the Send as Email window to send the report to recipients
noteThis option requires an email server to be configured.
-
Schedule Export – Opens the Schedule export window to save a copy of the report to a shared folder
noteThis option requires a shared folder to be configured.
Reports are downloaded to your local machine's Downloads folder, according to your browser settings. You can configure a folder on the application server to place copies of all exported reports.
See the Folder Settings Page topic for additional information.
Send as Email
This option requires an email server to be configured. If this requirement isn't met, a message will appear in the window. See theEmail Page topic for additional information.
You can send the report data of an investigation as an attachment to an email. The attachment can be any of the file formats available for download.
Step 1 – Click Investigate in the application header bar to open the Investigations interface. Then click a folder in the navigation pane to access a saved investigation. An investigation is located in the folder where it was saved.
Step 2 – After running a query and confirming the report data is displayed in the report sections, click the Export menu and select Send as Email. The Send as Email window opens.

Step 3 – Begin typing in the Recipients textbox. You can enter a user name or email address. Available email addresses read from Active Directory that match the text string will populate in the dropdown menu. Select a recipient.
Step 4 – Repeat Step 3 to add additional recipients.
Step 5 – Modify the subject line as desired in the Email Subject box. The default subject is: Export of Report '[NAME OF INVESTIGATION]'.
Step 6 – Select the file format: CSV, PDF, or JSON.
Step 7 – Click Send. The Send as Email window closes and the recipients receive the report as an email attachment.
Scheduled Export
This option requires a shared folder to be configured. If this requirement isn't met, a message will appear in the window. See the Folder Settings Page section for additional information.
You can schedule to save the report data of an investigation to a shared folder. The file format can be any of the formats available for download.
Step 1 – Click Investigate in the application header bar to open the Investigations interface. Then click a folder in the navigation pane to access a saved investigation. An investigation is located in the folder where it was saved.
Step 2 – After running a query and confirming the report data is displayed in the report sections, click the Export menu and select Scheduled export. The Schedule export window opens.
The name of the respective investigation is displayed as a link. Click it to view the filter defined for the investigation.
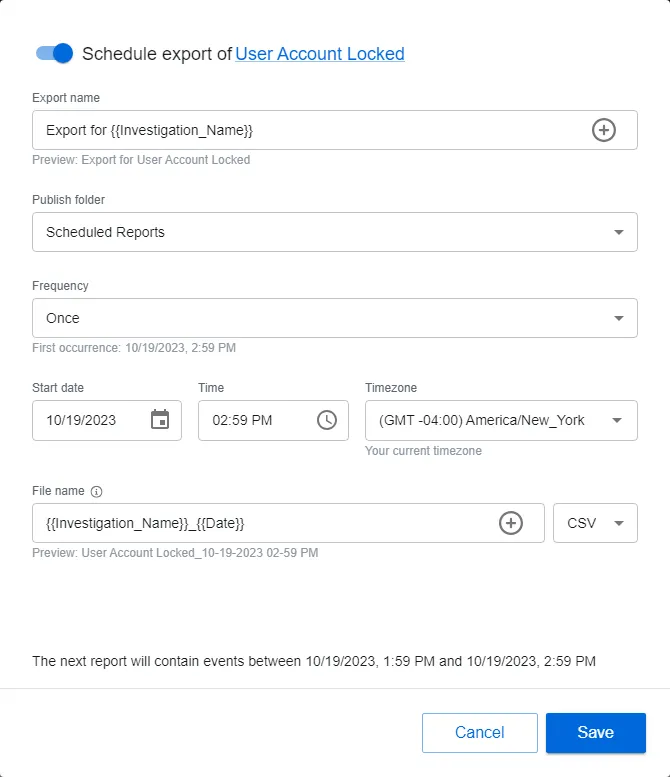
Step 3 – By default the schedule is enabled. You can disable it with the toggle button by the window name.
Step 4 – Modify the text in the Export name field as desired. The default name is: Export for
\{\{Investigation_Name\}\}. The system replaces this variable with the name of the investigation.
The + button opens a variable menu for the field.
Step 5 – Select a shared folder from the Publish folder dropdown menu. Only folders configured on the Folder Settings page of the Integrations interface will be listed here.
Step 6 – Set a frequency. Options in the Frequency dropdown menu are: Once, Daily, Weekly, and Monthly. Ensure the frequency doesn't exceed the "Time to Retain" settings for the System Jobs configured in the System Settings interface.
Step 7 – Set the start date, time, and timezone for the selected frequency:
- Start date – This field opens a calendar. You can also enter a date in the field.
- Time – This field opens a clock. You can also enter a time in the field.
- Timezone – This field opens a dropdown menu. Select a timezone.
Step 8 – Set the file name in the File name field. The default name is:
\{\{Investigation_Name\}\}_{{Date}}. This variable will be replaced with the name of the
investigation. The + button opens a variable menu for the field.
Step 9 – Select the file format for the export from the dropdown menu: CSV, PDF, JSON, Excel Viewing.
Step 10 – Click Save. The Schedule export window closes.
The scheduled export is listed on the Subscriptions and Exports page of the Investigations interface.
See the Subscriptions and Exports Page topic for additional information.