Configure endpoint operations for Microsoft Entra ID
Microsoft Graph imports Microsoft Entra users, groups, devices, and relationships into Netwrix Privilege Secure for Discovery (NPS-D). SAML authenticates an existing NPS-D identity. Neither integration provides a Windows endpoint execution channel.
Configure endpoint operations through one of these models:
- Entra Native baseline: Microsoft Graph and SAML with read-only inventory when NPS-D has direct endpoint connectivity and a valid Scan account.
- Entra Native with EDR: Microsoft Graph and SAML with a supported endpoint detection and response (EDR) connector.
- AD and Entra Hybrid: Active Directory (AD), Microsoft Graph, and SAML with direct Windows connectivity. An EDR connector is optional.
Review the operating model comparison before you continue.
Entra Native baseline: inventory only
Use this model for Microsoft Entra directory visibility, SAML single sign-on (SSO), and read-only endpoint inventory.
A direct scan succeeds only when:
- NPS-D can resolve and reach the Windows endpoint through a supported network path.
- The required Windows management protocols and ports are available.
- A valid, least-privilege Scan account can authenticate to the endpoint.
- Scan Mode is enabled for the target device or policy scope.
Keep Protect, Deny, Just-In-Time Access (JIT/JITA), and Offline Access Management (OAM) disabled in this model.
This model doesn't guarantee that NPS-D can scan every Entra-joined device. If an endpoint isn't directly reachable, Microsoft Graph can still supply its directory record, but NPS-D can't collect endpoint-local inventory through Graph. Use Entra Native with EDR or AD and Entra Hybrid when you require reliable endpoint operations.
Entra Native with EDR
Use this model when Microsoft Graph supplies the directory objects, SAML provides NPS-D authentication, and a supported EDR platform provides the endpoint execution path.
NPS-D provides EDR configuration for:
Use the provider guide to configure provider-side access and required NPS-D fields. The endpoint actions available to a device depend on the selected connector, its configuration, and the installed NPS-D release. Validate each required action with a controlled pilot before you use it in production.
Configure the shared EDR workflow
-
Complete Microsoft Graph directory synchronization and SAML configuration.
-
Complete the provider-side prerequisites in the selected EDR guide.
-
Confirm that each pilot Windows endpoint has an active provider agent and appears in the provider console.
-
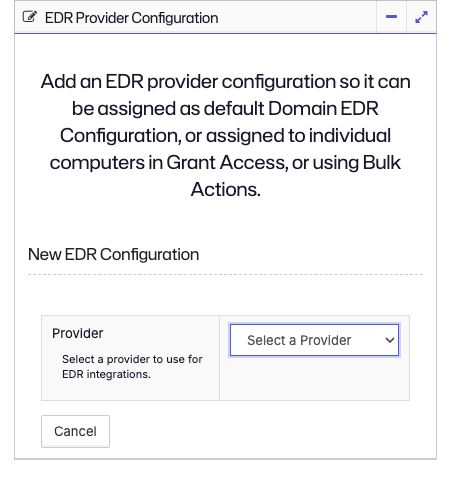
In NPS-D, open Configure > Server > EDR Provider Configuration.
-
Select Add Provider, and select the provider.
-
Enter a descriptive configuration name, provider URL, dedicated application programming interface (API) credential, proxy settings, and provider-specific values.
-
Enable the provider option for remote systems management when the configuration is ready for testing. The field label varies by provider.
The following screenshot shows a disabled CrowdStrike Falcon configuration with documentation-only values. It doesn't show a successful connection. Don't copy these values to a production configuration.
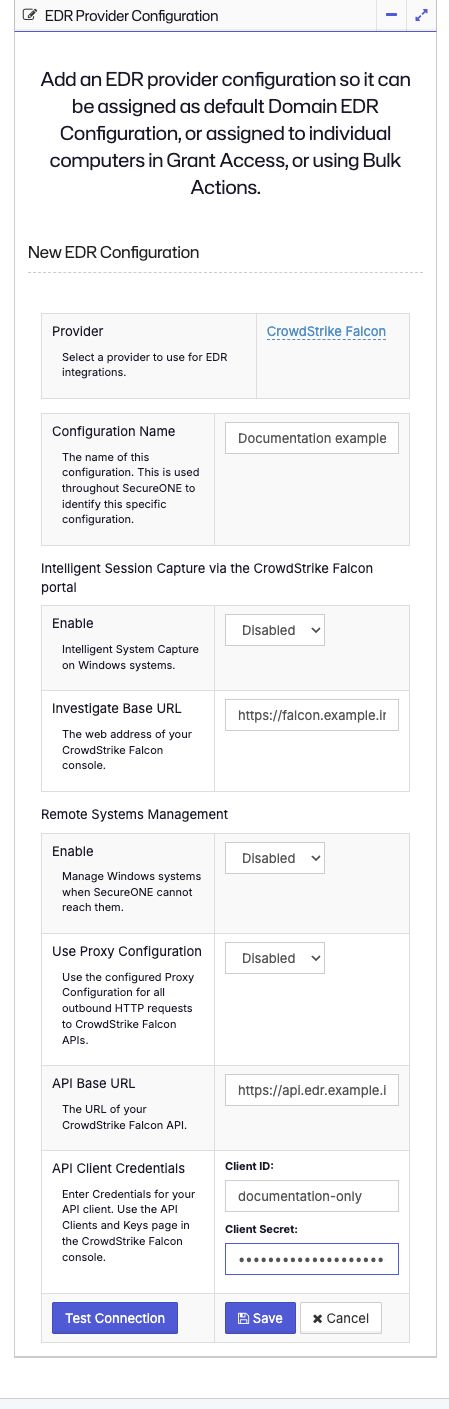
- Select Test Connection, and save the provider configuration.
A successful connection test verifies the provider API path. It doesn't verify an endpoint operation.
-
Open the Microsoft Entra domain configuration.
-
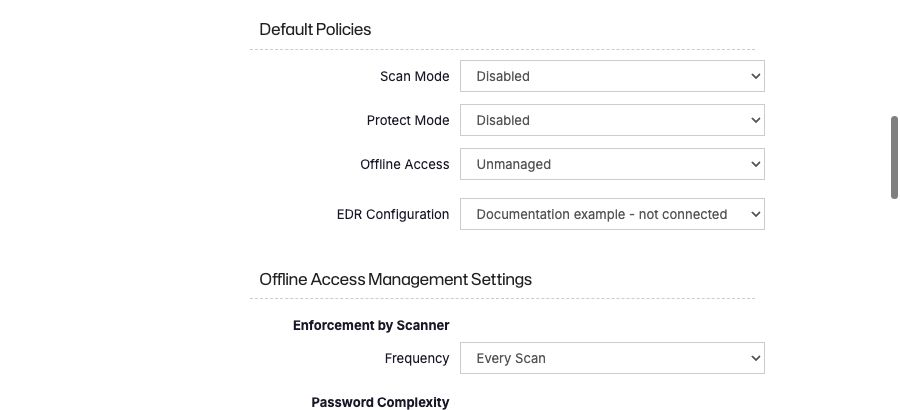
Under Default Policies > EDR Configuration, select the provider configuration.
-
Assign the EDR configuration individually or through Bulk Actions to devices that already exist in NPS-D.
-
Enable Scan Mode for a controlled pilot. Keep Protect and OAM disabled.
-
Run a scan.
-
Verify device mapping, local Administrators inventory, timestamps, and the related NPS-D and provider events.
-
Commission Protect, Deny, JIT/JITA, and OAM separately only when the connector and installed release support the required action.
Use a dedicated provider-side service identity with only the required permissions. Store its credential in the approved secret manager. Don't reuse the Graph client secret as a Scan, Protect, LDAP, or EDR credential.
Tanium Bulk Scan boundary
Tanium Bulk Scan is an inventory path. It doesn't replace the standard per-device path for supported Protect, Deny, JIT/JITA, or password-management operations. Follow the Tanium Cloud configuration guide, and validate the completed, offline, and unmatched device counts during the pilot.
AD and Microsoft Entra Hybrid
Use this model when AD users and devices synchronize to Microsoft Entra through Microsoft Entra Connect or Cloud Sync, and NPS-D can connect to the corresponding AD domain.
In this model:
- Lightweight Directory Access Protocol (LDAP) supplies AD identities, domain information, and direct Windows management configuration.
- Microsoft Graph supplies the Microsoft Entra representation and cloud relationships.
- NPS-D uses available on-premises identity information to correlate the hybrid records.
- Separate AD Scan and Protect accounts provide the direct Windows execution path.
- SAML authenticates users through the Microsoft Entra enterprise application.
- An EDR connector can provide an approved path for endpoints without consistent direct connectivity.
An Entra-joined device alone doesn't establish the hybrid model. NPS-D must contain both the LDAP domain configuration and the corresponding Microsoft Entra source.
Configure the hybrid model
-
Confirm that the required users, groups, and devices originate in AD and synchronize to Microsoft Entra.
-
Verify that the synchronized Microsoft Entra objects contain the expected on-premises synchronization attributes.
-
In NPS-D, open Configure > Server > Domain Configuration > Add Domain > LDAP.
-
Configure the AD Domain Name System (DNS) domain, directory endpoint, secure LDAP settings, bind account, and directory search scope.
-
Configure separate least-privilege accounts:
- Use the Scan Mode account for read and inventory operations.
- Use the Protect Mode account for approved local administrator membership and password-management actions.
-
Select the Windows authentication method.
- For NT LAN Manager (NTLM), use the required
NETBIOS\Useraccount format. - For Kerberos, use the corresponding AD principal and configure the correct AD DNS and NetBIOS names.
- For NT LAN Manager (NTLM), use the required
-
Keep Protect and OAM disabled. Complete and validate the LDAP synchronization.
-
Add the corresponding Microsoft Entra source. See Configure Microsoft Graph directory synchronization.
-
Complete both synchronization paths.
-
Verify that the pilot AD objects correlate with their Microsoft Entra representations without duplicates.
-
Verify that each pilot user and device maps to one NPS-D record. Confirm the expected AD identifiers, domain, DNS name, domain-controller classification when applicable, group memberships, and source of the effective policy.
-
Enable Scan Mode for a controlled pilot, and validate direct endpoint inventory.
-
Commission Protect, Deny, JIT/JITA, and OAM separately after you accept read-only inventory.
Validate AD DNS resolution, time synchronization, endpoint reachability, authentication, and effective service-account permissions. If the deployment also uses an EDR connector, document which connection path applies to each endpoint scope.
Assign endpoint policies
Domain defaults apply to newly discovered devices. Apply approved settings to existing devices through individual device configuration or Bulk Actions.
Enable a policy action only after you confirm that the selected direct or EDR path supports it in the installed release.
| Setting | Purpose |
|---|---|
| Scan Mode | Enables scheduled administrator inventory and endpoint processing. |
| Protect Mode: Disabled | Keeps the device in inventory-only mode. |
| Protect Mode: New Accounts: JITA | Removes unauthorized, nonpersistent administrator membership while allowing an approved identity to remain eligible for JITA. |
| Protect Mode: New Accounts: Deny | Removes unauthorized, nonpersistent administrator membership without retaining newly discovered access for JITA. |
| Authorization Groups | Defines approved group-based administrator membership that remains persistent. |
| EDR Configuration | Selects the endpoint execution provider. |
| Offline Access | Selects the approved OAM policy and password lifecycle. |
Complete the administrator inventory before you enable Protect Mode. Define persistent accounts, service identities, exclusions, rollback, and break-glass access.
Security boundaries
- Use separate, dedicated credentials for Graph synchronization, LDAP bind, Windows Scan, Windows Protect, and each EDR provider.
- Don't grant
DeviceLocalCredential.Read.Allor other Microsoft Entra Local Administrator Password Solution (LAPS) password-read permissions to the Graph synchronization application. This integration doesn't require Graph access to local administrator passwords. - This integration doesn't use Microsoft Intune as an endpoint execution path. Configure direct Windows connectivity or a supported EDR connector for endpoint operations.
- Use one password-management authority for each managed local account. If Windows LAPS manages an account, don't configure NPS-D OAM to rotate the same account.
- Store every secret in the approved secret manager. Assign an owner and expiration-monitoring process to each credential.
After you configure the selected model, validate and commission endpoint operations.