Bring Your Own Vault (BYOV) Connector Configuration
This topic walks through the steps necessary to configure Netwrix Privilege Secure as a BYOV Integration Connector you can use to perform activities as a specific user account. This can be done with accounts managed by Privilege Secure, or with accounts stored in a Secret Vault within Privilege Secure.
Use this workflow to bypass the default "Enable Account" and "Disable Account" pre-session and post-session actions, or when you need to use an unmanaged Secret Vault credential for an activity.
Set Up an Integration Connector
Begin by setting up an Integration Connector for using Netwrix Privilege Secure as a BYOV Connector. Ensure that the account you want to use for your activity is managed by Privilege Secure or is contained within a Secret Vault resource in Privilege Secure.
For managed accounts, ensure you have rotated the account password at least once since managing it. Otherwise, there is no vaulted password in the Netwrix Privilege Secure database.
Configure the Activity Connector
To configure an Activity Connector.
Step 1 – In the Netwrix Privilege Secure console, navigate to the Configuration menu, and the Integration Connectors submenu.
Step 2 – Click the Plus to add a new Activity Connector.
Step 3 – Configure the following activity connector fields:
- Connector Name – Enter a name to uniquely identify the connector
- Connector Description (Optional) – Enter a brief description to identify the service account
- Connector Template – A selection of templates for connector configurations. Select BYOV from the dropdown list.
- API Url – The base URL for the API being used for the vault integration. Ex: http://localhost:6500.
- App ID – The application ID for the vault. Enter SbPAM.
- Client Certificate – The base 64 string from the certificate file being used to authenticate to the vault. Leave blank.
- Advanced – Use this section to override the default behavior of the connector by providing a custom PowerShell script. Click the Advanced section to edit the Checkout Script Block and the Checkin Script Block or Skip the Certificate Check.
- Skip Certificate Check – Select the checkbox
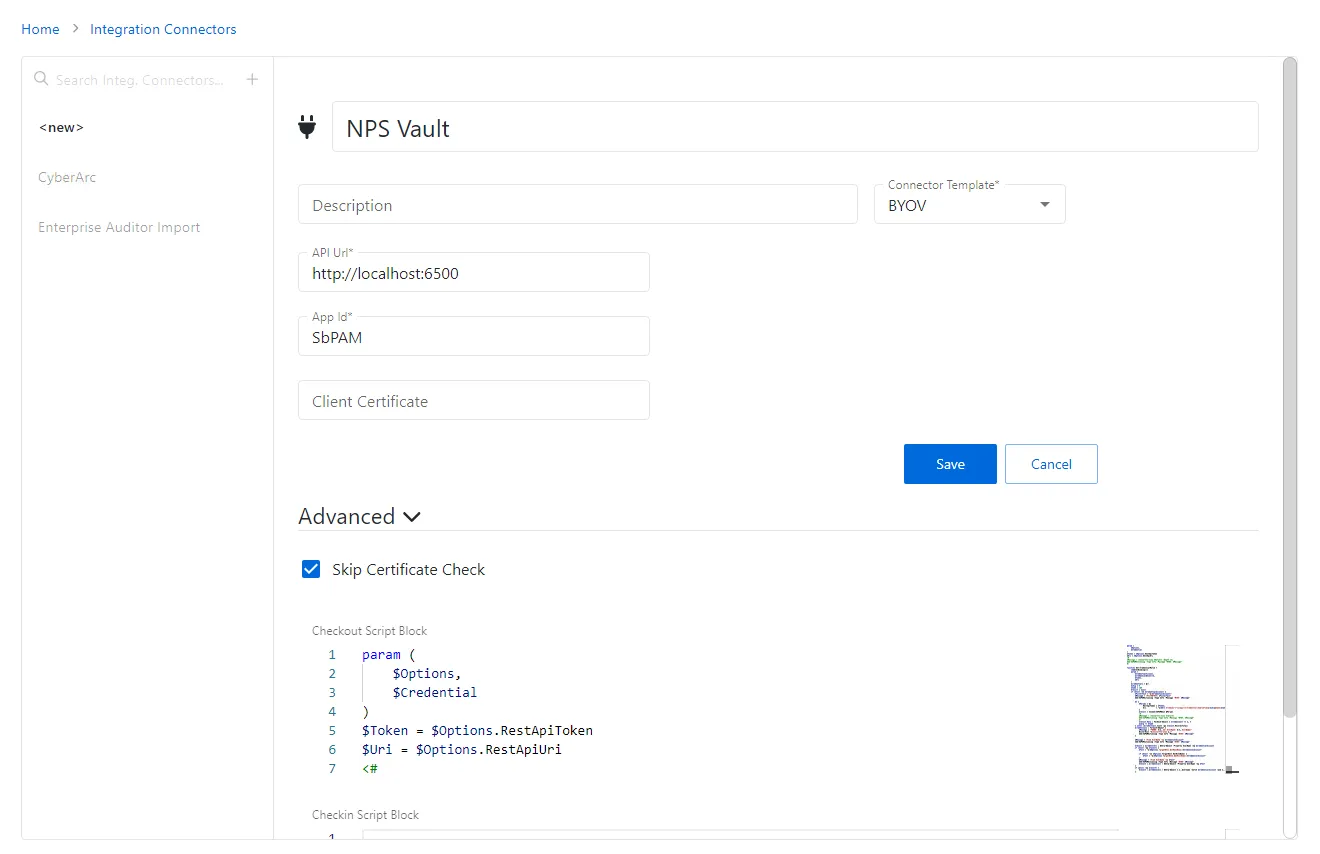
Step 4 – Copy and paste the following script into the "Checkout Script Block" field. (The "Checkin Script Block" field may be left blank.)
Checkout Script Block
param (
    $Options,
    $Credential
)
$Token = $Options.RestApiToken
$Uri = $Options.RestApiUri
<#
$Message = (ConvertTo-Json $Options -Depth 12)
Add-SbPAMActionLog -Type Info -Message "BYOV: $Message"
#>
function Get-CredentialMatch {
    [CmdletBinding()]
    param (
        $CredentialAccount,
        $CredentialResource,
        $Token,
        $Uri
    )
    $credentials = @()
    $skip = 0
    $take = 100
    $result = $null
    if ($null -ne $CredentialAccount) {
        $FilterText = "$($CredentialAccount)"
        $Message = "FILTERTEXT: $FilterText"
        Add-SbPAMActionLog -Type Info -Message "BYOV: $Message"
        do {
            $Params = @{
                RestApiToken = $Token;
                Uri          = "$($Uri.TrimEnd("/"))/api/v1/Credential/Search?skip=$skip&take=$take&filterText=$FilterText&credentialType=1";
            }
            $result = Invoke-SbPAMRest @Params
            <#
            $Message = (ConvertTo-Json $result)
            Add-SbPAMActionLog -Type Info -Message "BYOV: $Message"
            #>
            $result.Data | ForEach-Object { $credentials += $_ }
            $skip += $take
        } until ($credentials.Count -ge $result.RecordsTotal)
        $credentials | Foreach-Object {
            $Message = "FOUND: $($_.Id) UserName: $($_.UserName)"
            Write-Host "$(ConvertTo-Json $_)"
            Add-SbPAMActionLog -Type Info -Message "BYOV: $Message"
        }
        $Message = "Find UserName -eq $CredentialAccount"
        Add-SbPAMActionLog -Type Info -Message "BYOV: $Message"
        $result = $credentials | Where-Object -Property UserName -eq $CredentialAccount
        if ($null -eq $result) {
            $Test = "$($Options.TargetHost.DnsHostName)\$CredentialAccount"
            if ($null -ne $Options.TargetHost.NetBiosName) {
                $Test = "$($Options.TargetHost.NetBiosName)\$CredentialAccount"
            }
            $Message = "Find UserName -eq $Test"
            Add-SbPAMActionLog -Type Info -Message "BYOV: $Message"
            $result = $credentials | Where-Object -Property UserName -eq $Test
        }
        if ($null -eq $result) {
            $result = $credentials | Where-Object { $_.Username -match $CredentialAccount -and $_.Domain -eq $CredentialResource }
        }
    }
    return $result
}
### If this is an activity then use the LoginAccountName
$TargetAccount = $Options.ActivitySession.LoginAccountName
$CredentialAccount = $null
$CredentialResource = $null
if ($null -ne $Options.ActivitySession) {
    $CredentialAccount = $Options.ActivitySession.LoginAccountName
}
$Message = "CredentialAccount: $CredentialAccount"
Add-SbPAMActionLog -Type Info -Message "BYOV: $Message"
### This is a service account, so the info should be in the Credential
if ($null -eq $CredentialAccount) {
    $CredentialAccount = $Credential.Username
}
$Message = "CredentialAccount: $CredentialAccount"
Add-SbPAMActionLog -Type Info -Message "BYOV: $Message"
$result = Get-CredentialMatch -CredentialAccount $CredentialAccount -Token $Token -Uri $Uri
if ($null -eq $result) {
    if ($CredentialAccount -match ".*@.*") {
        $Parts = $CredentialAccount.Split("@")
        $CredentialAccount = $Parts[0]
        $CredentialResource = $Parts[1]
    }
    $result = Get-CredentialMatch -CredentialAccount $CredentialAccount -CredentialResource $CredentialResource -Token $Token -Uri $Uri
}
if ($null -ne $result) {
    $Params = @{
        RestApiToken = $Token;
        Uri          = "$($Uri.TrimEnd("/"))/api/v1/Credential/$($result[0].CredentialId)?showPassword=true";
    }
    $result = Invoke-SbPAMRest @Params
    # To support domain users in secret vaults
    if ($result.Username -match ".*\.*") {
        $Parts = $result.Username.split("\")
        $Credential.Username = $Parts[1]
        $Credential.Domain = $Parts[0]
        $Credential.Password = $result.Password
    }
    $Credential.Username = $result.Username
    $Credential.Domain = $result.Domain
    $Credential.Password = $result.Password
    return $Credential
}
else {
    $Message = "Unable to find credential for $CredentialAccount $CredentialResource"
    Add-SbPAMActionLog -Type Error -Message "BYOV: $Message"
}
Step 5 – Click Save to create the BYOV connector.
See the Bring Your Own Vault (BYOV) Integration topic for additional information on configuring a BYOV connector.
Create a User
After you configure the integration connector, create a manually-managed user.
To create a manually-managed user.
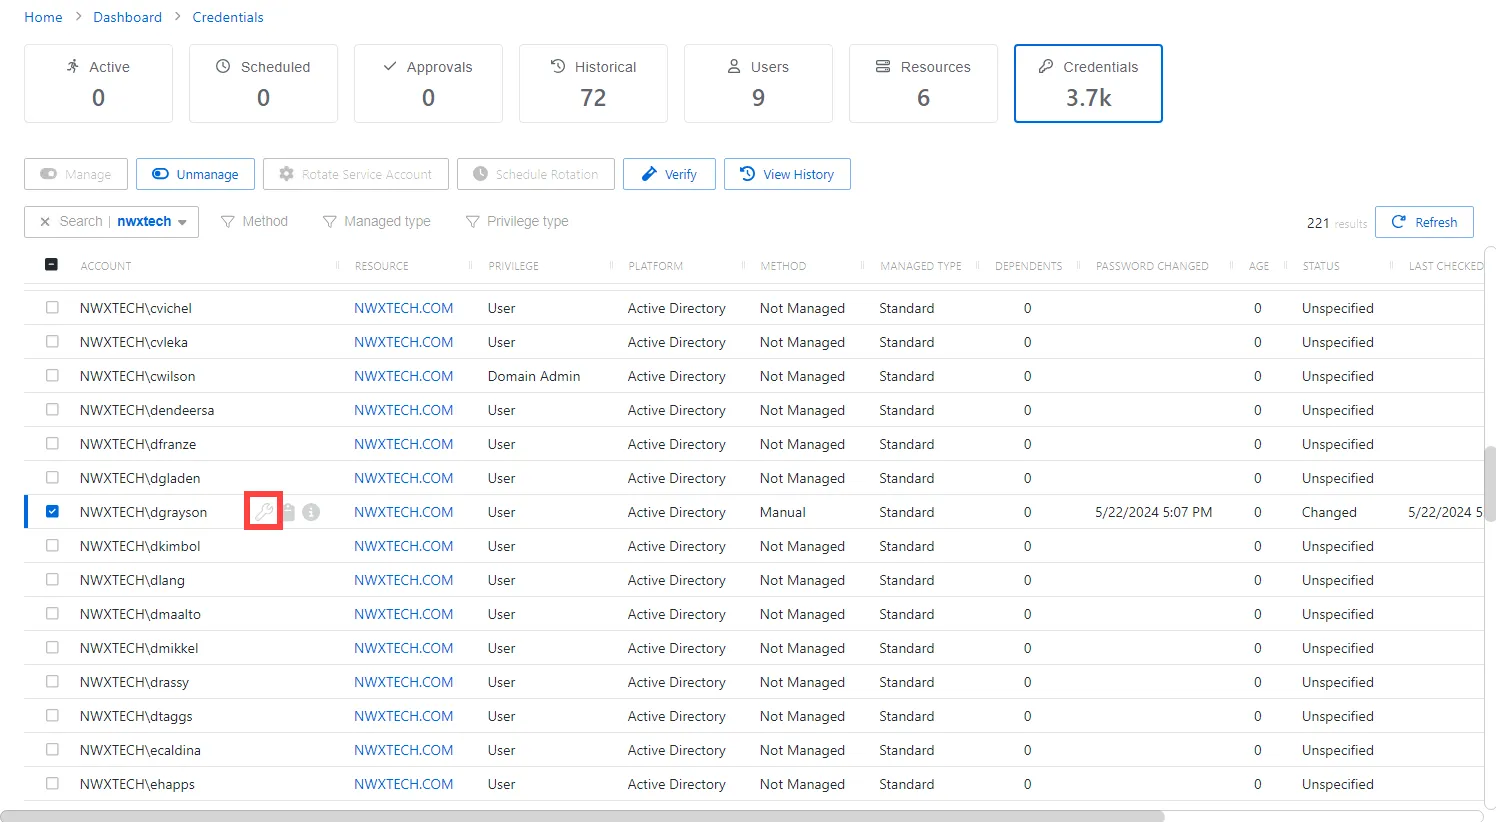
Step 1 – Navigate to Dashboard > Credentials tab.

Step 2 – Search or scroll to find the user you want to manage. Once identified, check the box next to the account name.

Step 3 – Click the Manage button that becomes available above the list, and select Manual.
Ensure the user isn't already managed or added into Privilege Secure.
See the Credentials Dashboard topic for additional information on creating a managed account.
Set the Account Password
After you manually manage the account, set the password for it. The following icons should be visible: Wrench (Set Password), Clipboard (Copy Password to Clipboard), and Information (View Password).
To set an account password.
Step 1 – Navigate to Dashboard > Credentials tab and locate the manually managed account.
Step 2 – Click the Wrench icon to set the password.
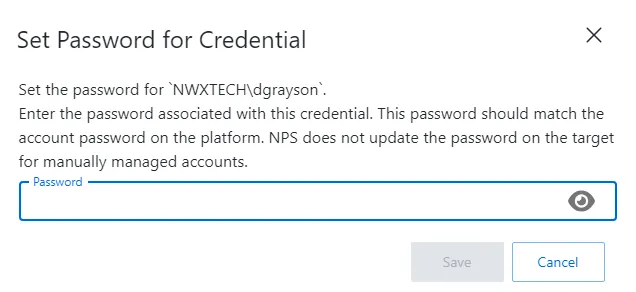
Step 3 – Enter a password to match the AD password, then click Save.
For versions before Privilege Secure 4.1, contact Support because the Set Password feature isn't available.
See the Manage Internal Service Accounts topic for additional information on manually managing an account.
Create an Activity
After you set the password for the account, create an activity for the BYOV connector.
To create an activity.
Step 1 – Navigate to Policy tab > Activities.
Step 2 – Click the blue plus icon and create a new Activity using the BYOV Connector.
Step 3 – Configure the activity with the following values:
- Name — Displays the name of the activity
- Description — Description of the policy
- Platform — Displays the type of platform, which defines the resource
- Login Account — Displays the account used to log onto the resource. Select Vault from the drop down menu.
- Activity Type — Controls the type of actions for the activity. Select Interactive from the dropdown menu.
- Vault Connector — Displays a list of previously configured vault connectors. Select the vault connector created in the previous steps.
You may use accounts stored in a Vault and added as a resource after the integration is created. Also, you may apply domain or other local accounts managed by Netwrix Privilege Secure, but the password must be rotated once before use with an activity.
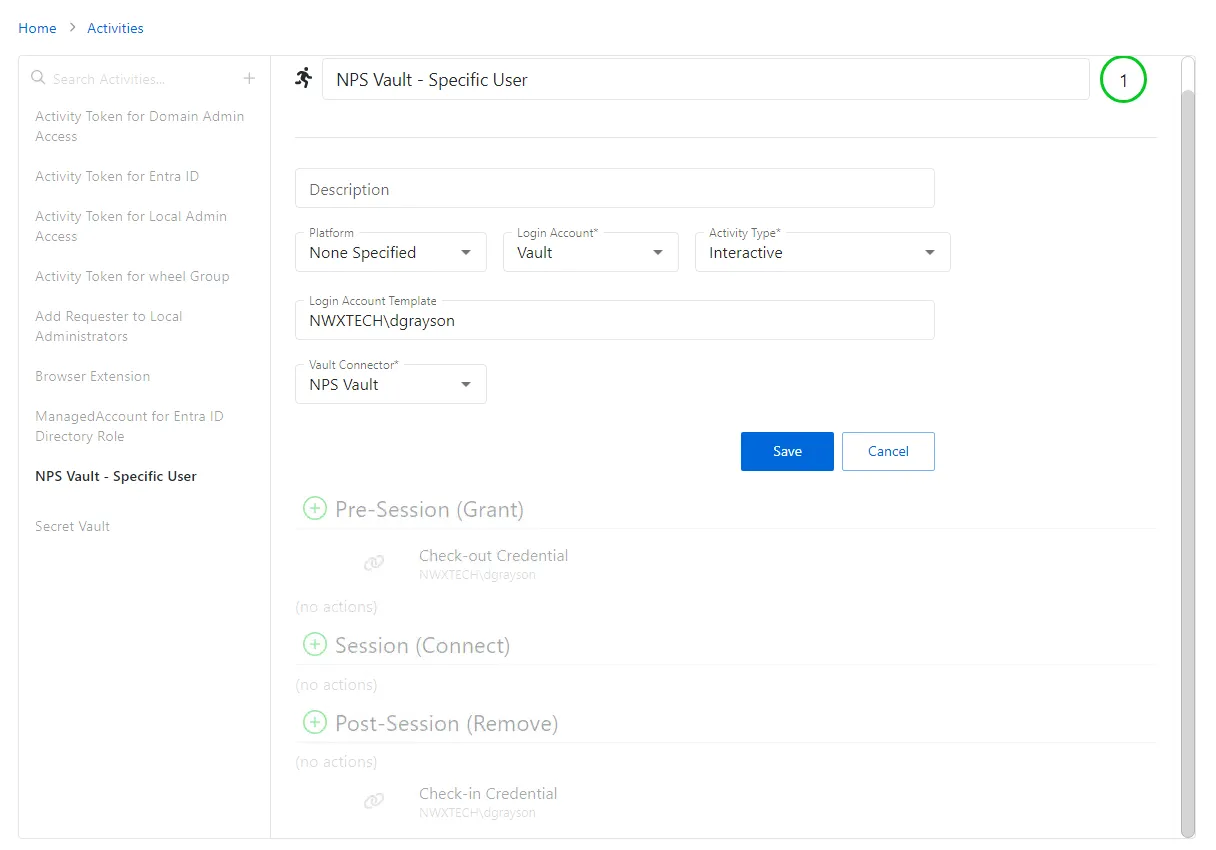
Step 4 – Click Save to create the Activity.
Ensure the Login Account Template uses the format DOMAIN\samAccountName (e.g., NWXTECH\dgrayson).
See the Add Activity topic for additional information on creating an Activity.
Configure a New Policy
After you create an Activity, configure a new Policy.
To create a Policy.
Step 1 – Navigate to the Policy tab > Access Policy.
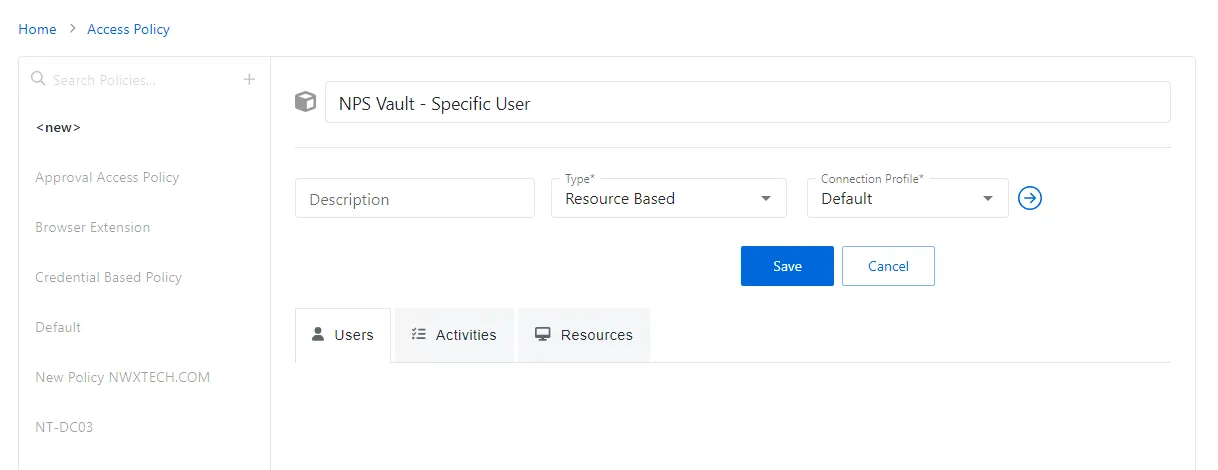
Step 2 – Click the Plus icon and create a new Policy. See the Add Access Policy topic for additional information.
- Set the Type as Resource Based and select a Connection Profile, with Default being sufficient for most setups.
Step 3 – Click Save to create the Access Policy.
Step 4 – after the Access Policy is created, add the following:
- Users to the Policy. See the Users Tab for Resource Based Access Policies topic for additional information.
- Activity created for the BYOV Connector. See the Activities Tab for Resource Based Access Policies topic for additional information.
- Associated resources intended for this Activity. See the Resources Tab for Resource Based Access Policies topic for additional information.
See the Add Access Policy topic for additional information on creating an Access Policy.
After completing these steps, you can use the specified manually-managed user on the resources outlined in the policy. This setup is ideal for scenarios where a single account is used across multiple resources but needs to be managed through Privilege Secure for enhanced security and management.

Verify configurations and permissions, especially when integrating with systems like AD and using specific user accounts for critical operations.