Resource Groups Page
The Resources Groups page is accessible from the Navigation pane under Resources. It shows the configured all configured resource groups and their details. Resources can be organized into groups to make it easier to manage common settings across them.
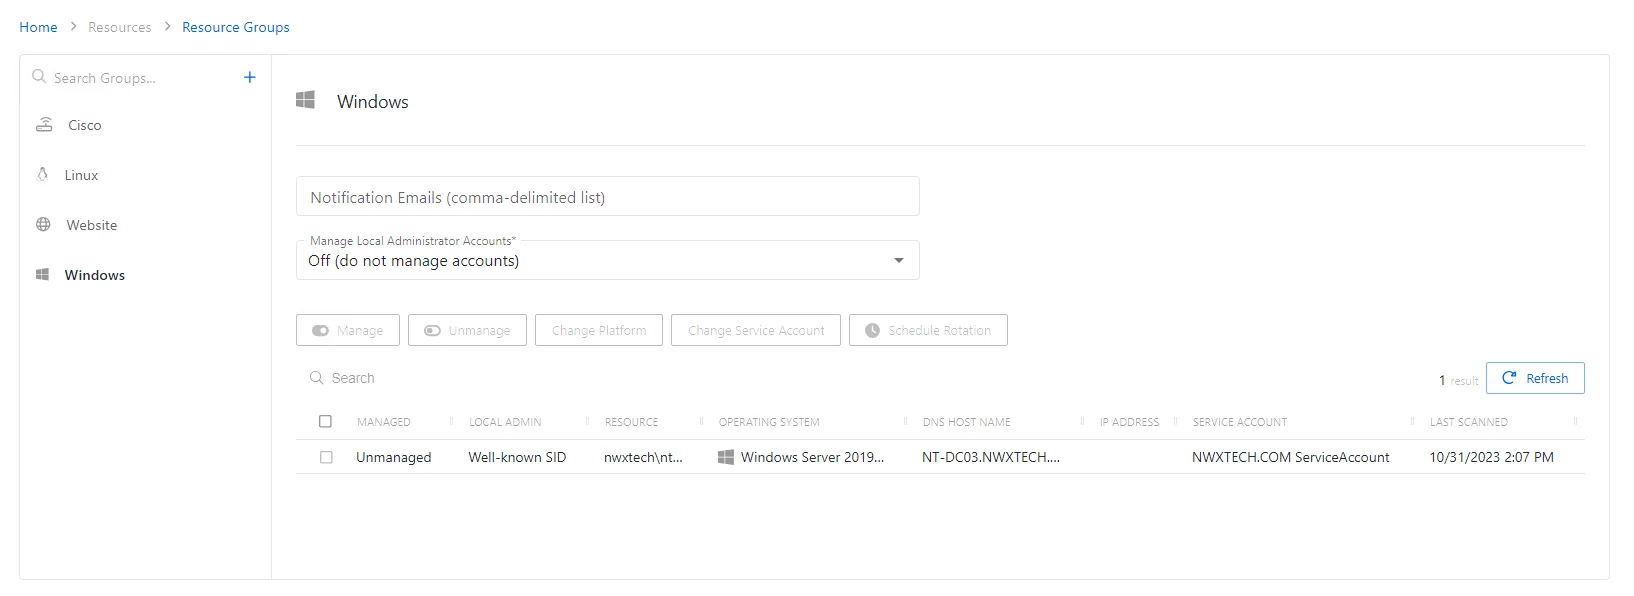
The pane on the left side of the page displays a list of the configured resource groups. This pane has the following features:
- Search — Searches the table or list for matches to the search string. When matches are found, the table or list is filtered to the matching results.
- Blue + button — Create a resource group. See the Add a Resource Group topic for additional information.
- Copy icon — Duplicates the resource group. Icon appears when group is hovered over.
- Trashcan icon — Deletes the resource group. Icon appears when group is hovered over. A confirmation window will display.
The selected resource group details display at the top of the main pane. The following details vary based on the type of resource group:
-
Name — Displays the name of the group
-
Map to OU checkbox — Indicates if the group is mapped to an OU. The following settings are enabled when checked:
- Sync Now button — Maps the specified OU to the group. A confirmation dialog is displayed to allow the user the option to either Sync Now or Cancel.
- OU FQDN — Displays the fully qualified domain name of the OU if mapping is enabled
- Include Child OUs checkbox — Indicates if child OUs of the specified OU are included in the mapping
- Auto-Onboard checkbox — Indicates if Privilege Secure automatically manages any resources found in the OU
-
Notification Emails — Displays a comma-delimited list email recipients to notify of events on the resources in the selected group
-
Manage Local Administrator Accounts — Indicates whether or not local Administrator accounts on resources in this group should be automatically managed when the resource is on-boarded. The account to be managed will correspond with the Built-in Account field on the resource's platform. See the Platforms Page topic for additional information.
- Off (Do Not Manage Accounts) — Do not manage any Local Administrator accounts on the resources in the selected group
- On (Manage All Accounts) — Manage all Local Administrator accounts on the resources in the selected group
- Per Individual Resource — Set whether the Local Administrator accounts will be managed on a per resource basis
If any of these settings are modified, Save and Cancel buttons are displayed. Click Save to commit the modifications. Click Cancel to discard the modifications.
The table has the following features:
- Search — Searches the table or list for matches to the search string. When matches are found, the table or list is filtered to the matching results.
- Add — Opens the Add Resources window. See the Add Resources Window for Resource Group topic for additional information.
- Remove — Removes the selected item from the group
- Manage — Set the selected account to be managed by Privilege Secure. This button is only available when the account Managed Type is Standard or Internal. For an Internal account, a pop up window will display.. Password rotation can be set to automatic or manual for managed accounts.
- Unmanage — Remove the account from being managed by Privilege Secure
- Change Platform — Opens the Change Platform window to modify the type of platform for the selected host resource. See the Change Platform Window topic for additional information.
- Change Service Account — Opens the Change Service Account window to modify the service account associated with the selected host resource. See the Change Service Account Window topic for additional information.
- Schedule Rotation — Add the credential rotation task to the queue. This button is only available when the Method is Automatic managed.
- Refresh — Reload the information displayed
The table has the following columns:
- Checkbox — Check to select one or more items
- Local Admin — Indicates if the account is managed by Privilege Secure
- Resource — Name of the resource
- Operating System— Displays the operating system of the resource
- DNS Host Name — Displays the DNS host name for a host resource or the FQDN for a domain resource
- IP Address — Displays the IP address for the resource
- Service Account — Displays the service account associated with the resource
- Last Scanned — Date timestamp for the last time the resource was scanned
Default Resource Groups
The following resource groups are available by default, and resources are automatically added to these groups:
- Cisco — Contains all resources with Cisco assigned as the Platform. This value is determined during initial onboarding of the resource, or can be configured manually on the Resource after it has been onboarded.
- Linux — Contains all resources with Linux assigned as the Platform. This value is determined during initial onboarding of the resource, or can be configured manually on the Resource after it has been onboarded.
- Website — Contains all resources with Website assigned as the Platform. This value is assigned to any Website resource upon being added.
- Windows — Contains all resources with Windows assigned as the Platform. This value is determined during initial onboarding of the resource, or can be configured manually on the Resource after it has been onboarded.