Resource Based Policy
Users Tab for Resource Based Access Policies
The Users tab shows the users and groups associated with the selected access policy.
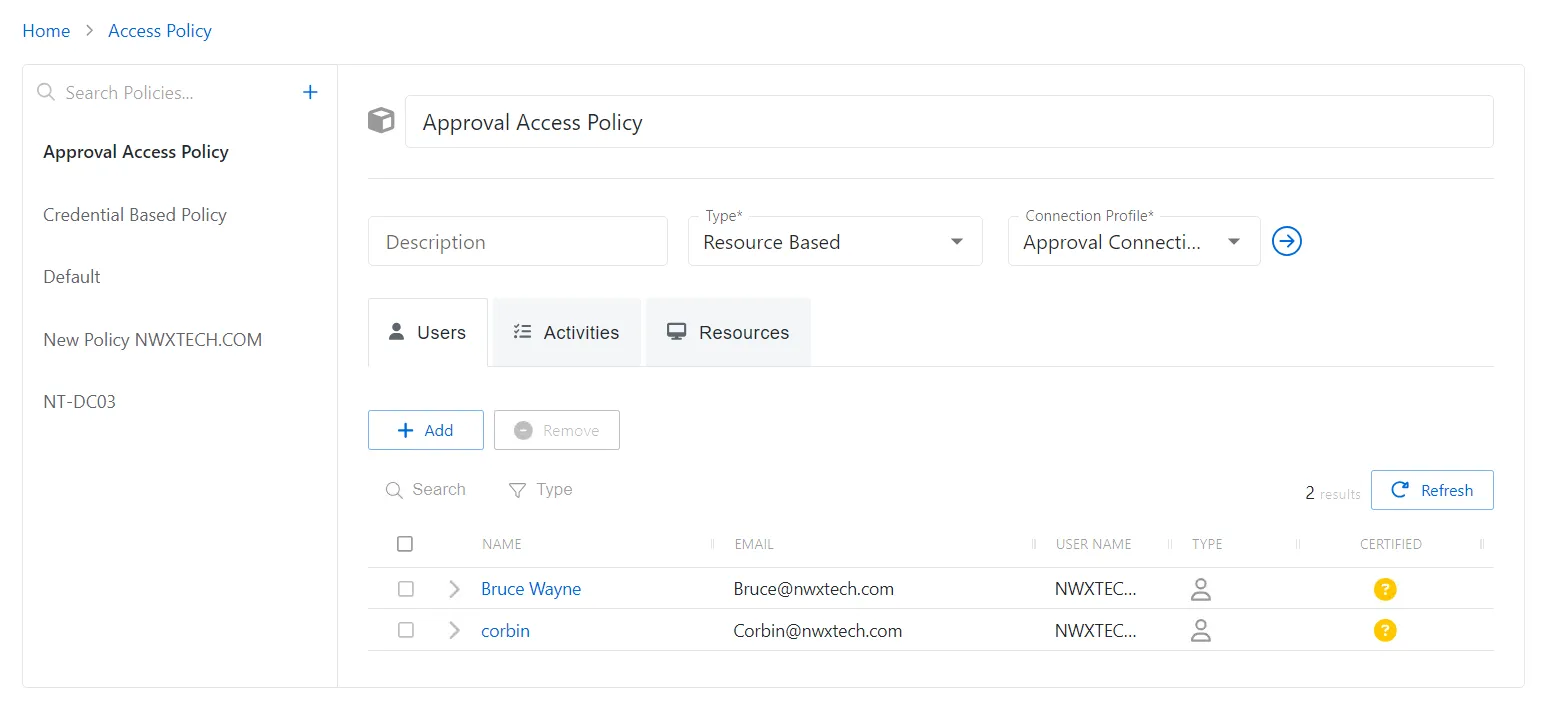
The Users tab has the following features:
- Add — Opens the Add Users and Groups window. See the Add Users & Groups Window topic for additional information.
- Remove — Removes the selected item from being associated with the policy
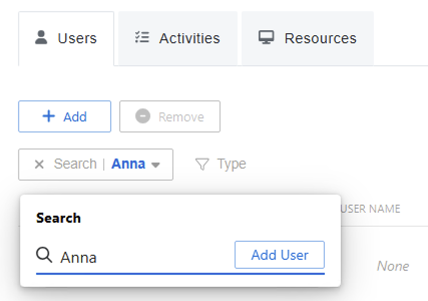
- Search — Searches the table or list for matches to the search string.
If a seach finds a match for a user (or users) that isn't already listed in the policy, an "Add User" box appears. Clicking on this box opens the Add User modal with the search results for quickly adding users.
-
Type — Provides options to filter results based on a chosen criterion:
-
All — Displays all individual and group types
-
User — Displays user types
-
Group — Displays group types
-
Application — Displays application types
-
Collection — Displays collection types
-
Local User — Displays local user types
-
Refresh — Reload the information displayed
The table has the following columns:
-
Checkbox — Check to select one or more items
-
Expand — Click the expand () icon to show additional information about the activities and resources authorized for the selected user or group
-
Name — Displays the name of the account. See the User, Group, & Application Details Page topic for additional information.
-
Email — Displays the associated email address, if available
-
User Name — Displays the sAMAccountName for the account
-
Type — Icon indicates the type of object
-
Certified — Indicates the access entitlement for the user or group. See the Access Certification Page topic for additional information.
-
Approved — Access entitlements have been approved
-
Denied — Access entitlements have been revoked
-
Incomplete — No access entitlement review has been completed
The table columns can be resized and sorted in ascending or descending order.
Activities Tab for Resource Based Access Policies
The Activities tab shows the activities associated with the selected access policy.
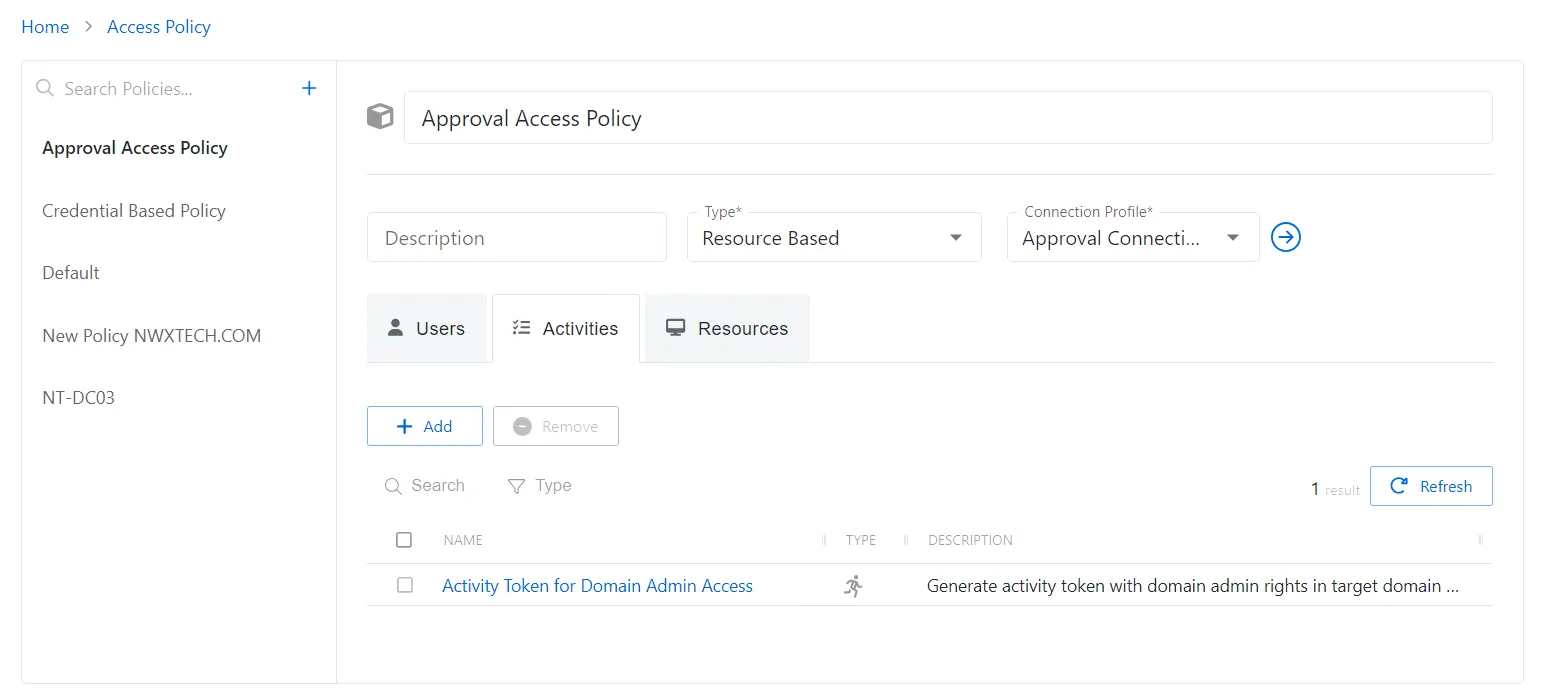
The Activities tab has the following features:
-
Search — Searches the table or list for matches to the search string. When matches are found, the table or list is filtered to the matching results.
-
Type— Provides options to filter results based on a chosen criterion:
-
All — Displays all activity for users and groups
-
Activity — Displays user activity
-
Activity Group — Displays group activity
-
Add — Opens the Add Activities and Activity Groups window. See the Add Activities and Activity Groups Window topic for additional information.
-
Remove — Removes the selected item from being associated with the policy
-
Refresh — Reload the information displayed
The table has the following columns:
- Checkbox — Check to select one or more items
- Name — Displays the name of the activity. Click the link to view additional details. See the Activities Page topic for additional information.
- Type — Classification of the activity. Click the link to view additional details.
- Description — Description of the policy
The table columns can be resized and sorted in ascending or descending order.
Add Activities and Activity Groups Window
The Add Activities and Activity Groups window provides a list of Activities that have been created. Activities are created in the Activities Page.
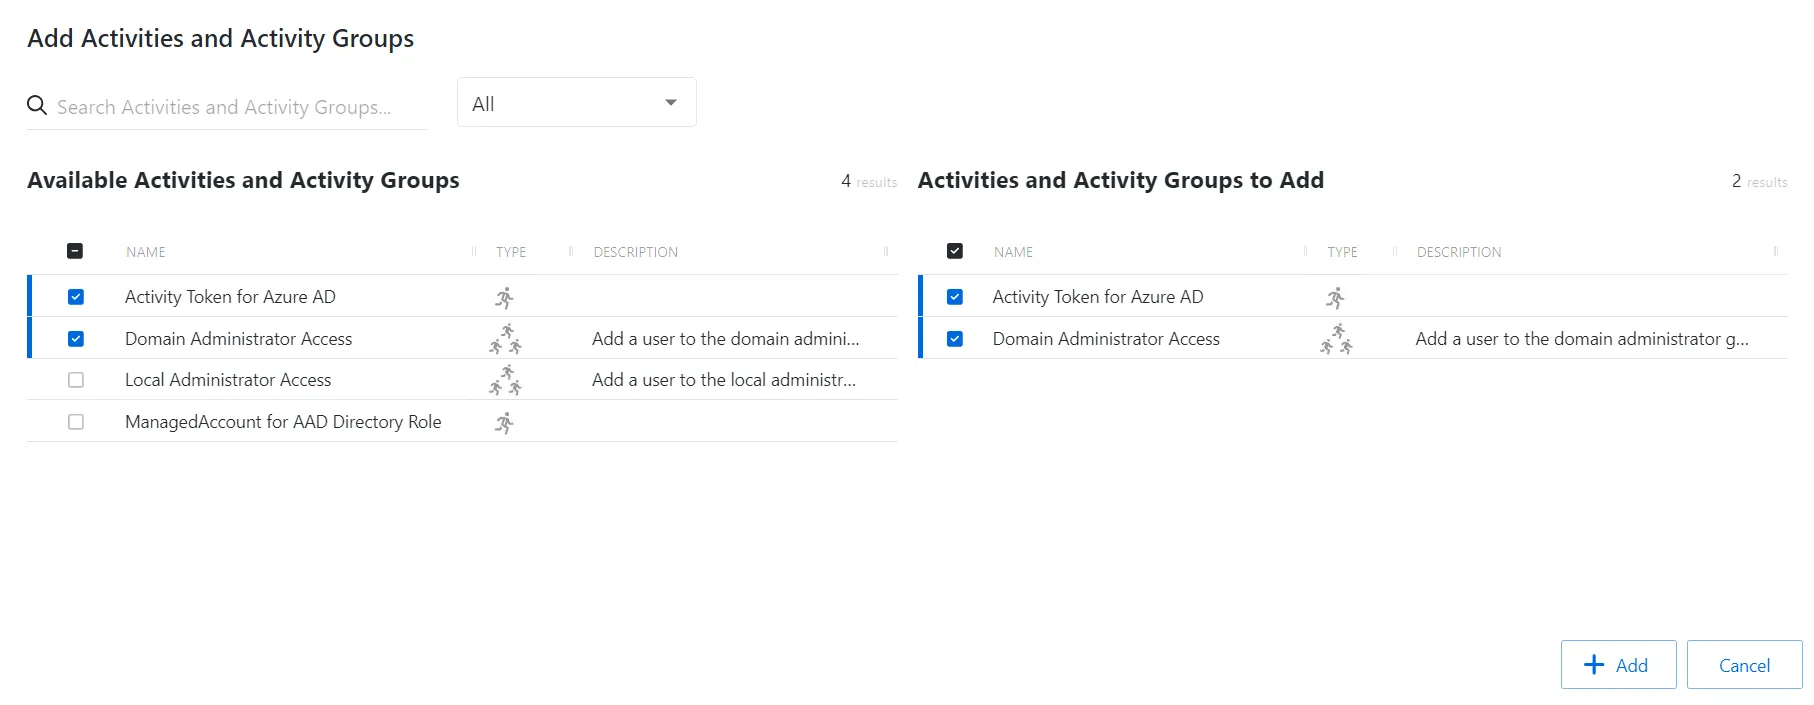
The window has the following features:
- Search — Searches the table or list for matches to the search string. When matches are found, the table or list is filtered to the matching results.
- Filter — Provides options to filter results based on a chosen criterion: All, Activity, or Activity Group
- Available Activities — Shows all available activities and activity groups
- Activities & Activity Groups to Add — Shows selected activities and activity groups
- Add — Adds modifications and closes window
- Cancel — Discards modifications and closes the window
Both tables have the following columns:
- Name — Displays the name of the activity
- Type — Classification of the activity
- Description — Description of the policy
Add Activities
To add activities to the selected access policy.
Step 1 – Navigate to the Policy > Access Policies page.
Step 2 – In the Access Policy list, select the name of the access policy and select the Activities tab.
Step 3 – Click Add to open the Add Activities and Groups window.
The Add Activities and Groups window has the following features:
-
Search – Searches the table or list for matches to the search string. When matches are found, the table or list is filtered to the matching results.
-
Available Activities and Groups – Shows all activities and groups that are added to the console
-
Activities and Groups to Add – Shows all activities and groups that are added to the protection policy
-
Column headers can be sorted in ascending or descending order
-
Name — Displays the name of the activity
-
Type — Classification of the activity
-
Description — Description of the policy
Step 4 – To add an activity to the access policy, click a row in the Available Activities list and it is immediately moved to the Activities & Groups to Add list.
Step 5 – (Optional) Click a row in the Activities & Groups to Add list to move it back to the Available Activities list.
Step 6 – Click Add to add the activities and activity groups to the access policy.
The new activities and activity groups are added to the access policy and are shown in the Activities Tab for Resource Based Access Policies.
Resources Tab for Resource Based Access Policies
The Resources tab shows the resources associated with the selected access policy.
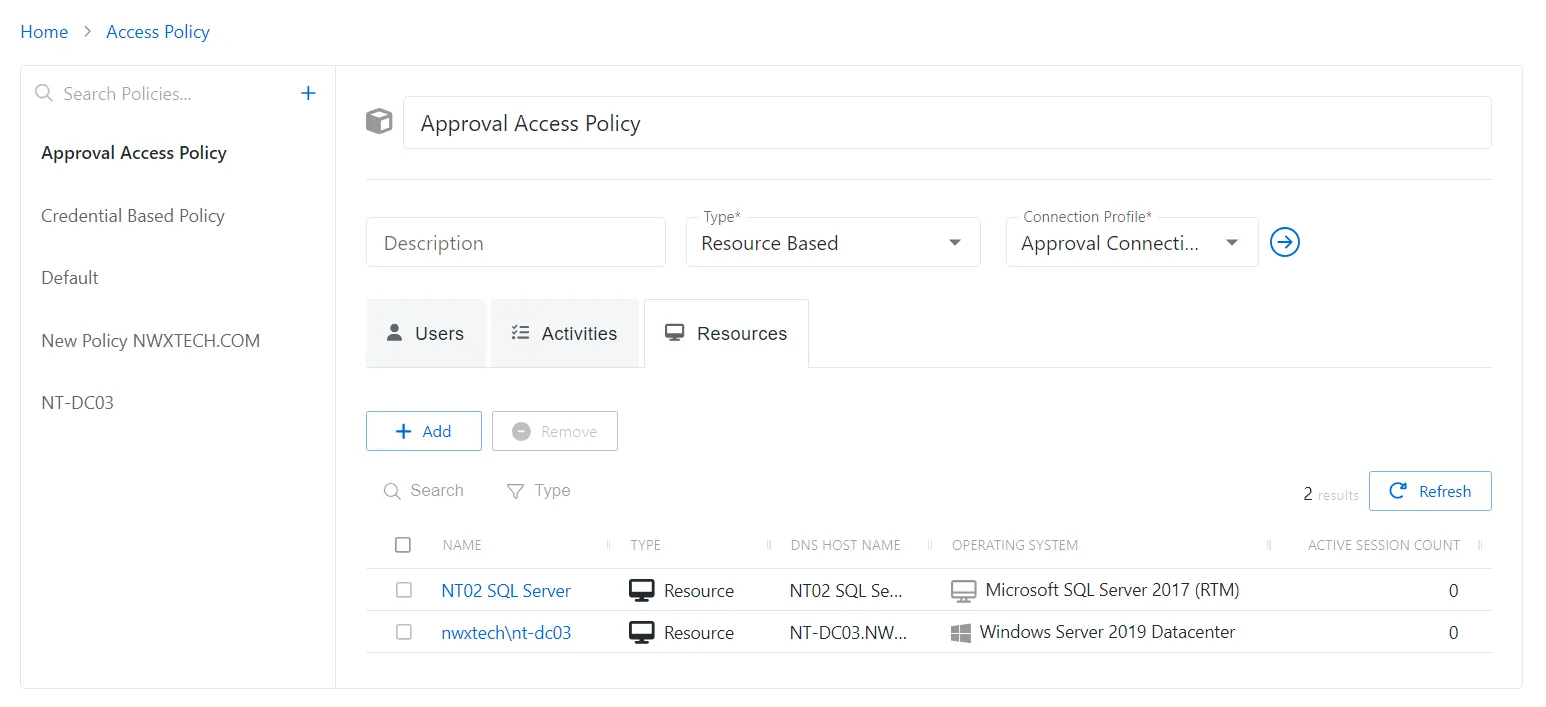
The Resources table has the following features:
-
Add — Opens the Add Resources and Resource Groups window. See the Add Resources and Resource Groups Window topic for additional information.
-
Remove — Removes the selected item from being associated with the policy
-
Search — Searches the table or list for matches to the search string. When matches are found, the table or list is filtered to the matching results.
-
Filter — Provides options to filter results based on a chosen criterion:
-
All — Displays all individual and group types
-
Resource — Displays individual types
-
Resource Group — Displays group types
-
Refresh — Reload the information displayed
The table has the following columns:
- Checkbox — Check to select one or more items
- Name — Displays the name of the resource. Click the link to view additional details. The details vary based on the type of resource. See the Resources Page topic for additional information.
- Type — Icon indicates the type of object
- DNS Host Name — Displays the DNS host name for a host resource or the FQDN for a domain resource
- Operating System — Displays the operating system of the resource
- Active Session Count — Displays the number of active sessions on the resource
The table columns can be resized and sorted in ascending or descending order.
Add Resources and Resource Groups Window
The Add Resources and Resource Groups window provides a list of resources that have been onboarded. Resources are onboarded in the Resources Page.
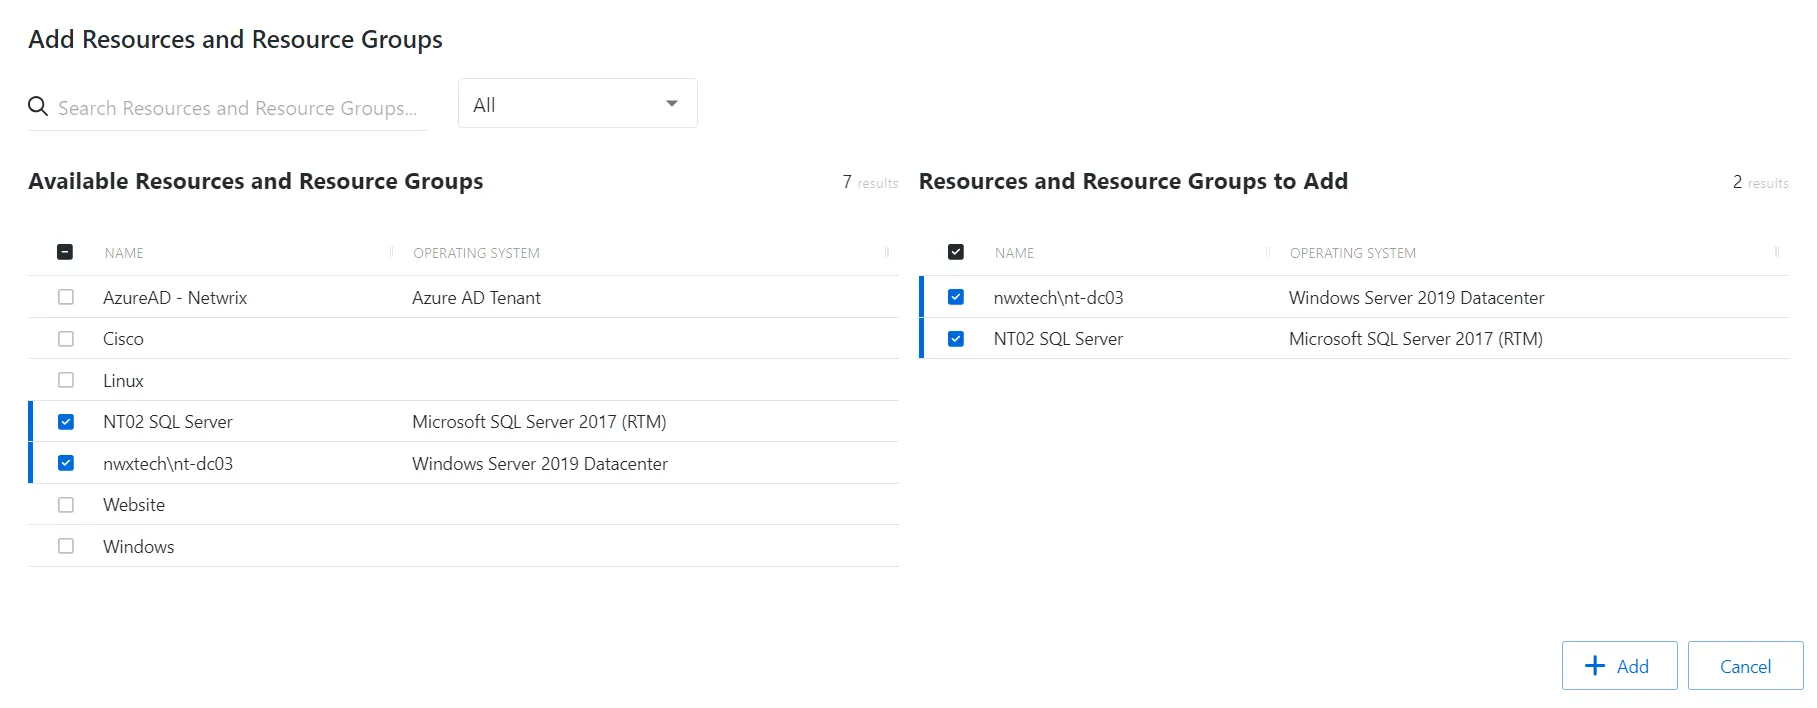
The window has the following features:
- Search — Searches the table or list for matches to the search string. When matches are found, the table or list is filtered to the matching results.
- Filter — Provides options to filter results based on a chosen criterion: All, Resource, or Resource Group
- Available Resources and Resource Groups — Shows all available resources and resource groups that have been onboarded
- Resources and Resource Groups to Add — Shows selected resources and resource groups
- Add — Adds modifications and closes window
- Cancel — Discards modifications and closes the window
Both tables have the following columns:
- Name — Displays the name of the resource
- Operating System— Displays the operating system of the resource
Add Resources
To add resources and resource groups to the selected access policy.
Step 1 – Navigate to the Policy > Access Policies page.
Step 2 – In the Access Policy list, select the name of the access policy and select the Resources tab
Step 3 – Click Add to open the Add Resources and Resource Groups window.
The Add Resources and Resource Groups window has the following features:
-
Search – Searches the table or list for matches to the search string. When matches are found, the table or list is filtered to the matching results.
-
Available Resources and Resource Groups – Shows all resources that are added to the console
-
Resources and Resource Groups to Add – Shows the resources to be added to the protection policy
-
Column headers can be sorted in ascending or descending order
-
Name – The name of the resource
-
Operating System – Operating System of resource
Step 4 – Filter by Resources or Resource Groups, and use the search feature.
Step 5 – To add a resource or resource group to the access policy, click a row in the Available Resources / Resource Groups table and it is immediately moved to the Resources and Resource Groups to Add table.
Step 6 – (Optional) Click a row in the Resources and Resource Groups to Add table to move it back to the Available Resources / Resource Groups table.
Step 7 – Click Add to add the resources and resource groups to the access policy.
The new resources and resource groups are added to the access policy and are shown in the Resources Tab for Resource Based Access Policies.