Org Clean Up Example
Here is an example using the simplest clean up case:
- Unused custom fields on Account object
- No risky dependencies
Using the steps outlined Org Clean Up, we can proceed quickly, efficiently and with confidence.
Step 1: Identify and Prioritize Targets for Clean Up
We are going to use the out-of-the-box Default Clean Up List View with these filters:

- Filter on the single Record Type Objects & Fields to enable editing the Customizations directly from the List View. This filter selects all Objects and their related Fields.
- Filter for API Names starting with Account (for example, Account._mycustom_field) limits results to the Account object. We could use a similar technique to focus on a specific App.
- Filter on Salesforce CustomField to return all Custom Fields.
- Filter to exclude Standard fields. The Salesforce metadata type for all fields is CustomField. Platform Governance for Salesforce identifies standard fields and appends Standard: object_name to the Customization Name so they can be filtered out of your results.
- In our example, unused means not used within the last six months, so we finish up with a Date Last Used filter.
Specify the fields to show:
- Name
- Base Record: the parent for fields on an Object and the Base Object for other Customizations.
- Owner
- Date Last Used
- Clean Up Comments: freeform area to add notes about your investigation.
- Clean Up Classification - freeform area to organize clean up projects. For example, Account Spring Clean Up.
- Clean Up Status: specific tracking of the stages of a clean up project.
- Reports
- Scripts
- Workflows / Approvals
- Extended Types
- % Populated
Step 2: Assess the Risk of Downstream Problems and Add Related Customizations
You now have a list of unused, custom fields on the Account object. Examine the dependencies to determine what to do next. For this example, we are going to clean up fields without these complications.
- Set the Clean Up Status on any field without dependencies to To Be Cleaned Up. In the
List View, click the
 icon and edit the Clean Up Status and other Clean Up Fields. You can select multiple fields
using the checkboxes to set the values for the group.
icon and edit the Clean Up Status and other Clean Up Fields. You can select multiple fields
using the checkboxes to set the values for the group. - For easy reference later, set a project name in the Clean Up Classification field such as Simple Account Clean Up. You can filter on this later when you send for approval.
- If you have questions, send an email or Chatter request to the owner and set the Clean Up Status to Send Request Info Email as a reminder you are awaiting a response.
- As you find unused fields with complex dependencies, such as Scripts or Workflows / Approvals, set the Clean Up Status to Under Investigation. As an example, you can also assign the Clean Up Classification to be Scripted Account Fields to group them for your investigation later.
- These fields need investigation to see if they can be cleaned up and, more importantly, if the scripts and workflows are still useful, need to be fixed, or cleaned up. What are the scripts or workflows doing if there is no data in the field?
- As you work through the list, note your findings in the Clean Up Comments field.
- To keep an unused field, set the Clean Up Status to Ignore. Alternatively, you can set
the Date Last Used to a date in the future. Platform Governance for Salesforce will not
override the manually set date with an earlier date so you can retain the Customization. To view
ignored Customizations, select:
Strongpoint > Reports > Clean Up > Customizations Excluded From Clean Up
PRO TIP
If you are cleaning up a very large object, add a filter for Clean Up Status equals “”. This shortens your list as you work your way through the fields and set an appropriate Clean Up Status. Remove the filter later when you want to work through the fields.
- Archived: tracks automatically cleaned up Reports.
- Deleted: tracks Customizations that have been deleted.
- Reassign Owner: reassigns the Owner of one or more Customizations.
Step 3: Track the Progress of the Clean Up Process
You now have a list of unused fields on the Account object grouped into fields that are relatively simple to clean up and fields with code and other critical dependencies.
TIP
If you have a blank List View, remove the filter on the Clean Up Status or set it to To Be Cleaned Up. If you set a Project Name in the Clean Up Classification, you can filter for it in the search box at the top of the List View.
Some of the fields may have associated Reports or List Views. If you open the DRD in the Customization Record, you can drill into the details to see if removing the field is likely to cause a problem. Some things to consider:
- List Views do not track Date Last Used. Be careful cleaning up them up. Reports do track DLU.
- Cleaning up fields used in Report Filters can change the scope of the report. You can check whether the field is used in the report filter by looking at the Search Filters check box field.
- Fields on actively used Reports should have Clean Up Status set to Under Investigation and a plan for cleaning up the Report documented in the Clean Up Comments field. You might want to email or Chatter with the owner to determine whether it is safe to clean up. Set the status to Send Request Info Emails as a reminder.
Step 4: Group Customizations for Approval and Clean Up
Now that you have identified what you can clean up, you can proceed with the Approval process. Some Customizations may require different levels of approval or different approvers. If you are using Intelligent Change Enablement, you can group related Customizations for approval and assign them to a Change Request directly from the List View:
-
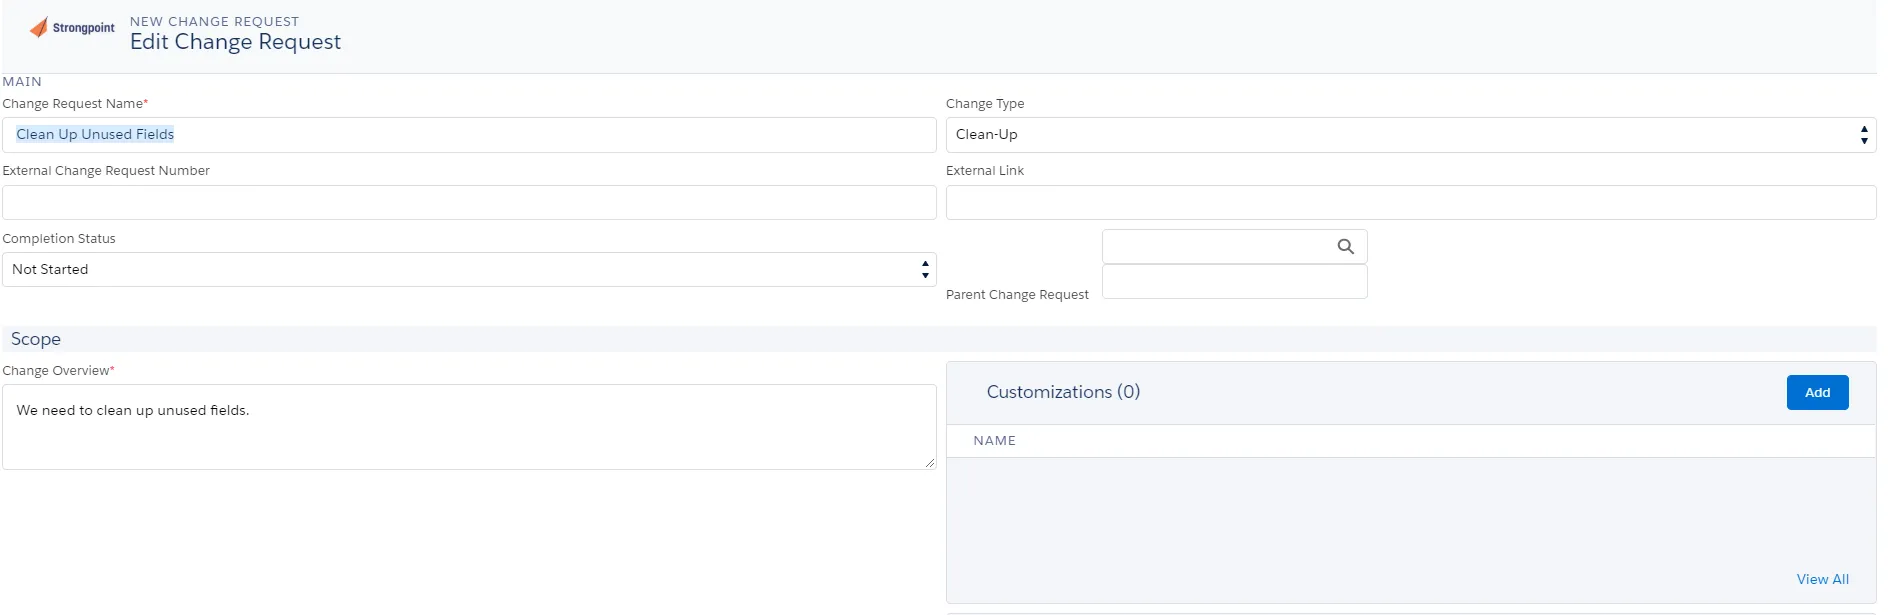
Click the Change Request tab and click New.
-
Enter the name and a brief description of the clean up project. Set the Change Type to Clean Up. If you are using an external change approval system such as Jira or ServiceNow, you can enter the External Change Request Number.
-
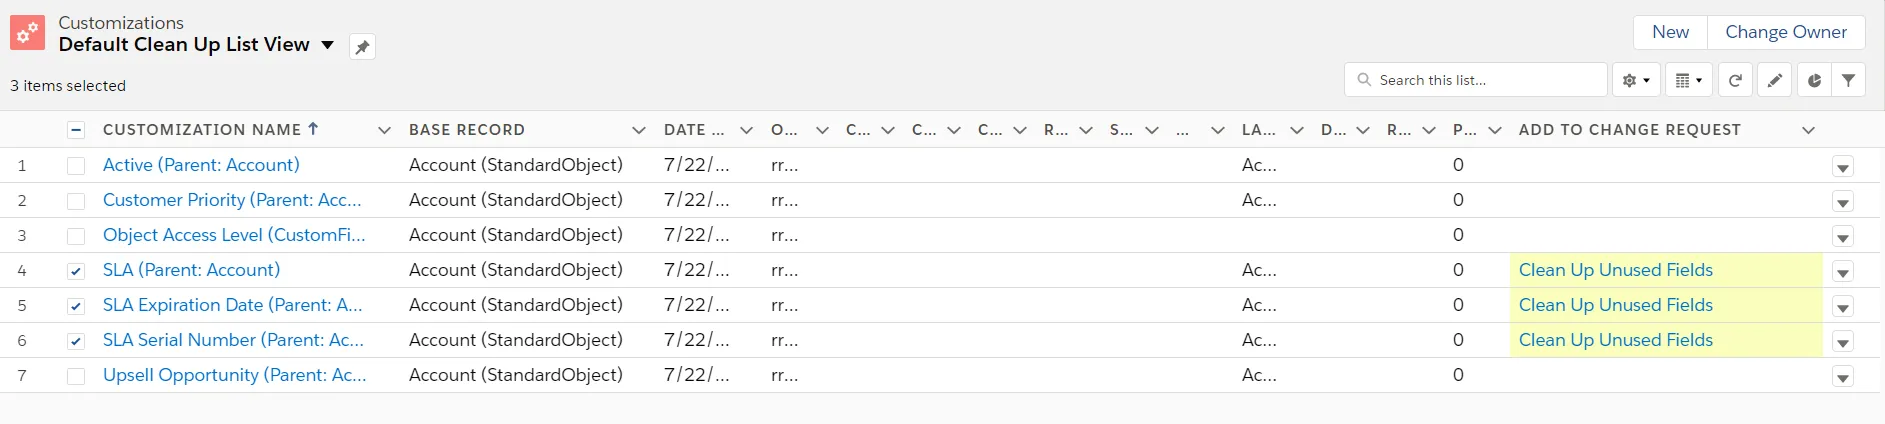
On your List View, set the Add To Change Request field for the Customizations you are planning to clean up with this Change Request.
-
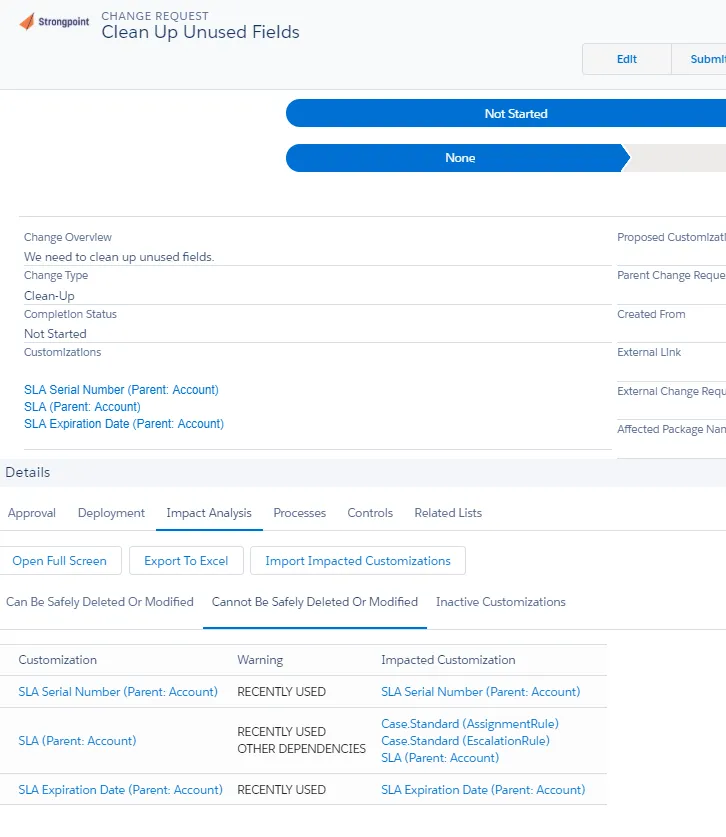
Open your Change Request and view the Impact Analysis for the Customizations you want to clean up. You are warned if there are SOQL, code, workflow, role, profile filter report or List View dependencies or if the field affects actively used Reports.
-
If you need to make changes to the Customizations, Edit the Change Request and select View All in the Customizations field. You can Add or Remove Customizations to the Selected Customizations list. Save when you are finished.
-
When you are ready, Submit your Change Request for Approval.
PRO TIP
You can add additional approvers (beyond what is required for the policy) to the Change Request. Initially, only the approvers from your default policy are required. There are two methods to add additional approvers:
- Create a Process Record and specify approvers. Add the Process Record to the Change Request under the Affected Processes field. The additional approvers are added to this Change Request and can be reused on future Change Requests. Process Owner Approvals must be enabled on the applicable Policy.
- Manually specify one or more approvers in the Additional Approvers field.
If you are not using Change Enablement, you can export the results to Excel by clicking the Export To Excel on the Change Request Impact Analysis tab. You can also create a report of Customization Records (there are third party apps that enable List View export). You must double check the impact and manually route your list for approval.
Step 5: Archive the Customization Definition / Data
Your metadata is automatically archived for the field. Best practice is to create a Report with all of the non-empty fields you are cleaning up, and store it on the Change Request before you clean up the fields.
Step 6: Clean Up Approved Customizations
As with any change, you are strongly encouraged to clean up the fields in a sandbox first, run your test sets, and review the changes with the affected business owners prior to making the change in production.
You currently cannot delete items using Platform Governance for Salesforce tools. To actually remove objects in bulk, you can use Destructive Change Sets. You can also remove them manually. We are working with customers to understand the controls required to automate this process, taking into account the judgment required to safety proceed in various sized orgs.
Step 7: Validate Your Change Approval Process Was Followed
To ensure that your change approval process is being followed, there is an Unresolved Non-Compliant Changes report. This report summarizes all changes where a Change Request was required by policy, but either not created or not approved. The report includes these details:
- Customization Name and API Name
- Metadata Type (for example, CustomField, WorkflowAlert, ApexClass)
- Change Overview (for example, Custom Field Created, WorkflowAlert Changed, ApexClass Created)
- Diff Summary (detailed comparison of before and after)
- Related Change Requests, if they exist
The Change Enablement Reports and List Views give you visibility into the changes occurring in your orgs.
Next Technical Debt Topic: Specific Clean Up Approaches