Filtering Data
Filtering Data
Filtering Data
The Data Console can show thousands of records, but only some of them will be of interest to you at any time. Filters let you focus on the important information.
You can create simple filters by typing values directly into the filter row, or by selecting values from Filtering by Column Values. More complex filters are created with the Custom Filters and Filter Editor windows.
The Filter Row
The top row in the Audit Log and Users tabs is called the Filter Row. You can type filter values directly into this row.

The Filter Row is empty when you first open the Data Console. To create a filter, click the Filter Row in the column you wish to filter. A cursor will appear. Type a value, and then press ENTER or TAB.
Click the button to shown an editor or selector that helps you enter a value. Values can include wildcard characters. Use a ? to match any single character, or a * to match more than one character.

The image above shows a filter on the Date, Source, and Source IP columns. Only password reset events on 2/5/2015 originating from IP addresses starting with 192.168.115 are shown. The small blue icons in the column headers show which columns have active filters.
NOTE: Rows are shown only if they match all filter values (logical AND). Use the custom filter or the filter editor windows for a logical OR filter.
Filtering by Column Values
You can also create a filter by selecting values from a list in the column headers.

Hover the mouse pointer over a column header until a small button appears on the right side of the header.

Click the button to show a list of values in the column.
Select one or more values from the list. Rows that do not match one of the selected values are hidden.
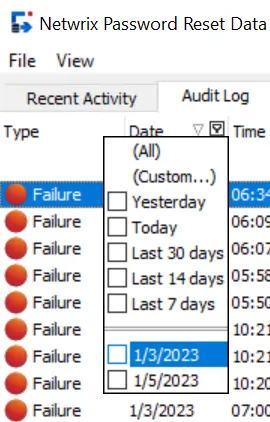
The list of values for date and date/time columns also includes date ranges such as Last 7 days, Today, Yesterday, etc.
Click (All) to clear the filter and display all values. Click (Custom...) to create a custom filter.
Custom Filters
Use custom filters to search for partial matches, find a range of values, or to create more complex filters. Click (Custom...) in a column header's value list to create a custom filter.
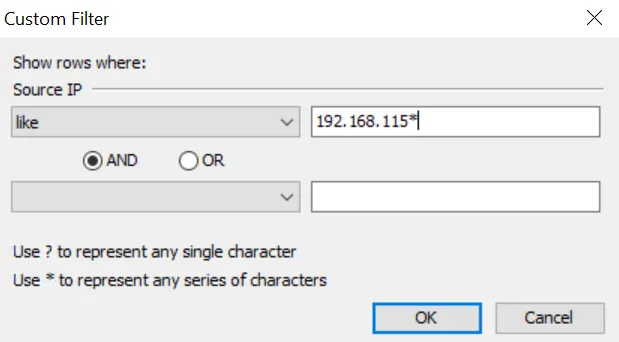
Custom filters can contain one or two conditions for each column. Select an operator for the first condition from the drop-down list below the column name. Only relevant operators are shown for each column.
Type a value for the condition in the text box beside the operator. The text box may have a button on the right. Click the button to shown an editor or selector that will help you enter a value. Values can include wildcard characters. Use a ? to match any single character, or a * to match more than one character.
Select the AND or OR operator if the filter will have two conditions. Select AND if the filter should only show rows that meet both conditions. Select OR if the filter should show rows that meet either condition.
Select an operator and value for the second condition, or leave them blank if your filter only has one condition. Click OK to close the Custom Filter window and apply the filter.
NOTE: The Filter Editor is shown instead of the Custom Filter window if the current filter is too complex for the Custom Filter window.
The Filter and Status Bars
The Status Bar appears at the very bottom of the Data Console. It shows the number of visible records and the total record count. The Filter Bar appears above the Status Bar, and it shows the active filter. The button on the right side of the Filter Bar opens the Filter Editor.

A button and a check box appear on the left side of the Filter Bar when a filter is active. Click the button to clear the filter. Toggle the check box to disable or enable the filter.

A drop-down button appears to the right of the filter. Click it to select a recently used filter.

Exporting Data
You can export the visible rows to Microsoft Excel, HTML, text, and XML formats.
Follow the steps below to export the visible rows in the current tab.
Step 1 – Click the Audit Log or Users tab.
Step 2 – Click the File menu, and then click one of the export menu items.
Step 3 – Type a filename, and then click Save.
NOTE: When exporting to Excel, you can choose the file type from the Export to Excel window. The default file type is .xlsx.
Deleting Users
Users are automatically deleted from Password Reset's database approximately one week after they are deleted from Active Directory. You can also manually delete users from the Data Console.
Follow the steps below to delete a user.
Step 1 – Click the Users tab.
Step 2 – Select the user(s) you wish to delete.
Step 3 – Press the DELETE key, and then click OK.
NOTE: You can still view a user's event history in the Audit Log tab after they are deleted from the Users tab.