Installation
Password Policy Enforcer/Web V7.11 is designed to run on Windows 2003, 2008, and 2012. Users access Password Policy Enforcer/Web from their web browser.
System Requirements
- Windows 2003, 2003 R2, 2008, 2008 R2, 2012, or 2012 R2.
- 5 megabytes of free disk space.
- 5 megabytes free RAM.
Password Policy Enforcer/Web can share server resources with other applications. It can be installed on an existing, well secured web server.
Preparing IIS
Windows 2008 and 2012 include a modular version of IIS that only has a small set of core features enabled by default. Password Policy Enforcer/Web is an ISAPI (Internet Server Application Programming Interface) extension, so you must enable ISAPI extensions on the server that will host Password Policy Enforcer/Web.
Complete the following steps to manage various circumstances that may arise during installation. The following are common situations that impact installation and the steps necessary to work around them:
- If IIS isn't installed on Windows 2012
- If IIS is already installed on Windows 2012
- If IIS isn't installed on Windows 2008
- If IIS is already installed on Windows 2008
If IIS isn't installed on Windows 2012
Complete the following steps to prepare IIS is IIS isn't installed on Windows 2012.
Step 1 – Start the Server Manager (ServerManager.exe).
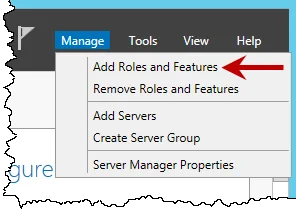
Step 2 – Click Manage > Add Roles and Features.
Step 3 – Click Next on Before You Begin page (if applicable).
Step 4 – Select Role-based or Feature-based installation, then click Next.
Step 5 – Select an appropriate server, then click Next.
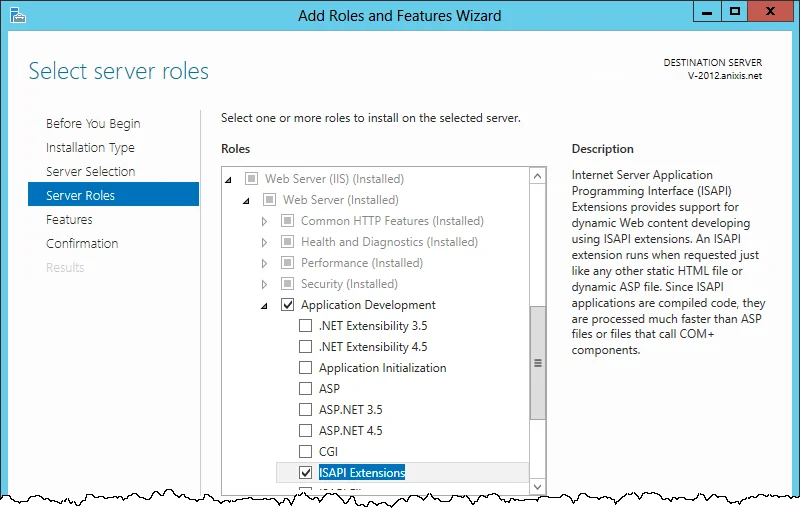
Step 6 – Select the Web Server (IIS) role.
Step 7 – Click Add Features if asked to install required features.
Step 8 – Click Next three times.
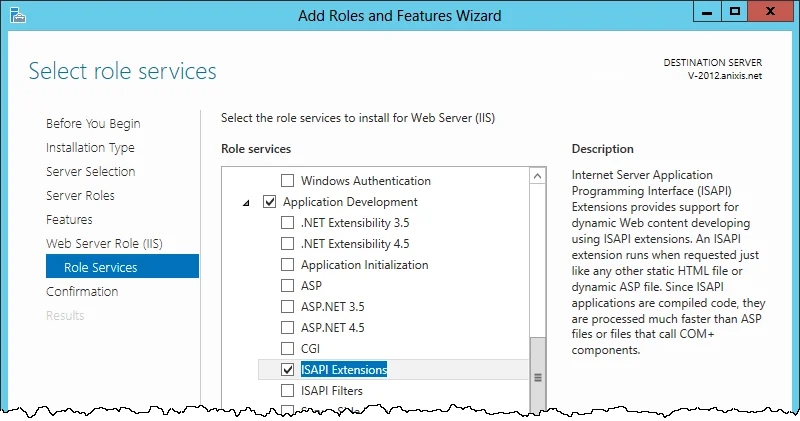
Step 9 – Expand the Application Development group, then select ISAPI Extensions.
Step 10 – Click Next, then click Install.
Step 11 – Wait for IIS to install, then click Close.
If IIS is already installed on Windows 2012
Complete the following steps to prepare IIS is IIS is already installed on Windows 2012
Step 1 – Start the Server Manager (ServerManager.exe).
Step 2 – Click Manage > Add Roles and Features.
Step 3 – Click Next on the Before You Begin page (if applicable).
Step 4 – Select Role-based or Feature-based installation, then click Next.
Step 5 – Select an appropriate server, then click Next.
Step 6 – Expand the Web Server (IIS) (Installed) group.
Step 7 – Expand the Web Server (Installed) group.
Step 8 – Expand the Application Development group, then select ISAPI Extensions.
Step 9 – Click Next twice, then click Install.
Step 10 – Wait for the ISAPI Extensions feature to install, then click Close.
If IIS isn't installed on Windows 2008
Complete the following steps to prepare IIS if IIS isn't installed on Windows 2008.
Step 1 – Start the Server Manager console (ServerManager.msc).
Step 2 – Click the Roles item in the left pane.
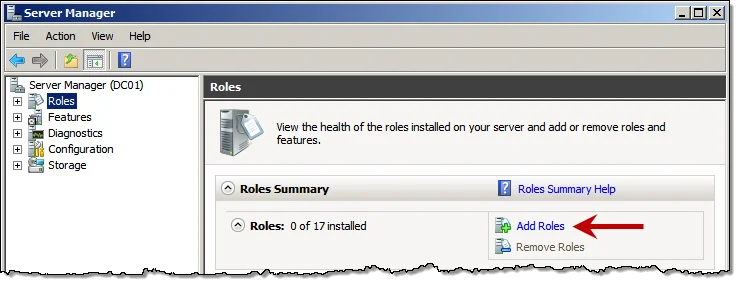
Step 3 – Click Add Roles in the right pane.
Step 4 – Click Next on the Before You Begin page (if applicable).
Step 5 – Select the Web Server (IIS) role, then click Next twice.
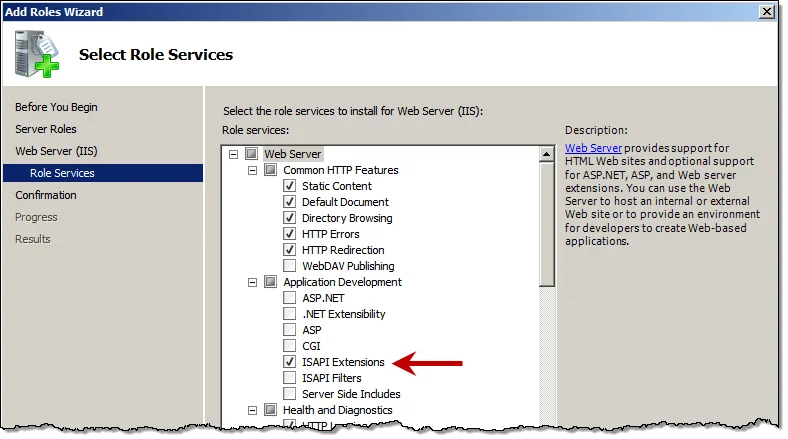
Step 6 – Select ISAPI Extensions in the Application Development group.
Step 7 – Click Next, then click install.
Step 8 – Wait for IIS to install, then click Close.
If IIS is already installed on Windows 2008
Complete the following steps to prepare IIS is IIS is already installed on Windows 2008.
Step 1 – Start the Server Manager console (ServerManager.msc).
Step 2 – Expand the Roles item in the left pane, then click Web Server (IIS).
Step 3 – Scroll down to the Role Services section in the right pane.
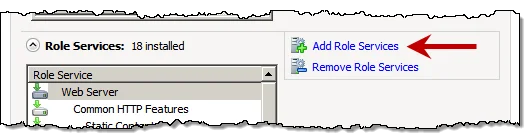
Step 4 – Click Add Role Services.
Step 5 – Select ISAPI Extensions in the Application Development group.
Step 6 – Click Next, then click Install.
Step 7 – Wait for the role service to install, then click Close.
The PPE/Web Setup Wizard
The Setup Wizard copies the required files onto the server and configures IIS to run the Password Policy Enforcer/Web application.
Complete the following steps to install PPE/Web.
Step 1 – Start the Password Policy Enforcer/Web Setup Wizard (PPEWeb711.exe).
Step 2 – If another version of Password Policy Enforcer/Web is detected, the Setup Wizard may required older files to be backed up. Back up these files if the original files have been modified. Click Next.
Step 3 – Click Next.
Step 4 – Read the License Agreement. Click I accept the terms of the license agreement, then click Next if you accept all the terms.
Step 5 – Click Browse... if you want to choose a different folder for the Password Policy Enforcer/Web documentation and tools, then click Next.
Step 6 – Select an IIS Web Site from the dropdown. Change the default Virtual Directory, if needed.
Password Policy Enforcer/Web should be installed in its own virtual directory.
Step 7 – Click Next twice.
Step 8 – Wait for Password Policy Enforcer/Web to install, then click Finish.
Upgrading from PPE/Web V7.x
Some planning is needed to ensure a smooth upgrade from PPE/Web V7.x. A trial run on a lab network is recommended.
Before You Begin
The HTML templates and associated images are overwritten during an upgrade. You must back up and
customized HTML templates and images before upgrading. The HTML templates and images are installed
in the \Inetpub\wwwroot\ppeweb\ folder by default.
A full backup of the PPE/Web server is recommended. Use it to roll back to the previous version if the upgrade can't be completed. You may need to restart Windows after upgrading.
PPE/Web V7.11 is only compatible with Password Policy Enforcer V7.0 and later. Upgrade Password Policy Enforcer to a compatible version if you have enabled Password Policy Enforcer integration.
Upgrading to V7.11
Step 1 – Start the PPE/Web Setup Wizard and follow the prompts. The Setup Wizard uninstalls the previous version. There is no need to manually uninstall previous versions.
Step 2 – Restore any customized HTML templates and images after upgrading. Don't restore PPEWeb.dll from the backup as it belongs to the previous version.
Upgrading from PPW/Web V6.x
Some planning is needed to ensure a smooth upgrade from PPE/Web V6.x. A trial run on a lab network is recommended.
Before You Begin
The HTML templates and associated images are overwritten during an upgrade. You must back up any
customized HTML templates and iages before upgrading The HTML templates and images are installed in
the \Inetpub\wwwroot\ppeweb\ folder by default.
A full backup of the PPE/Web server is recommended. Use it to roll back to the previous version if the upgrade can't be completed. You may need to restart Windows after upgrading.
PPE/Web V7.11 is only compatible with Password Policy Enforcer V7.0 and later. Upgrade Password Policy Enforcer to a compatible version if you have enabled Password Policy Enforcer integration.
Upgrading to V7.11Upgrading to V7.11
Complete the following steps to upgrade PPE/Web to V7.11.
Step 1 – Start the PPE/Web Setup Wizard and follow the prompts The Setup Wizard uninstalls the previous version. There is no need to manually uninstall previous versions.
Step 2 – Restore any customized HTML templates and images after upgrading. Don't restore PPEWeb.dll from the backup as it belongs to the previous version.
Step 3 – Open the Configuration Console to import your PPE/Web configuration settings. If you have a perpetual license, also install your new license key. See the Configuration topic for additional information.
Upgrading from PPE/Web V3.x
PPE/Web V3.x didn't include a Setup Wizard, so you should manually remove the old version before upgrading.
Removing PPE/Web V3.x
Complete the following steps to manually remove PPE/Web V3.x.
Step 1 – Open the IIS Manager console.
Step 2 – Right-click the PPE/Web virtual directory in the left pane of the IIS Manager console, then click Delete. Click Yes to confirm.
Step 3 – Click the Web Service Extensions item in the left pane of the IIS Manager console. Right-click the PPE/Web item in the right pane, then click Delete. Click Yes to confirm.
Step 4 – Back up the PPE/Web V3.x files.
the PPE/Web V3.x files are most likely located in the \Inetpub\wwwroot\ppeweb\ folder.
Step 5 – Delete the folder containing the PPE/Web V3.x files.
Upgrading to V7.11
Complete the following steps to upgrade to PPE/Web V7.x.
Step 1 – Start the PPE/Web Setup Wizard and follow the prompts.
Step 2 – Open the Configuration console to configure PPE/Web and install your new license key.
Any customizations to the PPE/Web V3.x user interface must be recreated after upgrading to PPE/Web V7.11. See the Editing HTML Templates topic for additional information.