Install the Server
Usercube Server can be installed on the same workstation as the database or on a separate workstation. If you are installing Usercube within the SaaS offering, this section is moot. You can skip directly to Set up End-User Authentication.
Please make sure that the server requirements are met before going further.
Server Working Directory
In
Create a Working Directory,
the server executable has been extracted to the
working directory
as Usercube-Server.exe and Usercube-Server.dll and will enable a user or IIS to run the Usercube
Server.
Set up the License Key
The license key provided by Usercube must be set up in the appsetting.json > License attribute.
Create an IIS Website
It is recommended to run the Usercube Server as an IIS website.
To install the Usercube Server as a Windows service, please jump to [Install the Server as a Windows Service].
Adding the Usercube Server as an IIS website can be achieved with the
Internet Information Services (IIS) Manager which can be launched with the
INETMGR.MSC command. You need to have an IIS 10.0 or greater.
An IIS website must be created using the Microsoft guide and the following parameters:
1. Site name: Usercube<Organization> is the recommended naming convention.
2. Physical path: /<working directory>/Runtime
3. Type: http
4. IP address: All unassigned
5. Port & Hostname: To access the Usercube Server and the UI. Use the hostname and port that has been reserved for Usercube.
During installation, the following information guides some of your choices:
- The Usercube Server uses an in-process hosting model.
- Usercube Server's
web.configcan be found in theRuntimefolder. - The Usercube Server uses .Net.
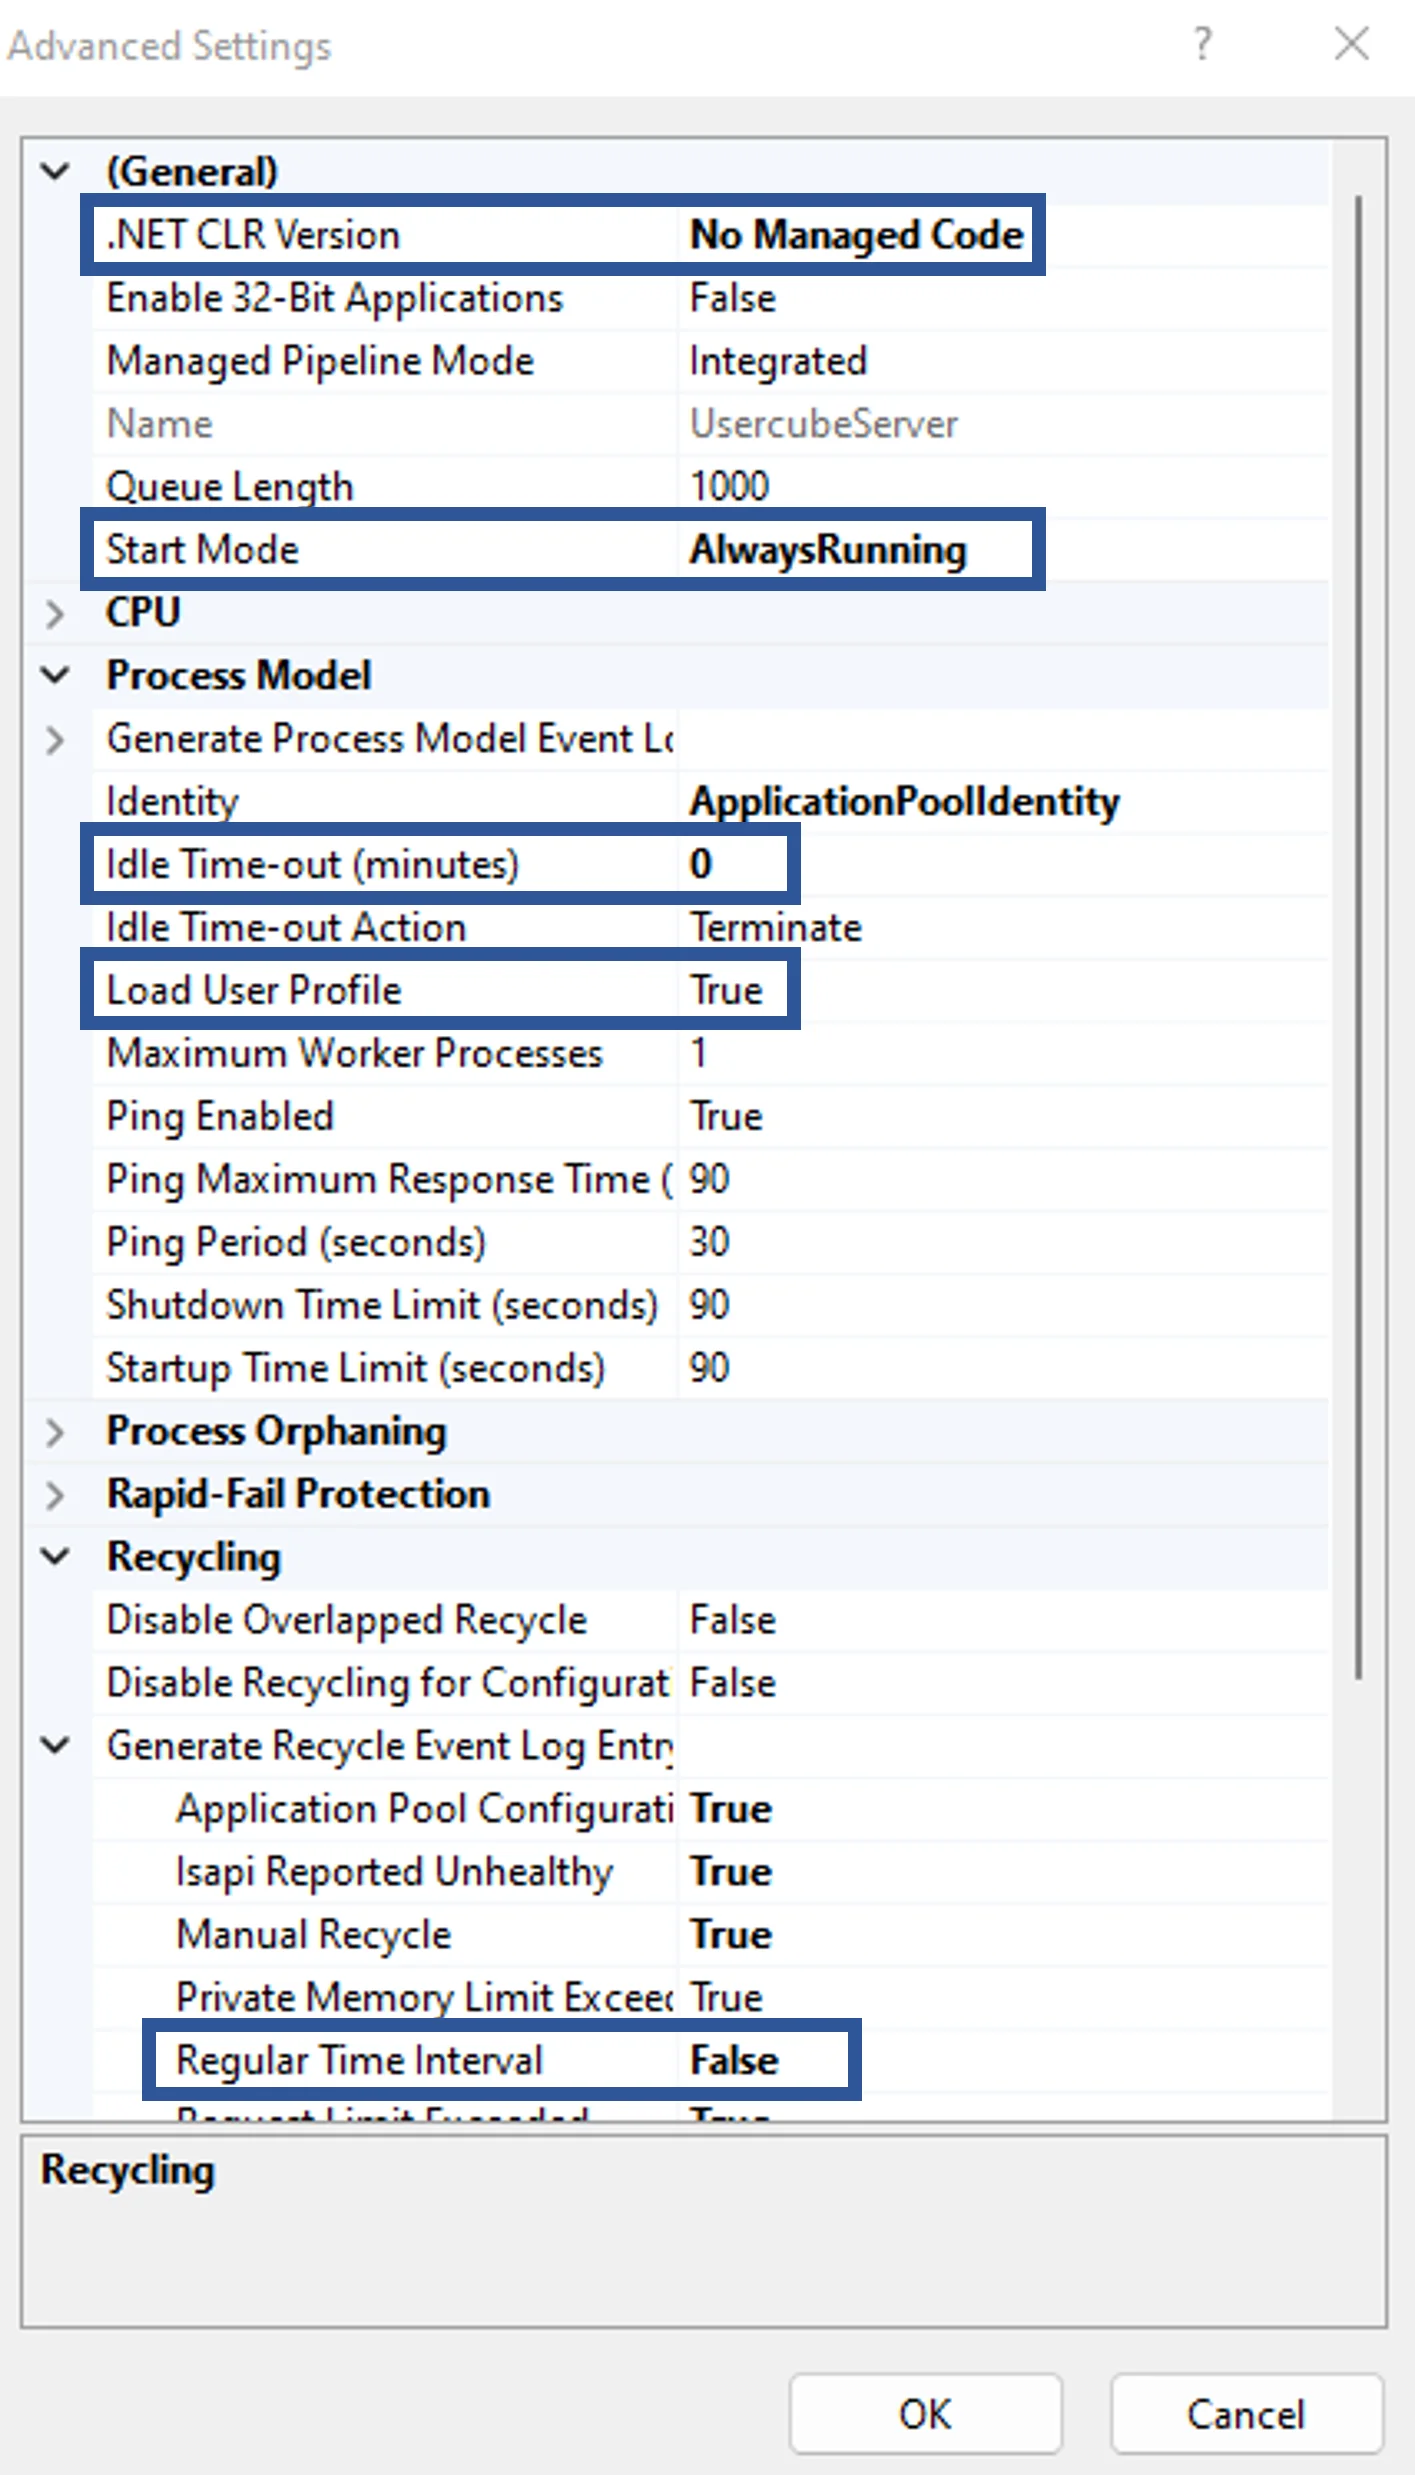
After creation, the following settings are recommended:
-
Application Pool >
Usercube<Organization>> Advanced Settings > General > Start Mode set toAlwaysRunning; -
Application Pool >
Usercube<Organization>> Advanced Settings > Process Model > Idle Time-out (minutes) set to0and Load User Profile set toTrue; -
Application Pool >
Usercube<Organization>> Recycling > Regular time intervals set to0.Recycling the application pool creates a discontinuation in the connection between server and agent, which can disrupt some of Usercube's features such as the job scheduler. IIS already recycles the application pool at each setting change, thus NETWRIX recommends not using periodic recycling.
The following is mandatory:
- Application Pool >
Usercube<Organization>> Advanced Settings > General > .NET CLR Version >No Managed Code
To sum up IIS settings:
An SSL Certificate should also be set to the IIS Server to perform HTTPS communication with end-users.
Hosting Bundle
You need to install the dotnet hosting bundle (version 8.0 or higher) to be able to run dotnet application.
Select a Server Identity
The Usercube Server, through the IIS Website, should be assigned a service account with the relevant permissions.
Create the service account
This section requires using an Active Directory account with sufficient privileges to create service accounts on the domain.
-
Log on to a Windows server in the target domain environment. You should use an account with the necessary permissions to create new domain accounts.
The target domain is the domain where SQL Server is installed.
-
Access the Active Directory User and Computers tool with the command
dsa.mc. -
Select the target domain.
-
Click Users.
-
From the users list, right-click to select New > User.
-
Choose a mnemonic First Name for the Usercube Server. Example:
UsercubeContosoServer. -
Remember for later, the down-level logon name in the format
DOMAIN/userName. Example:CONTOSO/identitymanagerContosoServer. -
Click Next.
-
Choose a password. Remember it for later.
-
Check User cannot change password.
-
Check Password never expires.
This newly created service account is a domain account and will be used as an IIS identity.
You can go further and use Managed Service Account to avoid dealing with the service account password update yourself and let Windows worry about it. This feature requires installing Usercube on Windows Server 2016 or later, and using an Active Directory with a forest level set to Windows Server 2016 or later.
Set an IIS identity
The following implies that a custom service account has already been created for the Usercube Server.
- Open the IIS Manager (
INETMGR.MSC). - Open the Application Pools node underneath the machine node.
- Select the
Usercube/<Organization>application pool. - Right-click and select Advanced Settings.
- In the Process Model section, on the Identity list item, click on the three dots to open the Application Pool Identity dialog.
- Select the Custom Account radio button and click on Set.
- Enter the previously created Service Account credentials:
- User name in the format
DOMAIN/userNamethat you have previously written down. - Password, previously remembered.
- User name in the format
- Click OK. You're all set.
The Usercube Server IIS site will now use this identity to access the database and the working directory.
Set the Server Permissions
Set the database permissions
The service account used by the Server to access the database needs the following database-level roles in SQL Server:
publicdbowner
And the following server-level role:
Administer bulk operations
This guide will show you how to perform these operations using SQL Server Management Studio.
-
Open SQL Server Management Studio (SSMS).
-
Log in to access the server on which runs the Usercube Database with an account member of the sysadmin or securityadmin server-level role.
-
Expand the Security node.
-
Expand the Login node.
-
Look for the Usercube service account in the list.
-
If you cannot find the service account:
-
From the Login node, right-click and select New > Login.
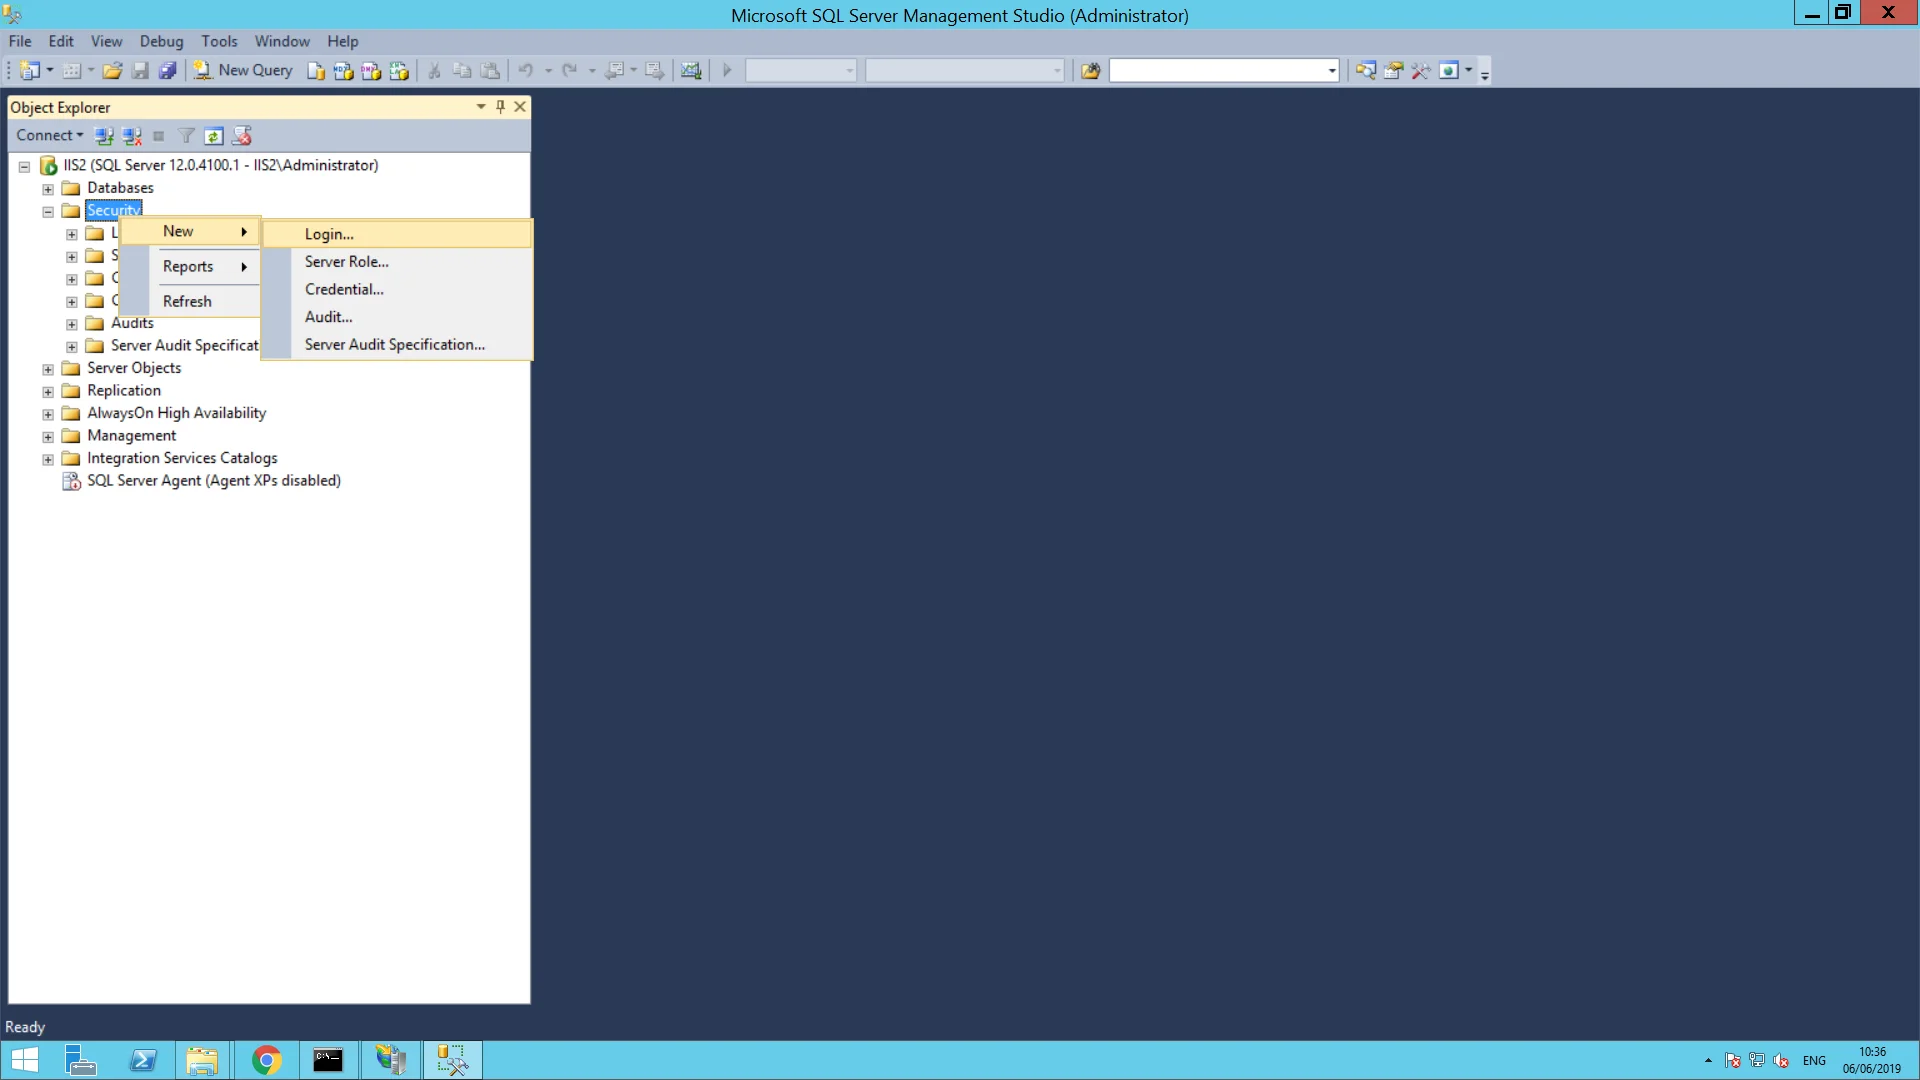
-
On the General page, enter the service account login name in the down-level logon format, such as
CONTOSO/identitymanagerContosoServer. If you're not sure about the correct spelling of your service account or domain, you can search for it using the search window. From the Login node, right-click and select New login > Login name > Search. -
Then, choose eitherWindows authentication if you chose to connect the server to the database with a Windows service account (Integrated Security=SSPI in the connection string) or a SQL Server authentication for a SQL Server account (if you set up the connection string with a login/password). In the SQL case, fill in the same password in the form as in the connection string. You should now see the newly created login in the Login list.
-
-
From the Login node, right-click the newly created login and select Properties.
-
Go to the Server Roles page on the left.
-
Make sure public is checked.
-
Go to User Mapping.
-
Make sure
Usercube/<Organization/>is checked (top panel), as well as db_owner and public (bottom panel). -
Right-click the Server root node and select Properties.
-
In the Permissions tab, select the service account or group name set up or found in Step 6 or 7.
-
Grant the Administer bulk operations permission.

-
Confirm with OK.
Usercube Server now has the required permissions to access the database.
Set the working directory permissions
The Usercube Server needs specific permissions on the working directory to run, read synchronization output, and write provisioning orders.
Up to four folders have to be considered:
- The working directory
- The
runtime
directory, usually
C:/identitymanager<Organization>/Runtime - The
data collection
directory, usually
C:/identitymanager<Organization>/Temp - The
provisioning orders
directory, usually
C:/identitymanager<Organization>/Temp(same as for the data collection directory).
The following steps can be performed for each of the relevant directories.
First, let's check what permissions the service account already has.
- Go to the working directory parent folder.
- Right-click the working directory.
- Select Properties.
- Select Security.
From there, you have two choices.
The Usercube Server service account that was chosen in the previous step:
-
Already has or belongs to a group that already has the needed permissions. There is nothing more to do.
-
Is missing one of the needed permissions:
-
Click on Edit.
-
Click on Add.
-
In the Enter the object names to select textbox, enter the service account name in the down-level logon format, such as
CONTOSO/identitymanagerContosoServer. -
Click OK.
-
Select the newly added user name in the Group or user names panel at the top of the window.

-
Check the
Allowcolumn for the relevant permissions. Check theDenycolumn for the others. -
Apply OK.
-
The working directory permissions are all set.
The same steps have to be performed on the runtime, the data collection and the provisioning orders directories.
Encryption and Authentication Key Pairs
The Usercube Server requires an RSA-2048 encryption key pair to perform various encryption operations, such as source, configuration, or log file encryptions. Usercube's Identity Server also needs an RSA-2048 authentication key pair for end-user authentication purposes.
These certificates don't need to be integrated into the target organization's Public Key Infrastructure (PKI) and don't require an expiration date. They're only relevant to specific Usercube temporary data and can be changed at any time.
Each RSA key pair, as in an X.509 public key certificate and a private key, can be stored one of two ways:
- As a PKCS #12 archive (also called
Personal Information Exchange file
or
.pfxfile) stored in the Server's host file system. The file contains both the public key certificate and the private key. - As a certificate from a Windows' certificate store identified by SubjectDistinguishedName or by Thumbprint. The Windows certificate also contains both the public key certificate and the private key. This is the recommended method.
The key pairs can be generated with tools such as OpenSSL or Microsoft's New-SelfSignedCertificateandpvk2pfx tool.
Here's an example showing how to generate a PKCS #12
archive (UsercubeContoso.pfx) bundling a public key certificate (usercubecontoso.cert) and an
RSA-2048 private key (usercubecontoso.key) with OpenSSL, with a 50-year expiration date:
openssl req -x509 -newkey rsa:2048 -keyout usercubecontoso.key -out usercubecontoso.cert -days 18250
openssl pkcs12 -export -out UsercubeContoso.pfx -inkey usercubecontoso.key -in usercubecontoso.cert
Public key certificates can also be bought from trusted certificate providers and bundled with a private key into a PKCS #12 archive using step 2 in the frame above.
Generate and use an encryption key pair
This is the key pair used to perform various encryption operations, such as source, configuration, or log file encryptions.
- Generate a key pair using the OpenSSL method.
- Store the key pair as a
.pfxfile or use the Windows certificate store (recommended) . - Link the generated certificate to Usercube (see
appsettings.json > EncryptionCertificate).
Generate and use an identity server key pair
This is the key pair used by the Identity Server for end-user authentication purposes.
- Generate a key pair using the OpenSSL method.
- Store the key pair as a .
pfxfile or use the Windows certificate store (recommended). - Link the generated certificate to Usercube (see
appsettings.json > IdentityServer).
Certificate as a plain file
The following parameters are used to link the file to Usercube in the IdentityServer section.
PKCS #12 archive can be
password protected,
hence the X509KeyFilePassword attribute.
Storing a .pfx file password in plain text in a production environment is strongly discouraged.
The password should always be encrypted using the
Usercube-Protect-CertificatePassword tool.
**appsettings.json**

{ ... "IdentityServer": { "X509KeyFilePath": "./identitymanagerContoso.pfx", "X509KeyFilePassword":
"eff@�%fmel/" } ... }
Certificate in the certificate store
The certificate can be stored in the certificate store instead of the file system. This is the recommended method.
    appsettings.json
{
...
"IdentityServer": {
"X509SubjectDistinguishedName":"UsercubeContoso",
"X509StoreLocation": "LocalMachine",
"X509StoreName": "AuthRoot"
}
...
}
Connect the Server to the Database
Now that the Usercube Server has been provided with a service account with the right permissions, let's finalize the setup.
The connection between the Server and the Database requires choosing an authentication method: Windows Authentication or SQL Server authentication. Windows authentication will require the IIS identity to be set to the custom Windows service account used to log in to the Usercube's Windows Server session. SQL authentication will work with both the built-in app pool identity and a custom service account. This authentication method will write the login and password directly in the connection string.
Runtime/appsettings.json is a
technical configuration
file that enables you to set up the connection between the Server and the Database through the
ConnectionString
attribute.
The connection string is set up in the Runtime/appsettings.json configuration file which can be
edited with any text editor, such as Notepad++.
If the SQL Server is hosted on Azure, you should use the AzureCredentials setting before going further.
In theRuntime/appsettings.json file, find or write the ConnectionString attributes following the
examples shown below:
The first example sets a connection string using the Windows authentication
(Integrated Security=SSPI) to connect, on a local SQL Server system (source=.), to the
UsercubeContoso database created in
Install the Database.
The service account used by the Server to access the Database is either:
- A Windows account if the connection string was set up using
Integrated Security=SSPI. - A SQL Server account if the connection string was set up with a login/password.
appsettings.json
{
...
"ConnectionString": "data source=.;Database=UsercubeContoso;Integrated Security=SSPI;Min Pool Size=10;encrypt=false;"
...
}
The second example sets a connection string using the SQL Server authentication.
CONTOSO/identitymanagerContosoServer has been set as the Usercube Server IIS website identity.
appsettings.json
{
...
"ConnectionString": "data source=.;Database=Usercube;User Id=CONTOSO/identitymanagerContosoServer;Password=myPassword;Min Pool Size=10;encrypt=false;"
...
}
SQL Server authentication stores plain text credentials in the configuration file. This is strongly discouraged. To avoid storing plain text credentials, you should always strive to use Windows authentication or encrypt sensitive setting values such as the connection string.
SSL Certificate
The Usercube Server requires the use of an SSL Certificate trusted by all the target end-users' browsers. The standard setup is to use a certificate signed by the target organization's PKI root Certificate Authority and import the certificate into the end-user's Windows Store.
This can be achieved using the Microsoft Management Console (MMC).
-
Open the MMC (Start > Run > MMC).
-
Click on File > Add/Remove Snap In.
-
Double-click on Certificates.
-
Click on Computer Account.
-
Click on Local Computer > Finish.
-
Click OK.
The Snap-in window closes.
-
Go to Certificates > Personal > Certificates.
-
Click
+. -
Right-click Certificates.
-
Go to All Tasks > Import.
-
Click Next.
-
Click Browse.
-
Browse to the SSL Certificate you want to use and click Next.
-
Select Automatically select the certificate store based on the type of certificate.
-
Click Finish and OK.
The certificate is now visible in IIS > Server Certificates.
DNS
Your organization's DNS needs to be updated according to the requirements indicated in Hostname and DNS.
Test Your Installation
- Make sure the IIS site is running.
- Go to the following URL with a browser:
<hostname>:<port>/hcwith the hostname and port set up in Create an IIS website. - The Usercube Server is trying to access the Database. If it succeeds, the message "Healthy" should be displayed in the browser.
Configure the Starting Mode in IIS (optional)
This step is important if the scheduler is enabled. IIS starts the Usercube Server only if an incoming http request is made on the server and the scheduler is not launched until the Usercube Server is started. Because of that, you need to carefully set up the starting mode of IIS to force the starting of the Usercube Server.
The Usercube Server warm up is done using the <applicationInitialization> element in the
web.config file, the configuration is described here:
https://docs.microsoft.com/en-us/iis/get-started/whats-new-in-iis-8/iis-80-application-initialization
You need to:
- Enable the Application Initialization feature
- Modify the applicationHost.config file to set the startMode of the application pool as AlwaysRunning. You also need to set the preloadEnabled of your application set to true. It is advised to backup the applicationHost.config file when doing this step to prevent mistakes
- Double check that the following section is set in your web.config file, in the section system.webServer:
<applicationInitialization doAppInitAfterRestart="true">
  <add initializationPage="/" />
</applicationInitialization>
Once done, you need to check that the configured jobs are launched via the Usercube's scheduler without having to manually issue a request on the Usercube Server.
If this is not correctly configured, any restart of your IIS or application pool could prevent jobs from being launched.
Set up End-User Authentication
The next step consists in setting up one or more authentication methods for end-users. You may choose one or several external authentication providers among the following:
Everything you need to know about setting up authentication is provided in the Technical Configuration Guide.
What's Next?
Install the Agent is the next step of the process.