Query Designer Policy
You can define a role-based access policy for the Query Designer. Using the Query Designer, users can create queries for various purposes, as discussed in the Specify Smart Group Query Attributes topic.
The Query Designer policy enables you to restrict the following Query Designer features for a security role:
- Policy application on new groups or on existing groups as well.
- The Start In container - Specify container(s) that will be displayed to role members on the Query Designer. Queries created by role members cannot run beyond the specified containers. You can also enforce the allowed containers so that role members cannot change them.
- Object types - Limit the object types that will be available to role members for including in queries. You can also enforce the allowed object types, so that role members cannot exclude any of them from queries.
- Tabs on the Query Designer - The Query Designer has multiple tabs and all of them are available to users by default. You can choose to hide any of these tab from role members.
- Attributes and their respective operators. - Specify the attributes that will be available to role members for building queries for Smart Groups and Dynasties. For each attribute, you can also specify the operators that role members can apply to it.
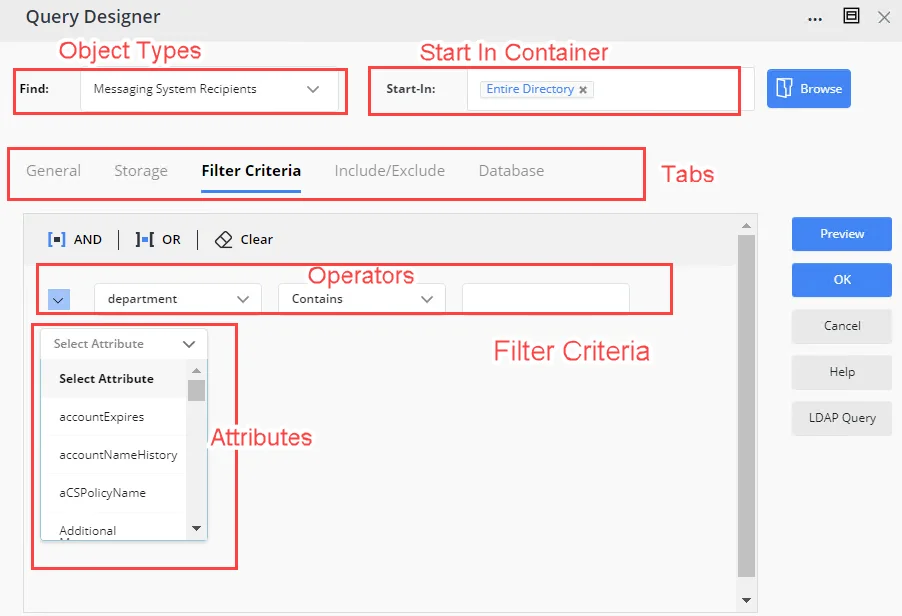
You can also specify a default filter criterion, involving an attribute, an operator, and a value, that will be displayed to users on the Filter Criteria tab of the Query Designer. Role members can change this criterion as required.
If you already have restricted some schema attributes for the Query Designer pages in portal, those settings will be override by the schema attribute settings specified here.
What do you want to do?
- Apply the Policy to Groups
- Limit the Search Scope of the Query to Specific Containers
- Limit the Objects for Use in a Query
- Hide the Tabs on the Query Designer
- Restrict the Attributes and Operators for Building a Query
- Specify a Default Filter Criteria
Apply the Policy to Groups
You can specify whether the defined role-based access policy for the Query Designer is to be applied on the newly created groups (Smart Groups and dynaasties) in GroupID 11.1 only or to all existing groups as well.
To apply the policy on groups:
-
In Admin Center, click Identity Stores in the left pane.
-
On the Identity Stores page, click the ellipsis button for an identity store and select Edit.
-
Click Security Roles under Settings in the left pane.
-
On the Security Roles page, click Edit for a security role.
-
On the Edit Security Role page, click Specify policies for the members in the Policies area.
-
On the Add Policies pane, click the Query Designer tab.
-
On the Query Designer tab:
-
enable the Apply policy only to newly created groups toggle button to apply the policy on the new groups created in GroupID 11.1.
Let's say the following policy is defined for a user role:
Start In Container: Users
Enforce Start In Containers: Enabled
Objects: Users with Mailboxes
Users with External Email-Address
Objects: Users
Enforce Objects: Enabled
Default filter Criteria: Department is exactly HR
When a user of this role creates a new group the policy is applied on it.
-
disable the Apply policy only to newly created groups toggle button to apply the policy on the existing groups as well.
After some time, if you enable the option again for the user role, the policy (with or without any modification) will no longer be applied to the existing groups. All the Query Designer configurations will be available to the user for the existing groups.
-
Limit the Search Scope of the Query to Specific Containers
By default, all containers in the directory and all their sub-containers are displayed in the Start In field on the Query Designer, indicating that the query will run on the entire directory to fetch matching objects. Users can exclude any container or sub-container, though.
You can restrict the search scope of the query to one or more containers and sub-containers for role members. Specify the containers and sub-containers to be displayed in the Start In field on the Query Designer dialog box. You can also enforce the container(s) so that role members cannot remove a container or sub-container.
To specify container(s):
-
In Admin Center, click Identity Stores in the left pane.
-
On the Identity Stores page, click the ellipsis button for an identity store and select Edit.
-
Click Security Roles under Settings in the left pane.
-
On the Security Roles page, click Edit for a security role.
-
On the Edit Security Role page, click Specify policies for the members in the Policies area.
-
On the Add Policies pane, click the Query Designer tab.
-
On the Query Designer tab, the Start In Container area lists each container and sub-container in the directory individually, indicating that the entire directory is set as the Start In container.
- To remove a container or sub-container, click Remove for it.
- To modify the list of allowed containers, click Modify Container. On the Modify Container dialog box, select the required containers and sub-containers, and click OK. The selected containers are displayed in the Start In Container area.
You can allow a sub-container even if you do not allow its parent container. In this case, the query will run in the sub-container but not in the parent container.
-
Use the Enforce Start In Containers toggle button to enforce the start-in containers.
- When you enforce the allowed containers, they will be displayed as disabled in the Start In field on the Query Designer. Role members will not be able to change this setting.
- When not enforced, role members can remove any of the allowed containers but they cannot add a container beyond the allowed ones.
-
Click OK.
-
On the Edit Security Role page, click Update Security Role.
-
On the Security Roles page, click Save.
Limit the Objects for Use in a Query
By default, several object types are available to users on the Query Designer for including in queries. Users select an object type from the Find drop-down list and then select its sub-types on the General tab of the Query Designer. The query returns the specified object types to include in group membership. The object types and their sub-types are discussed in the Query Designer - General tab topic.
You can limit the object types available to role members for use in queries. You can also enforce the object types so that role members cannot exclude an allowed object type from queries.
To limit object types:
-
In Admin Center, click Identity Stores in the left pane.
-
On the Identity Stores page, click the ellipsis button for an identity store and select Edit.
-
Click Security Roles under Settings in the left pane.
-
On the Security Roles page, click Edit for a security role.
-
On the Edit Security Role page, click Specify policies for the members in the Policies area.
-
On the Add Policies pane, click the Query Designer tab.
-
The Objects area lists the object types with their sub-types. Here is a mapping of the object types displayed here with the options in the Find list on the Query Designer:
- Exchange = Messaging System Recipients
Note that the sub-types displayed under Exchange are the same as displayed on the General tab when you select Messaging System Recipients in the Find drop-down list. - Computer = Computers
- All = Users, Contacts and Groups
Select the check boxes for the object sub-types that you want to display to role members in the Query Designer.
- Exchange = Messaging System Recipients
-
Use the Enforce Objects toggle button to enforce the allowed objects.
- When you enforce the allowed object types, they will be displayed as disabled in the Query Designer. Role members will not be able to exclude any object type; hence all the allowed object types will be included in the query.
- When not enforced, role members can exclude any of the allowed object types but there is no option to include an object type beyond the allowed ones.
-
Click OK.
-
On the Edit Security Role page, click Update Security Role.
-
On the Security Roles page, click Save.
Hide the Tabs on the Query Designer
The Query Designer has multiple tabs, where each tab groups similar settings. These tabs are:
- General - select the object types to include in the query
- Storage - filter mailboxes
- Filter Criteria - specify a filter criteria to add objects to group membership
- Include/Exclude - specify objects to include or exclude in group membership, regardless of the query
- Database - combine an external data source with the directory to determine a group's membership
- Script - write scripts to manipulate group membership
- Password Expiry Options - available for Smart Groups with a password expiry condition
You can hide any of these tabs from role members.
NOTE: The General tab is displayed to all users and cannot be hidden. However, you can hide the objects displayed on it, as discussed in the Limit the Objects for Use in a Query topic.
To hide a tab:
- In Admin Center, click Identity Stores in the left pane.
- On the Identity Stores page, click the ellipsis button for an identity store and select Edit.
- Click Security Roles under Settings in the left pane.
- On the Security Roles page, click Edit for a security role.
- On the Edit Security Role page, click Specify policies for the members in the Policies area.
- On the Add Policies pane, click the Query Designer tab.
- The Tabs area lists the tabs available on the Query Designer, except the General tab. By
default, all tabs are selected, indicating that they are displayed to role members.
Clear the check box for a tab to hide it from role members. - Click OK.
- On the Edit Security Role page, click Update Security Role.
- On the Security Roles page, click Save.
Restrict the Attributes and Operators for Building a Query
By default, all schema attributes are displayed to role members for creating a filter criterion for the query (see the Filter Criteria tab of the Query Designer). You can:
- limit the list of attributes to be displayed to role members
- limit the operators that role members can apply to an attribute
To allow specific attributes and operators:
-
In Admin Center, click Identity Stores in the left pane.
-
On the Identity Stores page, click the ellipsis button for an identity store and select Edit.
-
Click Security Roles under Settings in the left pane.
-
On the Security Roles page, click Edit for a security role.
-
On the Edit Security Role page, click Specify policies for the members in the Policies area.
-
On the Add Policies pane, click the Query Designer tab.
-
Click Edit Allowed Attributes in the Attributes area.
The Allowed Attributes dialog box is displayed. By default, all attributes are selected. This indicates that all attributes are available to role members on the Filter Criteria tab of the Query Designer for creating queries.- Clear the check boxes for the attributes that you do not want to display to role members. Use the search box to search for your required attributes.
- You can also clear the Allow all attributes check box to deny all attributes, then select the check boxes for the required attributes. At least one attribute must be selected.
-
For each attribute, you can specify the operator(s) that can be applied to the attribute on the Filter Criteria tab.
On the Allowed Attributes dialog box, click the plus sign next to an attribute and select the check box for the operators you want to provide for the attribute. When role members select an attribute, only the respective operators will be displayed for it. For example, if you allow the ‘Contains’ and ‘Equals’ operators for the ‘cn’ attribute, then only these operators will be displayed when role members select the ‘cn’ attribute.NOTE: This schema attribute setting will override the schema attribute setting specified on the Smart Group Attribute page in portal's design settings. See the Specify Smart Group Query Attributes topic.
-
Click Save Selection on the Allowed Attributes dialog box. The Attributes area displays the allowed attributes count.
To view or update the allowed attributes, click Edit Allowed Attributes. On the Allowed Attributes dialog box, select the Show only selected check box to get a list of the allowed attributes. Make the desired changes and close the dialog box. -
Click OK.
-
On the Edit Security Role page, click Update Security Role.
-
On the Security Roles page, click Save.
Specify a Default Filter Criteria
Role members can specify a filter criterion on the Filter Criteria tab of the Query Designer to determine a group's membership. This criteria is created using an attribute, operator, and a value. For example, the following criterion will add the users in the Human Resources department to the membership of the group.
Attribute: department
Operator: Equals
Value: Human Resources
You can specify a default criteria, that will be displayed to role members on the Filter Criteria tab. They can change it as required
NOTE: If you have limited the attributes and operators for role members, then only the allowed attributes and operators are available to create a default filter criteria.
To specify a default filter criteria:
-
In Admin Center, click Identity Stores in the left pane.
-
On the Identity Stores page, click the ellipsis button for an identity store and select Edit.
-
Click Security Roles under Settings in the left pane.
-
On the Security Roles page, click Edit for a security role.
-
On the Edit Security Role page, click Specify policies for the members in the Policies area.
-
On the Add Policies pane, click the Query Designer tab.
-
Click Add Filter in the Default Filter Criteria area. A row is displayed for adding a default criterion.
- Select a schema attribute in the first drop-down list (for example, title).
- Select an operator in the second drop-down list (for example, Equals).
- Enter a value for the attribute in the third box (for example, Manager).
With this filter, the query would fetch users whose job titles are set to Manager. Role members can change it as required.
-
You can also create an advanced query by adding more rows and applying the AND or OR operator to group them. See steps 1-2 in the Advanced Filter section of the Designate a Criterion for the Search Scope topic.
After creating a query, you can:- Click Preview to get a list of the objects fetched by the query created by the current settings on the Query Designer tab, namely the start-in container, objects, and default filter criteria.
- Click Clear to delete the default filter criteria.
-
Click OK on the Query Designer tab.
-
On the Edit Security Role page, click Update Security Role.
-
On the Security Roles page, click Save.
See Also