Customize the Navigation Bar
The left navigation bar in a portal lists nodes that enable users to navigate in the portal: These nodes are:
- Create New
- Dashboard
- Groups
- Users
- Requests
- History
- Entitlement
- Synchronize
- Reports
On expanding a node, its sub-nodes are displayed. On clicking a sub-node, users are redirected to a page that contains tabs under that sub-node. It is as:
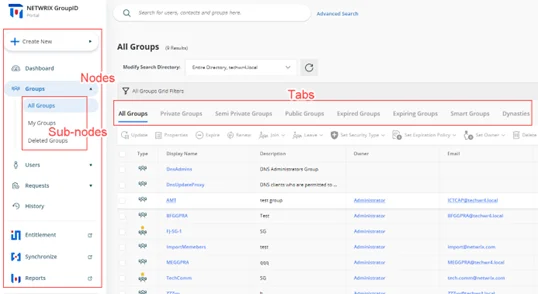
GroupID enables you to customize the nodes, sub-nodes, and their respective tabs.
What do you want to do?
At the node level:
- Add a Node (Category)
- Update the Details of a Node
- Rearrange the Nodes on the Navigation Bar
- Remove a User-defined Node
At the sub-node level:
- Add a Sub-node to a Node
- Update the Details of a Sub-node
- Rearrange the Sub-nodes for a Node
- Remove a Sub-node from a Node
At the tab level:
Add a Node (Category)
The following nodes have been defined by default on the navigation bar:
| Category (Node) | Mapped To |
|---|---|
| Create New | The Create New button on the portal’s navigation bar. It has four buttons as its sub-nodes: Group, User, Mailbox, and Contact. Sub nodes do not have tabs. |
| High Priority | The Dashboard node on the navigation bar. It has one sub-node, Dashboard, with no tab. |
| Groups | The Groups node on the navigation bar. It has four sub-nodes: All Groups, My Groups, Transfer Ownership, and Deleted Groups. All except the Transfer Ownership sub-node have tabs. |
| Users | The Users node on the navigation bar. It has two sub-nodes: My Direct Reports and Linked Accounts. Only the My Direct Reports sub-node has tabs. |
| Requests | The Requests node on the navigation bar. It has three sub-nodes: All Requests, My Requests, and Request Inbox. Sub nodes do not have tabs. |
| Others | The History node on the navigation bar. It has one sub-node, History, that has tabs. |
| External Links | The Entitlement, Synchronize, and Reports nodes on the navigation bar. It has three sub-nodes, Entitlement, Synchronize, and Reports, that can be modified to a limited extent. You cannot manage the tabs or other options displayed under these nodes in the portal. |
Note the following:
- The Create New, High Priority, Others, and External Links nodes cannot be edited or removed.
- You can add and remove sub-nodes for nodes; however, you cannot add sub-nodes for the Create New node.
- You cannot add tabs to sub-nodes; only edit and remove tabs that exist by default.
To add a node:
-
In Admin Center, select Applications in the left pane.
On the GroupID Portal tab, a portal's card displays its info. -
Click the ellipsis button for a portal and select Settings.
-
Select an identity store under Design Settings to customize the portal for it.
All identity stores linked with the portal are listed under Design Settings. You can design a different portal for each of these. -
Click Navigation Bar in the left pane.
The Navigation Bar page has two tabs: the Navigation Bar Categories tab is used to manage nodes while the Navigation Bars tab is used to manage sub-nodes and their respective tabs. -
Click Navigation Bar Categories to define a new node.
-
On the Navigation Bar Categories tab, click Add. The Add Navigation Category pane is displayed.
-
Enter a name for the node in the Title box. The node will be displayed with this name on the navigation bar.
-
In the Access Level drop-down list, select a security role. The node would be visible to users of this role and roles with a priority value higher than this role. For all other users, the node would be hidden. See Priority.
Select Never to hide the node for all users. -
In the Tooltip Text box, enter the text to appear when a user hovers the mouse over the node.
-
Use the Icon Class box to upload the image (icon) to be displayed with the node name.
-
If no image is uploaded, click Save to browse and select an image for upload.
-
If an image has been uploaded, the very image is displayed. Click the icon below the image to replace the existing image with a new one.
NOTE: Image dimensions: 30 x 30 pixels
Supported formats: .webp, .jpg, .jpe, .jpeg
-
-
Click OK.
-
Click Save on the Navigation Bar page.
Update the Details of a Node
You can update the following details for the Groups, Users, and Requests nodes on the portal’s navigation bar:
- Node name
- Access level
- Tooltip text
- Node icon
The Create New, High Priority, Others, and External Links nodes cannot be modified.
To update a node:
- In Admin Center, select Applications in the left pane.
On the GroupID Portal tab, a portal's card displays its info. - Click the ellipsis button for a portal and select Settings.
- Select an identity store under Design Settings to customize the portal for it.
All identity stores linked with the portal are listed under Design Settings. You can design a different portal for each of these. - Click Navigation Bar in the left pane. Then click the Navigation Bar Categories tab.
- On the Navigation Bar Categories tab, click Edit for a node to update it.
The Edit Navigation Category pane is displayed. Follow step 7 and onwards in the Add a Node (Category) topic to update node details.
Rearrange the Nodes on the Navigation Bar
- In Admin Center, select Applications in the left pane.
On the GroupID Portal tab, a portal's card displays its info. - Click the ellipsis button for a portal and select Settings.
- Select an identity store under Design Settings to customize the portal for it.
All identity stores linked with the portal are listed under Design Settings. You can design a different portal for each of these. - Click Navigation Bar in the left pane. Then click the Navigation Bar Categories tab. The Navigation Bar Categories tab is displayed.
- To rearrange the nodes on the navigation bar, click the equal sign for a node and drag to change
its position.
You can move all except the Create New node. - Click Save.
Remove a User-defined Node
You can delete user-defined nodes on the portal’s navigation bar. System-defined nodes cannot be deleted.
To delete a node:
- In Admin Center, select Applications in the left pane.
On the GroupID Portal tab, a portal's card displays its info. - Click the ellipsis button for a portal and select Settings.
- Select an identity store under Design Settings to customize the portal for it.
All identity stores linked with the portal are listed under Design Settings. You can design a different portal for each of these. - Click Navigation Bar in the left pane. Then click the Navigation Bar Categories tab.
- On the Navigation Bar Categories tab, click Remove for a node to delete it.
- Click Save.
Add a Sub-node to a Node
You can customize the nodes on the portal’s navigation bar by defining sub-nodes for them. Note that:
- You cannot add sub-nodes to the Create New node.
- You cannot add tabs to a sub-node.
To define a sub-node:
-
In Admin Center, select Applications in the left pane.
On the GroupID Portal tab, a portal's card displays its info. -
Click the ellipsis button for a portal and select Settings.
-
Select an identity store under Design Settings to customize the portal for it.
All identity stores linked with the portal are listed under Design Settings. You can design a different portal for each of these. -
Click Navigation Bar in the left pane. The Navigation Bar page is displayed with the Navigation Bars tab selected by default.
-
In the Select Navigation Bar Type drop-down list, select a node on the portal’s navigation bar; its sub-nodes get listed under Name.
-
To add a sub-node to the selected node, click Add .The Add Link pane is displayed.
-
In the Tab Name box, enter a name for the sub-node.
-
In the Display Text box, enter the text to display as the sub-node name on the navigation bar.
-
In the Tooltip Text box, enter the text to appear when a user hovers the mouse over the sub-node.
-
Use the Icon Class box to upload the image (icon) to be displayed with the sub-node name. See step 10 in the Add a Node (Category) topic for details.
The facility to upload an image is not available for sub-nodes under Groups. Users, Requests, and External Links. -
In the URL box, provide the URL of a webpage to link to this sub-node. The respective webpage will be displayed when users click the sub-node in the portal.
Use the following formats to specify the URL:- To link a page from within the GroupID portal template:
GroupManagement/Groups/MyGroups - To link to an external webpage:
https://www.xyz.com.
Click View in Browser to preview the webpage.
- To link a page from within the GroupID portal template:
-
Select the Open in new tab check box to open the linked page in a new tab in the browser.
If you do not select it, users will directly navigate to the linked page. They will have to use the browser’s back button to return to the previous page. -
In the Access Level drop-down list, select a security role. The sub-node would be visible for users of this role and roles with a priority value higher than this role. For all other users, the sub-node would be hidden. See Priority.
Select Never to hide the sub-node for all users. -
Click OK.
-
Click Save on the Navigation Bar page.
Update the Details of a Sub-node
You can change the following for a sub-node:
- The name of the sub-node
- The display name of the sub-node (this is the sub-node’s name on the portal’s navigation bar)
- The tooltip text for the sub-node
- The URL of the webpage that opens when a user clicks the sub-node
- Access level
To update sub-node properties:
- In Admin Center, select Applications in the left pane.
On the GroupID Portal tab, a portal's card displays its info. - Click the ellipsis button for a portal and select Settings.
- Select an identity store under Design Settings to customize the portal for it.
All identity stores linked with the portal are listed under Design Settings. You can design a different portal for each of these. - Click Navigation Bar in the left pane. The Navigation Bar page is displayed with the Navigation Bars tab selected by default.
- In the Select Navigation Bar Type drop-down list, select a node on the portal’s navigation bar; its sub-nodes get listed under Name.
- Click Edit for a sub-node to update its properties; the Edit Link pane is displayed.
- Follow steps 7-14 in the Add a Sub-node to a Node topic to update
the required information and save it.
The Links section is displayed for system-defined nodes only. Use it to manage the tabs for a sub-node.
Rearrange the Sub-nodes for a Node
- In Admin Center, select Applications in the left pane.
On the GroupID Portal tab, a portal's card displays its info. - Click the ellipsis button for a portal and select Settings.
- Select an identity store under Design Settings to customize the portal for it.
All identity stores linked with the portal are listed under Design Settings. You can design a different portal for each of these. - Click Navigation Bar in the left pane. The Navigation Bar page is displayed with the Navigation Bars tab selected by default.
- In the Select Navigation Bar Type drop-down list, select a node on the portal’s navigation bar; its sub-nodes get listed under Name.
- To rearrange the sub-nodes under the selected node, click the equal sign for a sub-node and drag to change its position.
- Click Save.
Remove a Sub-node from a Node
- In Admin Center, select Applications in the left pane.
On the GroupID Portal tab, a portal's card displays its info. - Click the ellipsis button for a portal and select Settings.
- Select an identity store under Design Settings to customize the portal for it.
All identity stores linked with the portal are listed under Design Settings. You can design a different portal for each of these. - Click Navigation Bar in the left pane. The Navigation Bar page is displayed with the Navigation Bars tab selected by default.
- In the Select Navigation Bar Type drop-down list, select a node on the portal’s navigation bar; its sub-nodes get listed under Name.
- Click Remove for a sub-node to remove it. This also removes all tabs defined for the sub-node.
- Click Save.
Update Tab Properties
You can modify the following for a tab:
- The name of the tab
- The display name of the tab (the tab is displayed in the portal with this name)
- Tooltip text
- The URL of the webpage that opens when a user clicks the tab
- Access level
To update tab properties:
-
In Admin Center, select Applications in the left pane.
On the GroupID Portal tab, a portal's card displays its info. -
Click the ellipsis button for a portal and select Settings.
-
Select an identity store under Design Settings to customize the portal for it.
All identity stores linked with the portal are listed under Design Settings. You can design a different portal for each of these. -
Click Navigation Bar in the left pane. The Navigation Bar page is displayed with the Navigation Bars tab selected by default.
-
In the Select Navigation Bar Type drop-down list, select a node on the portal’s navigation bar; its sub-nodes get listed under Name.
-
Click Edit for a system-defined sub-node. On the Edit Link pane, the Links area lists the tabs for the sub-node (in case the sub-node has tabs).
-
Click Edit for a tab to edit it.
-
On the Edit Link pane (for the tab), update the required information and click OK:
- Link Name – The name of the tab.
- Display Text – The text displayed as the tab name in the portal.
- Tooltip Text – The text that appears when a user hovers the mouse over the tab.
- URL – The address of the webpage to display when a user clicks the tab.
- Access Level – Select a security role. The tab would be visible to users of this role and
roles with a priority value higher than this role. For all other users, the tab would be
hidden. See
Priority.
Select Never to hide the tab for all users.
-
Click OK twice on the Edit Link pane.
-
Click Save on the Navigation Bar page.
Rearrange the Tabs for a Sub-node
- In Admin Center, select Applications in the left pane.
On the GroupID Portal tab, a portal's card displays its info. - Click the ellipsis button for a portal and select Settings.
- Select an identity store under Design Settings to customize the portal for it.
All identity stores linked with the portal are listed under Design Settings. You can design a different portal for each of these. - Click Navigation Bar in the left pane. The Navigation Bar page is displayed with the Navigation Bars tab selected by default.
- In the Select Navigation Bar Type drop-down list, select a node on the portal’s navigation bar; its sub-nodes get listed under Name.
- Click Edit for a system-defined sub-node. On the Edit Link pane, the Links area lists the tabs for the sub-node (in case the sub-node has tabs).
- To change the order in which tabs are displayed in the portal, click the equal sign for a tab and drag to change its position.
- Click OK.
- Click Save on the Navigation Bar page.
Remove a Tab from a Sub-node
- In GroupID Admin Center, select Applications in the left pane.
On the GroupID Portal tab, a portal's card displays its info. - Click the ellipsis button for a portal and select Settings.
- Select an identity store under Design Settings to customize the portal for it.
All identity stores linked with the portal are listed under Design Settings. You can design a different portal for each of these. - Click Navigation Bar in the left pane. The Navigation Bar page is displayed with the Navigation Bars tab selected by default.
- In the Select Navigation Bar Type drop-down list, select a node on the portal’s navigation bar; its sub-nodes get listed under Name.
- Click Edit for a system-defined sub-node. On the Edit Link pane, the Links area lists the tabs for the sub-node (in case the sub-node has tabs).
- Click Remove for a tab to remove it.
- Click OK.
- Click Save on the Navigation Bar page.
See Also