Cloud Policy Setup Wizard
Step 1 – New Policy: Use the Actions button to start a new Cloud Tracker system setup.
Step 2 – Cloud Report Template: Change Tracker filters these templates to show only the Cloud reports available in your system.
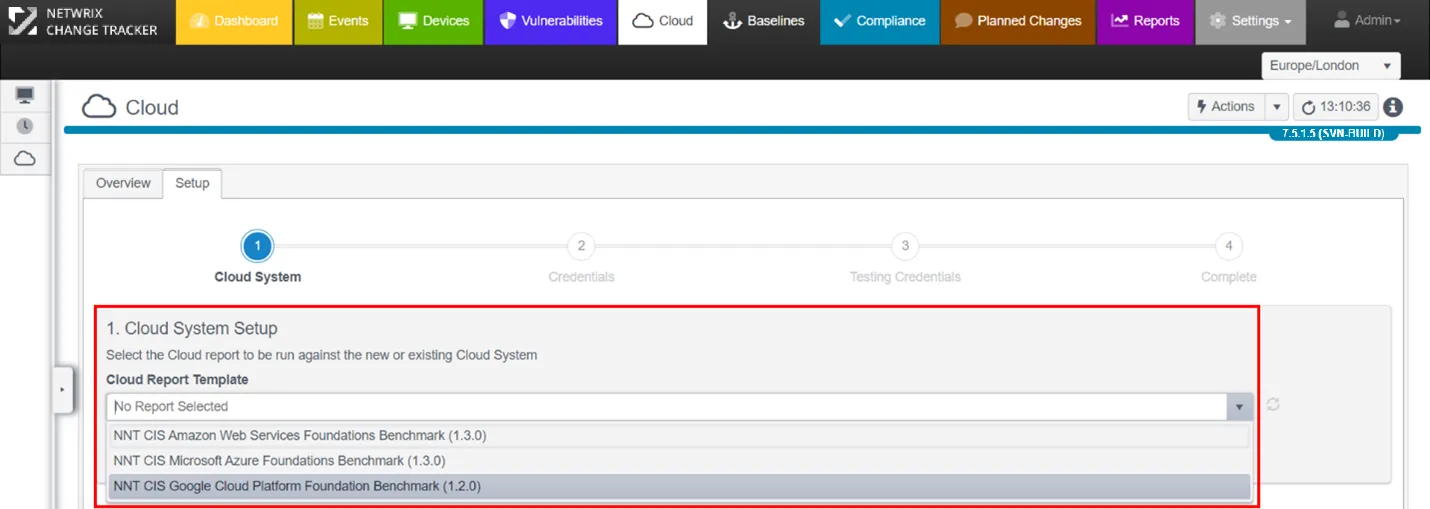
Step 3 – Create a new Cloud System and Credentials: The Cloud Setup Wizard is context-sensitive, so the Cloud Platform you select determines which Credentials dialog appears next.
Google Cloud Platform Credentials example:
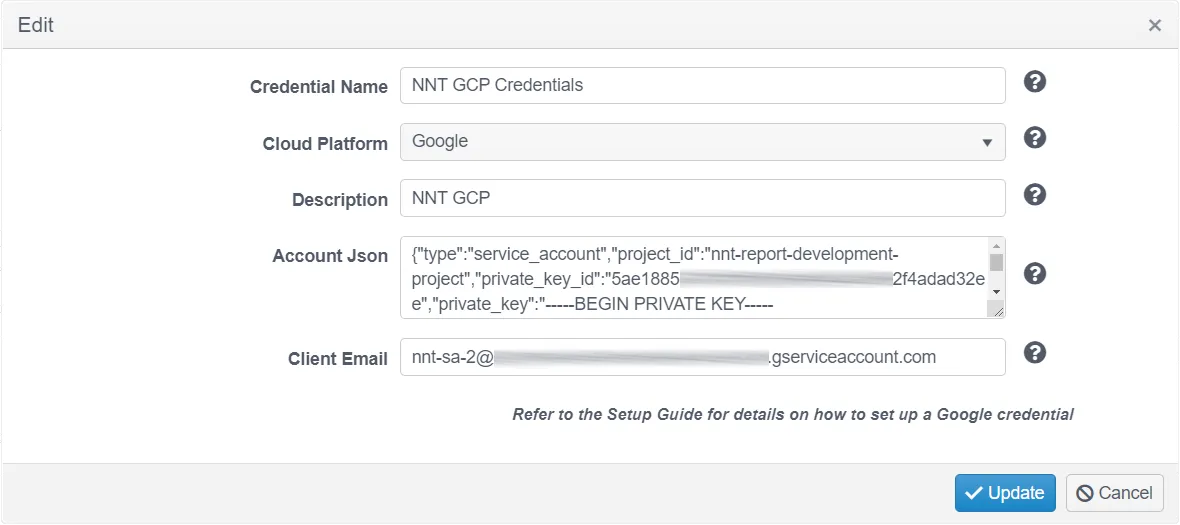
Click the Query icon to get a quick tip on what the Credential field requires.
- Credential Name – Enter a name to uniquely identify these credentials
- Cloud Platform – Select from the dropdown options presented
- Description – Optionally provide a credential description
After you enter Credentials, Change Tracker automatically selects an Agent to run the Cloud Compliance Report from, then runs a test of the Credentials. By default, Change Tracker selects the local Agent on the Hub Server.
This must always be the latest Net Core Gen 7 Agent. See the Netwrix Support site for more details.
After the Credentials test completes, you can change this using the links that appear. If the Credentials aren't working for any reason, you can edit them and verify you entered them correctly.
Managing Cloud security credentials is more complex than managing standard access credentials for regular servers and hypervisors, so contact Netwrix Support if you need help.
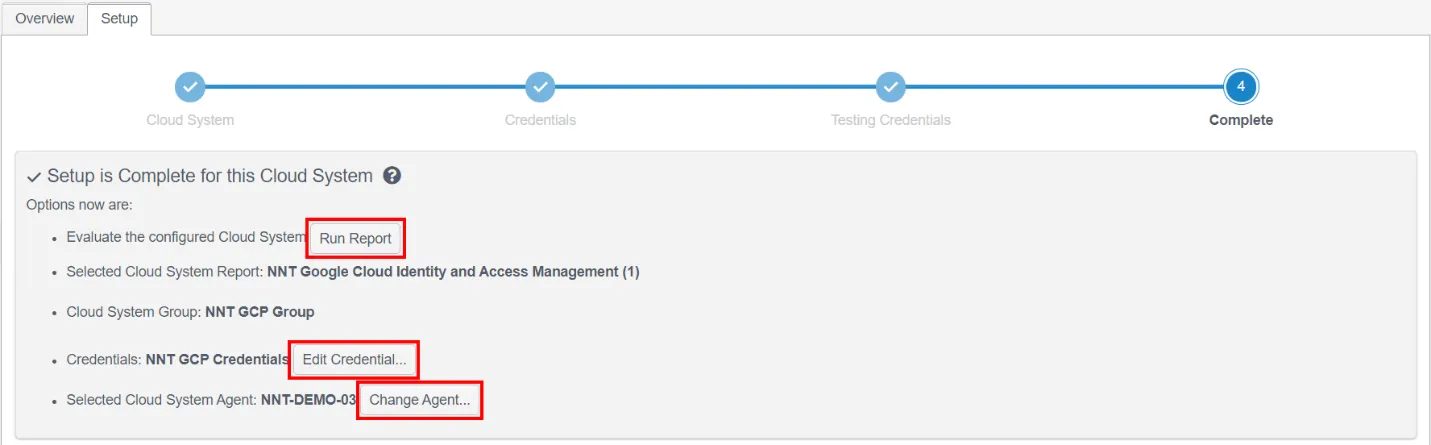
At this point, you're ready to run your first Cloud Compliance Report. Click Run Report.
AWS Platform Credentials Example:
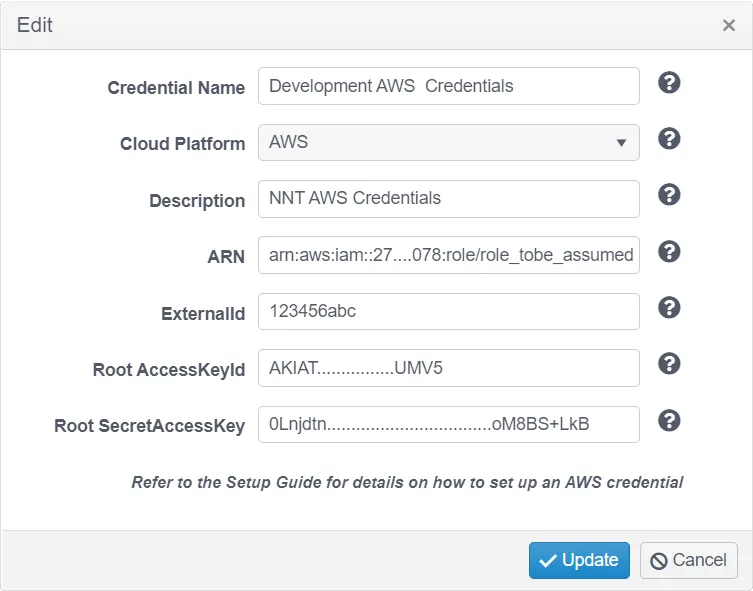
- Credential Name – Enter a name to uniquely identify these credentials
- Cloud Platform – Select from the dropdown options presented
- Description – Optionally provide a credential description
- ARN – AWS Resource Name of a role a user can assume when establishing a trust relationship
- ExternalId – An Id used in establishing the trust relationship
- Root AccessKeyId – The Access Key Id of the AWS user for whom you establish the trust relationship
- Root SecretAccessKey – The Access Key Secret of the AWS user for whom you establish the trust relationship
Special Instructions for AWS Cloud Reporting
The NNT Cloud Tracker feature set uses the Microsoft PowerShell cmdlets for AWS.
You may experience a failure message after the Credentials Test has run: "Can't execute AWS commands, error: The specified module 'AWSPowerShell. NETCore wasn't loaded because no valid module file was found in any module directory".
In this case, run the following PowerShell setup on the host running the Gen7Agent NETCore used for Cloud Tracker work:
Step 1 – Install PowerShell NETCore version 7.x (this isn't the old PowerShell packaged with Windows, but a new cross-platform version based on NETCore). See the Microsoft Installing the MIS package article for additional information.
Although the agent provides its own PowerShell scripting, you must install this NETCore version of PowerShell so that you can install the various AWS, Azure, and other PowerShell core support libraries. Some Change Tracker reports use these libraries to collect data from the cloud environments.
Step 2 – Install AWS Cmdlets for use in AWS compliance reports. Run the following in the PowerShell NETCore command prompt (PowerShell 7 (x64) Start menu item, Run As Administrator).
Install-Module -name AWSPowerShell.NetCore -scope AllUsers
Azure Platform Credentials Example:
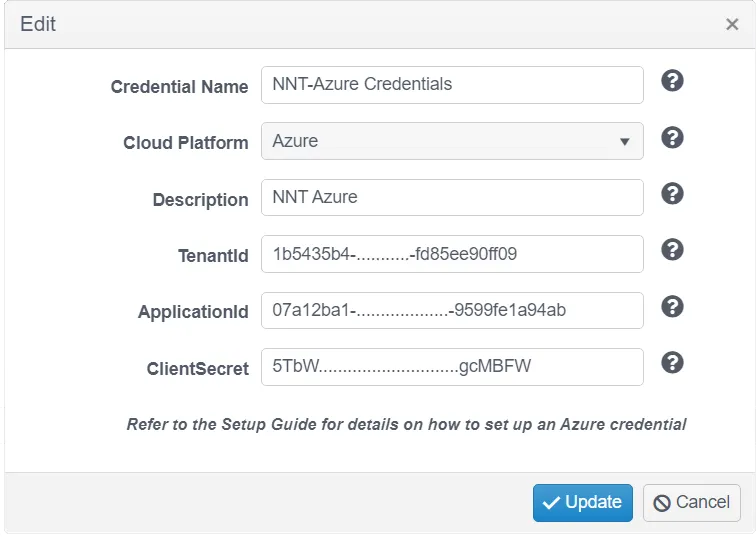
- Credential Name – Enter a name to uniquely identify these credentials
- Cloud Platform – Select from the dropdown options presented
- Description – Optionally provide a credential description
- Tenant ID – From the Azure portal, click properties and copy the Tenant Id
- Application ID – The Azure application (client) ID
- ClientSecret – The application client secret
Special Instructions for Azure Cloud Reporting
The NNT Cloud Tracker feature set uses the Microsoft PowerShell cmdlets for AWS.
You may experience a failure message after the Credentials Test has run: "Can't execute Az commands, error on Import-Module: The specified module 'Az' wasn't loaded because no valid module file was found".
In this case, run the following PowerShell setup on the host running the Gen7Agent NETCore used for Cloud Tracker work:
Step 1 – Install PowerShell NETCore version 7.x (this isn't the old PowerShell packaged with Windows, but a new cross-platform version based on NETCore). See the Microsoft Installing the MIS package article for additional information.
Although the agent provides its own PowerShell scripting, you must install this NETCore version of PowerShell so that you can install the various AWS, Azure, and other PowerShell core support libraries. Some Change Tracker reports use these libraries to collect data from the cloud environments.
Step 2 – Install Azure Cmdlets for use in Azure compliance reports. Run the following in the PowerShell NETCore command prompt (PowerShell 7 (x64) Start menu item, Run As Administrator):
Install-Module -name Az -scope AllUsers