Device Groups
Click a Device Group to edit the assigned Device Tracking template and Compliance Report, and to set the reporting schedule. Contact Netwrix Support for more help.
- To create a new Device Tracking template, use the Configuration Templates page;
- Assigning more than one Device Tracking Policy to a Device Group results in a single merged policy;
- To create a new Compliance Report template, use the Compliance Report Templates page;
- To add additional Compliance Reports to a Device Group, click the Schedule a New Report button;
- Use the ‘Group Name’ box to search and filter Device Groups shown.

Click a Device Group name to configure further attributes for the Group, such as:
- Device Tracking Policy
- Compliance Reports
- Group Members, with the option to export a list of members
- Define the schedule for Agent Updates

Agent Discovery/Registration Process
An Agent is a highly automated piece of software with extensive capabilities for monitoring and reporting on your secure endpoints.
The controlling system must securely govern the agent, and registering and driving the agent involves a range of operations.
First Run – HubDetails.xml File
The Hub controls the Agent configuration settings during operations, but the initial registration necessitates a basic configuration file for registration with the Hub.
The HubDetails.xml file includes details unique to your deployment of Netwrix Change Tracker, so it requires your intervention to ensure the settings are correct.
The key tags within the file are as follows:
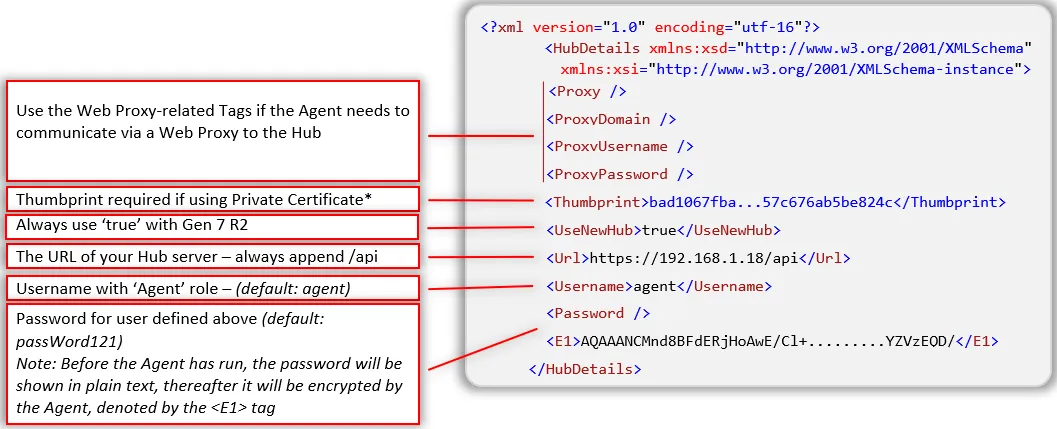
*The Thumbprint uniquely identifies the Web Server certificate. See the How to: Retrieve the Thumbprint of a Certificate Microsoft article for more information.
Agent also supports additional nodes – NamePrefix and NameSuffix.
Agent doesn't need the UseNewHub node defined – it defaults to true.
Step 1 – Open IIS Manager.
Step 2 – Select the server from the list on the left-hand side.
Step 3 – Select Server Certificates.
Step 4 – Double click your certificate in the list to open the certificates permissions.
Step 5 – Open the Details tab.
Step 6 – Scroll to the bottom of the list and highlight the Thumbprint field.
Step 7 – IIS Manager displays the thumbprint value. Transpose this to your HubDetails.xml file.
Registration
Provided the Agent can connect to the Hub /api page (referenced in the HubDetails.xml), the registration process takes place. The Agent presents its Username and Password (referenced in HubDetails.xml), and the Hub (or Active Directory server, if used) authenticates it against the stored credentials.
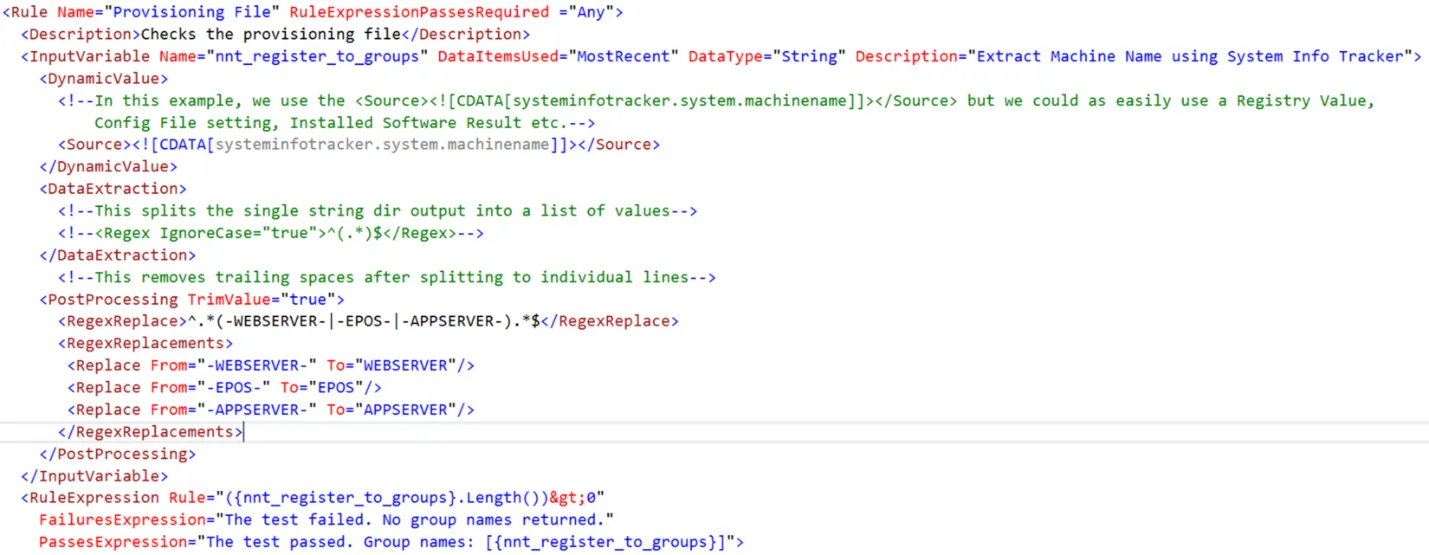
The Agent then downloads and runs the assigned Registration Report*, which determines the Device Group to assign the Device to. The Registration Report is like a full Compliance Report in that it can provision Trackers to gather configuration data from the device and process the returned data using rule expressions, with the results governing Group assignment.
In this example, the group regex match (-WEBSERVER-|-EPOS-|-APPSERVER-) extracts only those
substrings if present, then the <Replace From lines substitute in a valid group name for each
possible match (in other words, there must be a group already defined with the Group name being
referenced). The Agent then uses this substituted name as the initial group to register into.
Note: if there's no match, they'll end up in the default New Devices group.
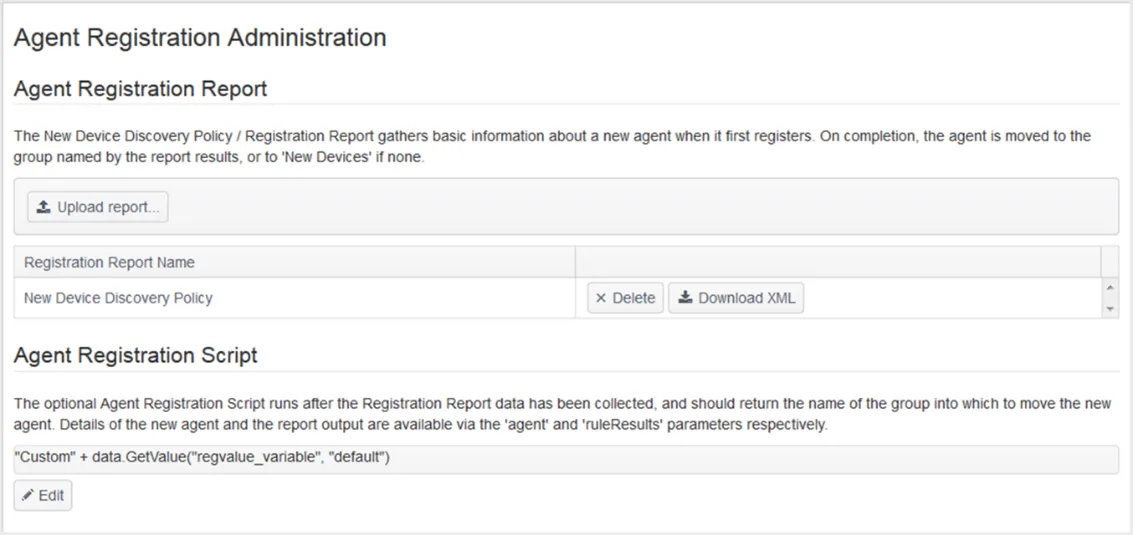
You can view and edit the Default Registration Report from the System page. In conjunction with
the Registration Report, you can use the optional Registration Script parameters, which provide a
GUI option for post-processing Registration Report results to control group allocation. In the
following example, assume the report has a variable called regvalue_variable, reading a value
from the registry, and the custom code reads this value and appends it to the text Custom. So,
if the registry value contained WebServer, Change Tracker places the device in the
CustomWebServer group if it exists, falling back to New Devices if it doesn't.