Permissions for Group Policy Auditing
Before you start creating a monitoring plan to audit the group policy in the domain, plan for the account that will be used for data collection – it should meet the requirements listed below. Then you will provide this account in the monitoring plan wizard (or in the monitored item settings).
You can use group Managed Service Accounts (gMSA) as data collecting accounts.
See the Use Group Managed Service Account (gMSA) topic and the following Microsoft article: Group Managed Service Accounts Overview for additional information about gMSA.
Account Requirements
NOTE: These group Managed Service Accounts should also meet the related requirements. See the Use Group Managed Service Account (gMSA) topic and the following Microsoft article: Group Managed Service Accounts Overview for additional information about gMSA.
The account used for data collection must meet the following requirements:
-
Member of the local Administrators group on the target server.
-
Member of the Domain Admins group on the target server.
NOTE: This covers all the required permissions below and is a mandatory setting if you want to use network traffic compression for data collection.
OR
-
The combination of the following rights and permissions if you plan to disable network traffic compression for your monitoring plan or, for some reasons, do not want to add this account to the Domain Admins group:
- Manage auditing and security log policy must be defined for this account. See the Permissions for Active Directory Auditing topic for additional information.
- If you plan to process Active Directory Deleted Objects container, Read permission on this container is required. See the Permissions for Active Directory Auditing topic for additional information.
Additional Configuration for Domain Controller's Event Logs Auto-backup
The following is required if auto-backup is enabled for the domain controller event logs:
- Permissions to access the HKEY_LOCAL_MACHINE\System\CurrentControlSet\Services\EventLog\Security registry key on the domain controllers in the target domain. See the Assign Permission to Read the Registry Key topic for additional information.
- Membership in one of the following groups: Administrators, Print Operators, Server Operators.
- Read/Write share permission and Full control security permission on the logs backup folder.
Assign Permission to Read the Registry Key
This permission is required only if the account selected for data collection is not a member of the Domain Admins group.
This permission should be assigned on each domain controller in the audited domain, so if your domain contains multiple domain controllers, it is recommended to assign permissions through Group Policy, or automatically using Audit Configuration Assistant.
To assign permissions manually, use the Registry Editor snap-in or the Group Policy Management console.
Assign Permission Via the Registry Editor Snap-in
Follow the steps to assign permission via the Registry Editor snap-in:
Step 1 – On your target server, open Registry Editor: navigate to Start > Run and type "regedit".
Step 2 – In the left pane, navigate to HKEY_LOCAL_MACHINE\SYSTEM\CurrentControl Set\Services\EventLog\Security.
Step 3 – Right-click the Security node and select Permissions from the pop-up menu.
Step 4 – Click Add and enter the name of the user that you want to grant permissions to.
Step 5 – Check Allow next to the Read permission.
Step 6 – For auditing Logon Activity, you also need to assign the Read permission to the HKEY_LOCAL_MACHINE\SECURITY\Policy\PolAdtEv registry key.
To assign permission using the Group Policy Management console
Assign Permission Using the Group Policy Management Console
Follow the steps to assign permission using the Group Policy Management console:
Step 1 – Open the Group Policy Management console on any domain controller in the target domain: navigate to Start > Windows Administrative Tools (Windows Server 2016/2019) or Administrative Tools (Windows 2012 R2 and below) > Group Policy Management.
Step 2 – In the left pane, navigate to Forest: <forest name> > Domains > <domain name> >
Domain Controllers. Right-click the effective domain controllers policy (by default, it is the
Default Domain Controllers Policy), and select Edit .
Step 3 – In the Group Policy Management Editor dialog, expand the Computer Configuration node on the left and navigate to Policies > Windows Settings > Security Settings > Registry.
Step 4 – Right-click in the pane and select Add Key.
Step 5 – Navigate to HKEY_LOCAL_MACHINE\SECURITY\Policy\PolAdtEv and click OK.
Step 6 – Click Add and enter the name of the user that you want to grant permissions to and press Enter.
Step 7 – Check Allow next to the "Read" permission and click OK
Step 8 – In the pop-up window, select Propagate inheritable permissions to all subkeys and click OK.
Step 9 – Repeat the steps 4-8 for keys below:
HKEY_LOCAL_MACHINE\SYSTEM\CurrentControlSet\Control\SecurePipeServers\winreg;HKEY_LOCAL_MACHINE\SYSTEM\CurrentControlSet\Services\EventLog\Security.
Step 10 – Close Group Policy Management console.
Step 11 – Navigate to Start > Run and type "cmd". Input the gpupdate /force command and
press Enter. The group policy will be updated.
Step 12 – Type repadmin /syncall command and press Enter for replicate GPO changes to other
domain controllers.
Step 13 – Ensure that new GPO settings were applied to the domain controllers.
Considerations for Netwrix Privilege Secure Integration
Starting with version 10.7, you can use Netwrix Privilege Secure to manage the account for collecting data, after configuring the integration. See the Netwrix Privilege Secure topic for additional information about integration and supported data sources. In this case, the credentials will not be stored by Netwrix Auditor. Instead, they will be managed by Netwrix Privilege Secure and provided on demand, ensuring password rotation or using temporary accounts for data collection.
Follow the steps to use Netwrix Privilege Secure as an account for data collection.
Step 1 – Select the desired item.
Step 2 – In the item configuration menu, select Netwrix Privilege Secure as an option for data collection.
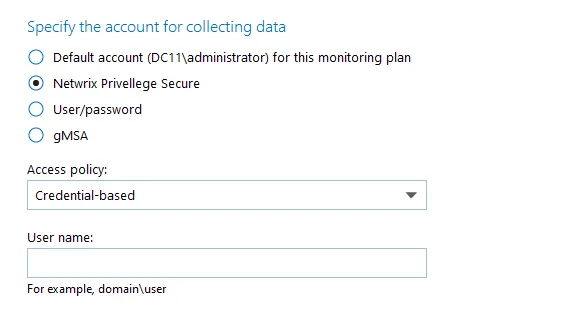
Step 3 – Select the type of the Access Policy you want to use in Netwrix Privilege Secure. Credential-based is the default option. Refer to the Netwrix Privilege Secure documentation to learn more about Access Policies.
In this case, you need to provide the username of the account managed by Netwrix Privilege Secure, and to which Netwrix Auditor has the access through a Credential-based access policy.
NOTE: Netwrix recommends using different credentials for different monitoring plans and data sources.
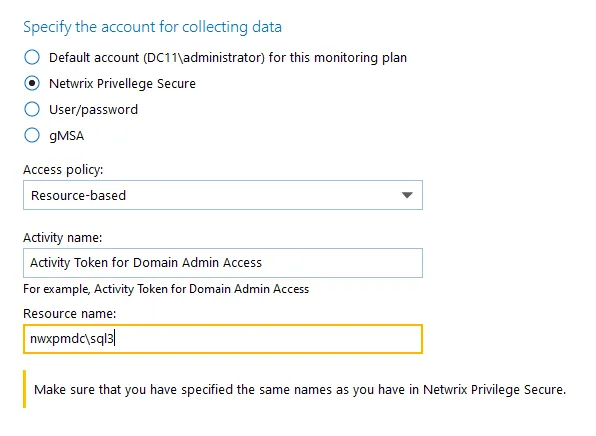
The second option is Resource-based. To use this option, you need to provide the Activity and Resource names, assigned to Netwrix Auditor in the corresponding Resource-based policy. Make sure that you specified the same names as in Netwrix Privilege Secure.
The Resource name in this case is where the activity will be performed. For example, if you grant the data collecting account the access to a local Administrators group - the resource is the server where the permission will be granted.
Netwrix Privilege Secure is ready to use as an account for data collection.