Windows Server
NOTE: Prior to configuring your monitoring plan, please read and complete the instructions in the following topics:
-
Protocols and Ports Required – To ensure successful data collection and activity monitoring configure necessary protocols and ports for inbound and outbound connections
-
Data Collecting Account – Configure data collecting accounts as required to audit your IT systems
-
Windows Server – Configure data source as required to be monitored
Complete the following fields:
| Option | Description |
|---|---|
| General | |
| Monitor this data source and collect activity data | Enable monitoring of the selected data source and configure Auditor to collect and store audit data. |
| Monitor changes to system components | Select the system components that you want to audit for changes. Review the following for additional information: - General computer settings—Enables auditing of general computer settings. For example, computer name or workgroup changes. - Hardware—Enables auditing of hardware devices configuration. For example, your network adapter configuration changes. - Add/Remove programs—Enables auditing of installed and removed programs. For example, Microsoft Office package has been removed from the audited Windows Server. - Services—Enables auditing of started/stopped services. For example, the Windows Firewall service stopped. - Audit policies—Enables auditing of local advanced audit policies configuration. For example, the Audit User Account Management advanced audit policy is set to "Failure". - DHCP configuration—Enables auditing of DHCP configuration changes. - Scheduled tasks—Enables auditing of enabled / disabled / modified scheduled tasks. For example, the GoogleUpdateTaskMachineUA scheduled task trigger changes. - Local users and groups—Enables auditing of local users and groups. For example, an unknown user was added to the Administrators group. - DNS configuration—Enables auditing of your DNS configuration changes. For example, your DNS security parameters' changes. - DNS resource records—Enables auditing of all types of DNS resource records. For example, A-type resource records (Address record) changes. - File shares—Enables auditing of created / removed / modified file shares and their properties. For example, a new file share was created on the audited Windows Server. - Removable media—Enables auditing of USB thumb drives insertion. |
| Specify data collection method | You can enable network traffic compression. If enabled, a Compression Service will be automatically launched on the audited computer, collecting and prefiltering data. This significantly improves data transfer and minimizes the impact on the target computer performance. |
| Configure audit settings | You can adjust audit settings automatically. Your current audit settings will be checked on each data collection and adjusted if necessary. This method is recommended for evaluation purposes in test environments. If any conflicts are detected with your current audit settings, automatic audit configuration will not be performed. Do not select the checkbox if you want to configure audit settings manually. See the Windows Server configuration topic for additional information about audit settings required to collect comprehensive audit data and the instructions on how to configure them. |
| Collect data for state-in-time reports | Configure Auditor to store daily snapshots of your system configuration required for further state-in-time reports generation. See the State–In–Time Reports topic for additional information. When auditing file servers, changes to effective access permissions can be tracked in addition to audit permissions. By default, Combination of file and share permissions is tracked. File permissions define who has access to local files and folders. Share permissions provide or deny access to the same resources over the network. The combination of both determines the final access permissions for a shared folder—the more restrictive permissions are applied. Upon selecting Combination of file and share permissions only the resultant set will be written to the Audit Database. Select File permissions option too if you want to see difference between permissions applied locally and the effective file and share permissions set. To disable auditing of effective access, unselect all checkboxes under Include details on effective permissions. In the Schedule state-in-time data collection section, you can select a custom weekly interval for snapshots collection. Click Modify and select day(s) of week you want your snapshot to be collected. In the Manage historical snapshots section, you can click Manage and select the snapshots that you want to import to the Audit Database to generate a report on the data source's state at the specific moment in the past. You must be assigned the Global administrator or the Global reviewer role to import snapshots. Move the selected snapshots to the Snapshots available for reporting list using the arrow button. The product updates the latest snapshot on the regular basis to keep users up to date on actual system state. Users can also configure Only the latest snapshot is available for reporting in Auditor. If you want to generate reports based on different snapshots, you must import snapshots to the Audit Database. |
| Activity | |
| Specify monitoring restrictions | Specify restriction filters to narrow your Windows Server monitoring scope (search results, reports and Activity Summaries). For example, you can exclude system activity on a particular objects on all computers. All filters are applied using AND logic. Click Add and complete the following fields: - User who initiated the change: – provide the name of the user whose changes you want to ignore as shown in the "Who" column of reports and Activity Summaries. Example: mydomain\user1. You can provide the "System" value to exclude events containing the “System” instead of an account name in the “Who” column. - Windows Server which setting was changed: – provide the name of the server in your IT infrastructure whose changes you want to ignore as shown in the "What" column of reports and Activity Summaries. Example: winsrv2016-01.mydomain.local. - Setting changed: – provide the name for unwanted settings as shown in the "What" column in reports and Activity Summaries. Example: System Properties*. You can use a wildcard (*) to replace any number of characters in filters. In addition to the restrictions for a monitoring plan, you can use the *.txt files to collect more granular audit data. Note that the new monitoring scope restrictions apply together with previous exclusion settings configured in the *.txt files. See the Monitoring Planstopic for additional information. |
Review your data source settings and click Add to go back to your plan. The newly created data source will appear in the Data source list. As a next step, click Add item to specify an object for monitoring. See the Add Items for Monitoring topic for additional information.
Computer
Select the account that will be used to collect data for this item. If you want to use a specific account (other than the one you specified during monitoring plan creation), select account type you want to use and enter credentials. The following choices are available:
- User/password. The account must be granted the same permissions and access rights as the default account used for data collection. See the Data Collecting Account topic for additional information.
- Group Managed Service Account (gMSA). You should specify only the account name in the domain\account$ format. See the Use Group Managed Service Account (gMSA) topic for additional information.
- Netwrix Privilege Secure. Starting with version 10.7, you can implement the integration between Netwrix Auditor and Netwrix Privilege Secure. See the Netwrix Privilege Secure topic for additional information.
IP Range
Complete the following fields:
| Option | Description |
|---|---|
| General | |
| Specify IP range | Specify an IP range for the audited computers. To exclude computers from within the specified range, click Exclude. Enter the IP subrange you want to exclude, and click Add. |
| Specify the account for collecting data | Select the account that will be used to collect data for this item. If you want to use a specific account (other than the one you specified during monitoring plan creation), select Custom account and enter credentials. The credentials are case sensitive. A custom account must be granted the same permissions and access rights as the default account used for data collection. See the Data Collecting Account topic for additional information. |
AD Container
Complete the following fields:
| Option | Description |
|---|---|
| General | |
| Specify AD container | Specify a whole AD domain, OU or container. Click Browse to select from the list of containers in your network. You can also: - Select a particular computer type to be audited within the chosen AD container: Domain controllers, Servers (excluding domain controllers), or Workstations. - Click Exclude to specify AD domains, OUs, and containers you do not want to audit. In the Exclude Containers dialog, click Add and specify an object. The list of containers does not include child domains of trusted domains. Use other options (Computer, IP range to specify the target computers. |
| Specify the account for collecting data | Select the account that will be used to collect data for this item. If you want to use a specific account (other than the one you specified during monitoring plan creation), select Custom account and enter credentials. The credentials are case sensitive. If using a group Managed Service Account (gMSA), you can specify only the account name in the domain\account$ format. Password field can be empty. Starting with version 10.7, you can implement the integration between Netwrix Auditor and Netwrix Privilege Secure. See the Netwrix Privilege Secure topic for additional information. Refer to the Permissions for Active Directory Auditing topic for more information on using Netwrix Privilege Secure as an account for data collection. A custom account must be granted the same permissions and access rights as the default account used for data collection. See theData Collecting Account topic for additional information. |
| Containers and Computers | |
| Monitor hidden shares | By default, Auditor will monitor all shares stored in the specified location, except for hidden shares (both default and user-defined). Select Monitor user-defined hidden shares if necessary. Even when this option is selected, the product will not collect data from administrative hidden shares such as: default system root or Windows directory (ADMIN$), default drive shares (D$, E$, etc.), shares used by printers to enable remote administration (PRINT$), etc. |
| Specify monitoring restrictions | Specify restriction filters to narrow your monitoring scope (search results, reports and Activity Summaries). All filters are applied using AND logic. Depending on the type of the object you want to exclude, select one of the following: - Add AD Container – Browse for a container to be excluded from being audited. You can select a whole AD domain, OU or container. - Add Computer – Provide the name of the computer you want to exclude as shown in the "Where" column of reports and Activity Summaries. For example, backupsrv01.mydomain.local. Wildcards (*) are not supported. In addition to the restrictions for a monitoring plan, you can use the *.txt files to collect more granular audit data. Note that the new monitoring scope restrictions apply together with previous exclusion settings configured in the *.txt files. See the Monitoring Planstopic for additional information. |
Use Netwrix Privilege Secure as a Data Collecting Account
Starting with version 10.7, you can use Netwrix Privilege Secure to manage the account for collecting data, after configuring the integration. See the Netwrix Privilege Secure topic for additional information about integration and supported data sources. In this case, the credentials will not be stored by Netwrix Auditor. Instead, they will be managed by Netwrix Privilege Secure and provided on demand, ensuring password rotation or using temporary accounts for data collection.
Follow the steps to use Netwrix Privilege Secure as an account for data collection.
Step 1 – Select the desired item.
Step 2 – In the item configuration menu, select Netwrix Privilege Secure as an option for data collection.
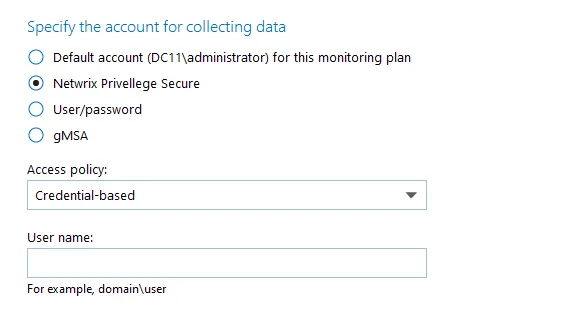
Step 3 – Select the type of the Access Policy you want to use in Netwrix Privilege Secure. Credential-based is the default option. Refer to the Netwrix Privilege Secure documentation to learn more about Access Policies.
In this case, you need to provide the username of the account managed by Netwrix Privilege Secure, and to which Netwrix Auditor has the access through a Credential-based access policy.
NOTE: Netwrix recommends using different credentials for different monitoring plans and data sources.
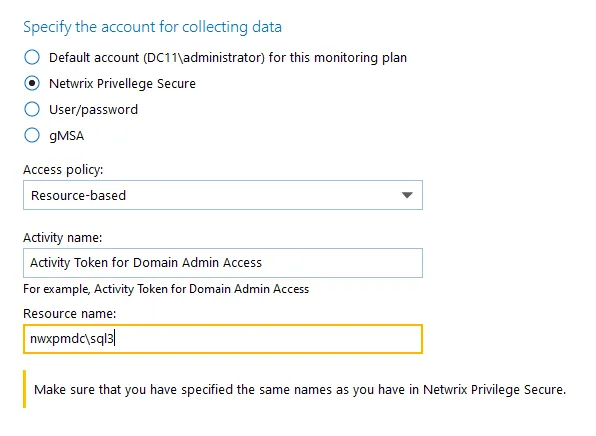
The second option is Resource-based. To use this option, you need to provide the Activity and Resource names, assigned to Netwrix Auditor in the corresponding Resource-based policy. Make sure that you specified the same names as in Netwrix Privilege Secure.
The Resource name in this case is where the activity will be performed. For example, if you grant the data collecting account the access to a local Administrators group - the resource is the server where the permission will be granted.
Netwrix Privilege Secure is ready to use as an account for data collection.