Windows File Server
NOTE: Prior to configuring your monitoring plan, please read and complete the instructions in the following topics:
- Protocols and Ports Required – To ensure successful data collection and activity monitoring configure necessary protocols and ports for inbound and outbound connections
- Data Collecting Account – Configure data collecting accounts as required to audit your IT systems
Windows File Share
Complete the following fields:
| Option | Description |
|---|---|
| General | |
| Specify Windows file share | Provide UNC path to a shared resource. See the section below for special considerations. Do not specify a default file share mapped to a local drive (e.g., \Server\e$). |
| Specify the account for collecting data | Select the account that will be used to collect data for this item. If you want to use a specific account (other than the one you specified during monitoring plan creation), select Custom account and enter credentials. The credentials are case sensitive. A custom account must be granted the same permissions and access rights as the default account used for data collection. See the Data Collecting Account topic for additional information. Starting with version 10.7, you can implement the integration between Netwrix Auditor and Netwrix Privilege Secure. See the Netwrix Privilege Secure topic for additional information. |
| Scope | |
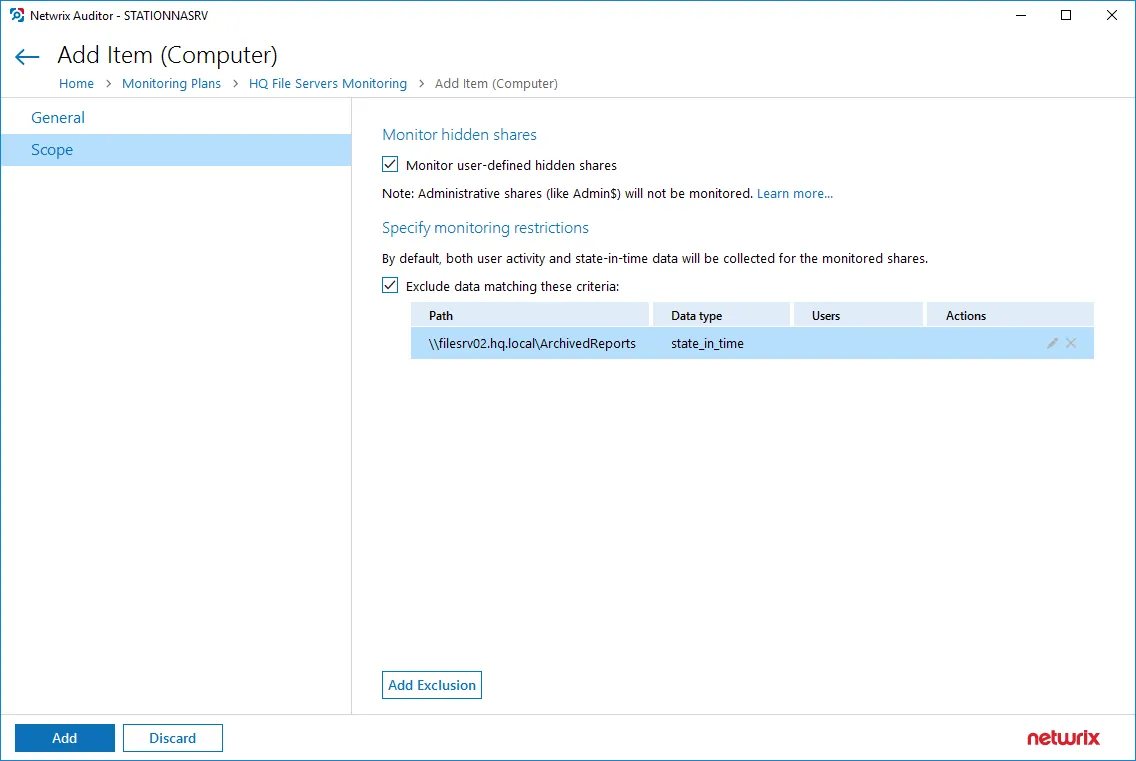
| Specify monitoring restrictions | Specify restriction filters to narrow your monitoring scope (search results, reports and Activity Summaries). All filters are applied using AND logic. See the Configure Scope topic for additional information on how to narrow your monitoring scope. By default, Netwrix Auditor will monitor all shares stored in the specified location, except for hidden shares (both default and user-defined). If you want to monitor user-defined hidden shares, select the related option in the monitored item settings. Remember that administrative hidden shares like default system root or Windows directory (ADMIN$), default drive shares (D$, E$), etc. will not be monitored. See the topics on the monitored items for details. In addition to the restrictions for a monitoring plan, you can use the *.txt files to collect more granular audit data. Note that the new monitoring scope restrictions apply together with previous exclusion settings configured in the *.txt files. See the Monitoring Planstopic for additional information. |
Configure Scope
You can narrow your monitoring scope by adding exclusions.
Click Add Exclusion. Then, in the Specify Filters dialog, do the following:
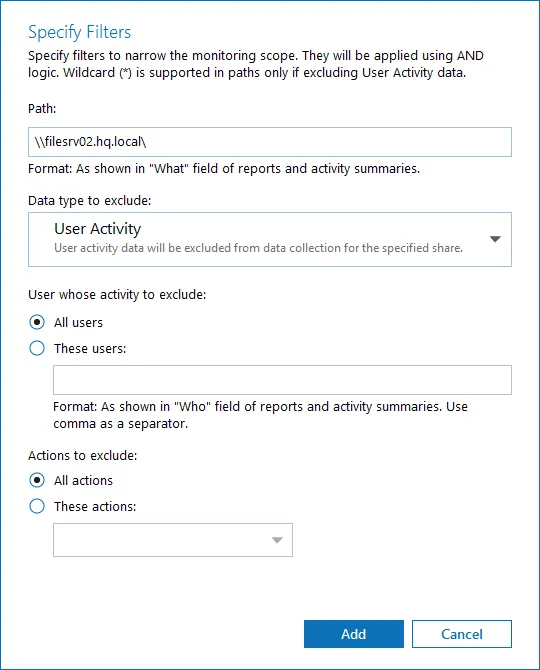
Step 1 – Provide the path to the file share where you are going to exclude some audit data. Use the path format as it appears in the "What" column of reports and Activity Summaries — for example, \corpsrv\shared.
Step 2 – You can use a wildcard (*) only if you need to exclude user activity on this file share. For other data types (state-in-time or all data) wildcards are not supported. This refers to the specified shared folder, its subfolders and files.
Step 3 – Select what type of data you want to exclude:
| Option | Description | Example |
|---|---|---|
| All Data | Select if you want to completely exclude the specified file share from being audited. The product will not collect any user activity or state-in-time data. NOTE: In this case,Auditor does not adjust audit settings automatically for the selected folders. | A Security Officer wants to monitor a file share but s/he does not have access to a certain folder on this share. Thus, s/he configures the product not to monitor this folder at all. |
| State-in-Time | Select to configure Auditor to exclude data for the state-in-time reports from the monitoring scope. | A Security Officer wants to monitor a file share, but it contains a folder with a huge amount of objects, so s/he does not want Auditor to collect state-in-time data for this folder. |
| User Activity | Select to exclude actions performed by specific users on the selected file share. See the procedure below for details. NOTE: In this case, the product still collects stat-in-time data for this share. | A Security Officer wants to monitor a file share that contains a public folder for which s/he does not want to collect Read operations. |
Follow the steps to exclude specific user activity.
Step 1 – Specify what user accounts should be excluded:
- All Users — Select to exclude the activity of any user on the file share you specified.
- These users— Select to exclude specific users' activity. Provide user names as shown in the "Who" column in reports and Activity Summaries, e.g., MyDomain\user1. To enter multiple accounts, use comma as a separator.
Step 2 – Specify what actions should be excluded:
- All actions — Exclude all actions of the selected users
- These actions — Use the drop-down list to select the actions to exclude, e.g. Added and Moved.

Step 3 – After configuring all filters, click Add to save them and return to the item settings.
Working with DFS File Shares
Netwrix Auditor supports auditing of DFS and clustered file servers if Object Access Auditing is enabled on DFS file shares or on every cluster node.
- When adding a cluster file server for auditing, it is recommended to specify a server name of the Role server or a UNC path of the shared folder located on the Role server.
- When adding a DFS file share for auditing, specify a Windows file share item and provide the UNC
path of the whole namespace or UNC path of the DFS link (folder). For example:
- "\domain\dfsnamespace" (domain-based namespace) or "\server\dfsnamespace" (in case of stand-alone namespace);
- "\domain\dfsnamespace\link" (domain-based namespace) or "\server\dfsnamespace\link" (in case of stand-alone namespace).
- For recommendations on configuring DFS replication, refer to this Knowledge Base article.
Working with Mount Points
You can specify a mount point as a monitored item. However, consider the following:
- If a mount point represents a shared folder, then the objects in its root will be initially collected by Netwrix Auditor and appear as processed by System account. Wait for the next data collections - then all actions for these objects will be monitored in a normal way.
- To monitor the mount points targeted at the subfolder of a file share, provide network path to the target subfolder.
AD Container
Complete the following fields:
| Option | Description |
|---|---|
| General | |
| Specify AD container | Specify a whole AD domain, OU or container. Click Browse to select from the list of containers in your network. You can also: - Select a particular computer type to be audited within the chosen AD container: Domain controllers, Servers (excluding domain controllers), or Workstations. - Click Exclude to specify AD domains, OUs, and containers you do not want to audit. In the Exclude Containers dialog, click Add and specify an object. The list of containers does not include child domains of trusted domains. Use other options (Computer, IP range to specify the target computers. |
| Specify the account for collecting data | Select the account that will be used to collect data for this item. If you want to use a specific account (other than the one you specified during monitoring plan creation), select Custom account and enter credentials. The credentials are case sensitive. If using a group Managed Service Account (gMSA), you can specify only the account name in the domain\account$ format. Password field can be empty. Starting with version 10.7, you can implement the integration between Netwrix Auditor and Netwrix Privilege Secure. See the Netwrix Privilege Secure topic for additional information. Refer to the Permissions for Active Directory Auditing topic for more information on using Netwrix Privilege Secure as an account for data collection. A custom account must be granted the same permissions and access rights as the default account used for data collection. See theData Collecting Account topic for additional information. |
| Containers and Computers | |
| Monitor hidden shares | By default, Auditor will monitor all shares stored in the specified location, except for hidden shares (both default and user-defined). Select Monitor user-defined hidden shares if necessary. Even when this option is selected, the product will not collect data from administrative hidden shares such as: default system root or Windows directory (ADMIN$), default drive shares (D$, E$, etc.), shares used by printers to enable remote administration (PRINT$), etc. |
| Specify monitoring restrictions | Specify restriction filters to narrow your monitoring scope (search results, reports and Activity Summaries). All filters are applied using AND logic. Depending on the type of the object you want to exclude, select one of the following: - Add AD Container – Browse for a container to be excluded from being audited. You can select a whole AD domain, OU or container. - Add Computer – Provide the name of the computer you want to exclude as shown in the "Where" column of reports and Activity Summaries. For example, backupsrv01.mydomain.local. Wildcards (*) are not supported. In addition to the restrictions for a monitoring plan, you can use the *.txt files to collect more granular audit data. Note that the new monitoring scope restrictions apply together with previous exclusion settings configured in the *.txt files. See the Monitoring Planstopic for additional information. |
IP Range
Complete the following fields:
| Option | Description |
|---|---|
| General | |
| Specify IP range | Specify an IP range for the audited computers. To exclude computers from within the specified range, click Exclude. Enter the IP subrange you want to exclude, and click Add. |
| Specify the account for collecting data | Select the account that will be used to collect data for this item. If you want to use a specific account (other than the one you specified during monitoring plan creation), select Custom account and enter credentials. The credentials are case sensitive. A custom account must be granted the same permissions and access rights as the default account used for data collection. See the Data Collecting Account topic for additional information. |
| Scope | |
| Monitor hidden shares | By default, Auditor will monitor all shares stored in the specified location, except for hidden shares (both default and user-defined). Select Monitor user-defined hidden shares if necessary. Even when this option is selected, the product will not collect data from administrative hidden shares such as: default system root or Windows directory (ADMIN$), default drive shares (D$, E$, etc.), shares used by printers to enable remote administration (PRINT$), etc. |
Computer
For evaluation purposes, Netwrix recommends selecting Computer as an item for a monitoring plan. Once the product is configured to collect data from the specified items, audit settings (including Core and Compression services installation) will be applied to all computers within AD Container or IP Range.
Complete the following fields:
| Option | Description |
|---|---|
| General | |
| Specify a computer | Provide a server name by entering its FQDN, NETBIOS or IPv4 address. You can click Browse to select a computer from the list of computers in your network. |
| Specify the account for collecting data | Select the account that will be used to collect data for this item. If you want to use a specific account (other than the one you specified during monitoring plan creation), select account type you want to use and enter credentials. The following choices are available: - User/password. The account must be granted the same permissions and access rights as the default account used for data collection. See the Data Collecting Account topic for additional information. - Group Managed Service Account (gMSA). You should specify only the account name in the domain\account$ format. See the Use Group Managed Service Account (gMSA) topic for additional information. - Netwrix Privilege Secure. Starting with version 10.7, you can implement the integration between Netwrix Auditor and Netwrix Privilege Secure. See the Netwrix Privilege Secure topic for additional information. |
| Scope | |
| Monitor hidden shares | By default, Auditor will monitor all shares stored in the specified location, except for hidden shares (both default and user-defined). Select Monitor user-defined hidden shares if necessary. Even when this option is selected, the product will not collect data from administrative hidden shares such as: default system root or Windows directory (ADMIN$), default drive shares (D$, E$, etc.), shares used by printers to enable remote administration (PRINT$), etc. |
| Specify monitoring restrictions | Specify restriction filters to narrow your monitoring scope (search results, reports and Activity Summaries). All filters are applied using AND logic. |
Configure Scope
By default, both user activity and state-in-time data will be collected for the monitored item. However, you can narrow your monitoring scope by specifying certain locations, user accounts or actions to exclude .
Click Add Exclusion, then follow the steps in the Specify Filters dialog:
Step 1 – Provide the path to the file share where you are going to exclude some audit data. Use the path format as it appears in the "What" column of reports and Activity Summaries — for example, \corpsrv\shared.
You can use a wildcard (*) only if you need to exclude user activity on this file share. For other data types (state-in-time or all data) wildcards are not supported. This refers to the specified shared folder, its subfolders and files.
Step 2 – Select what type of data you want to exclude:
| Option | Description | Example |
|---|---|---|
| All Data | Select if you want to completely exclude the specified file share from being audited. The product will not collect any user activity or state-in-time data. In this case,Netwrix Auditor does not adjust audit settings automatically for the selected folders. | A Security Officer wants to monitor a file share but s/he does not have access to a certain folder on this share. Thus, s/he configures the product not to monitor this folder at all. |
| State-in-Time | Select to configure Netwrix Auditor to exclude data for the state-in-time reports from the monitoring scope. | A Security Officer wants to monitor a file share, but it contains a folder with a huge amount of objects, so s/he does not want Netwrix Auditor to collect state-in-time data for this folder. |
| User Activity | Select to exclude actions performed by specific users on the selected file share. See the procedure below for details. In this case, the product still collects stat-in-time data for this share. | A Security Officer wants to monitor a file share that contains a public folder for which s/he does not want to collect Read operations. |
Follow the steps to exclude specific user activity.
Step 1 – Specify what user accounts should be excluded:
- All Users — Select to exclude the activity of any user on the file share you specified.
- These users — Select to exclude specific users' activity. Provide user names as shown in the "Who" column in reports and Activity Summaries, e.g., MyDomain\user1. To enter multiple accounts, use comma as a separator.
Step 2 – Specify what actions should be excluded:
- All actions — Exclude all actions of the selected users
- These actions — Use the drop-down list to select the actions to exclude, e.g. Added and Moved
After configuring all filters, click Add to save them and return to the item settings.
Use Netwrix Privilege Secure as a Data Collecting Account
Starting with version 10.7, you can use Netwrix Privilege Secure to manage the account for collecting data, after configuring the integration. See the Netwrix Privilege Secure topic for additional information about integration and supported data sources. In this case, the credentials will not be stored by Netwrix Auditor. Instead, they will be managed by Netwrix Privilege Secure and provided on demand, ensuring password rotation or using temporary accounts for data collection.
Follow the steps to use Netwrix Privilege Secure as an account for data collection.
Step 1 – Select the desired item.
Step 2 – In the item configuration menu, select Netwrix Privilege Secure as an option for data collection.
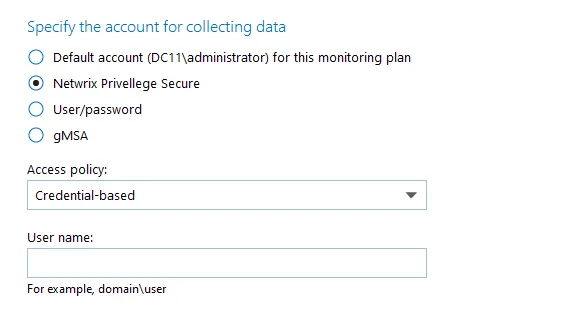
Step 3 – Select the type of the Access Policy you want to use in Netwrix Privilege Secure. Credential-based is the default option. Refer to the Netwrix Privilege Secure documentation to learn more about Access Policies.
In this case, you need to provide the username of the account managed by Netwrix Privilege Secure, and to which Netwrix Auditor has the access through a Credential-based access policy.
NOTE: Netwrix recommends using different credentials for different monitoring plans and data sources.
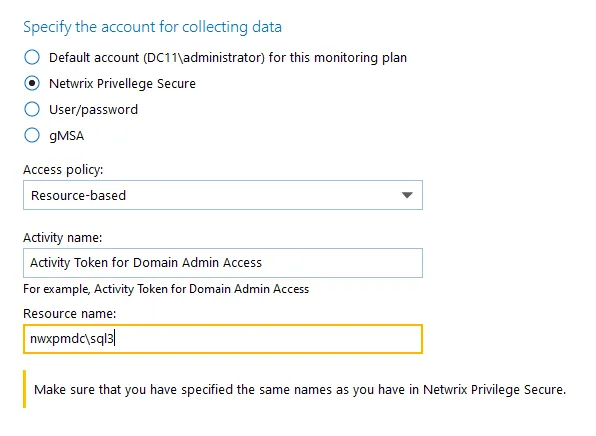
The second option is Resource-based. To use this option, you need to provide the Activity and Resource names, assigned to Netwrix Auditor in the corresponding Resource-based policy. Make sure that you specified the same names as in Netwrix Privilege Secure.
The Resource name in this case is where the activity will be performed. For example, if you grant the data collecting account the access to a local Administrators group - the resource is the server where the permission will be granted.
Netwrix Privilege Secure is ready to use as an account for data collection.