Exchange Online
NOTE: Prior to configuring your monitoring plan, please read and complete the instructions in the following topics:
-
Protocols and Ports Required – To ensure successful data collection and activity monitoring configure necessary protocols and ports for inbound and outbound connections
-
Data Collecting Account – Configure data collecting accounts as required to audit your IT systems
-
Exchange Online – Configure data source as required to be monitored
How to add Exchange Online Monitoring Plan
This instruction shows how to collect audit data from the Microsoft 365 tenant.
If you plan to use modern authentication, see the Configuring Microsoft Entra ID App for Auditing Microsoft Entra ID topic for additional information on how to prepare Microsoft Entra ID app with required permissions. Make sure you have the following at hand:
- Tenant name
- For modern authentication: Application (client) ID
- Application secret
- For basic authentication: User name and password
Types of data that can be collected by Netwrix Auditor from the Microsoft 365 tenant depend on the authentication option you choose.
Follow the steps to configure Office 365 tenant as a monitored item.
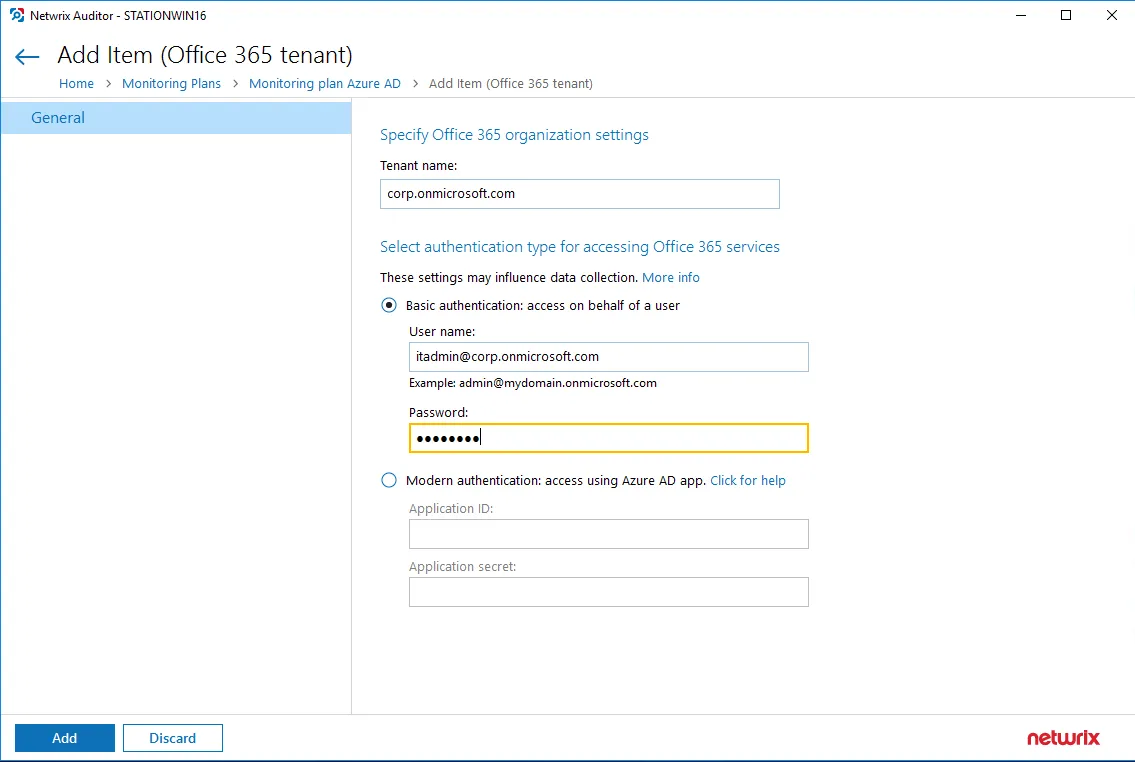
Step 1 – On the General page of the item properties, specify Tenant name:
-
If you are going to use Basic authentication, you can proceed to the next step – Tenant name will be filled in automatically after it.
-
NOTE: Basic authentication is no longer possible for Exchange Online. For the already existing tenants it is still possible to use basic authentication for SharePoint Online and Microsoft Entra ID monitoring.
-
If you are going to use Modern authentication, paste the obtained name. See the Using Modern Authentication with Microsoft Entra ID topic for additional information.
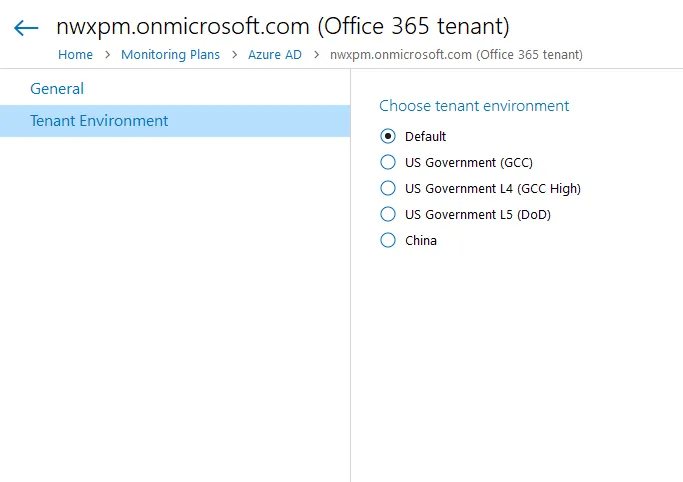
If you are using a government tenant, please click the Tenant Environment tab and select the desired tenant environment.
Step 2 – Select authentication method that will be used when accessing Office 365 services:
-
Basic authentication:
- Selected, Office 365 organization will be accessed on behalf of the user you specify.
- Enter User name and password; use any of the following formats: user@domain.com or user@domain.onmicrosoft.com.
- The Tenant name field then will be filled in automatically.
- Make sure this user account has sufficient access rights. See Using Basic Authentication with Microsoft Entra ID topic for additional information.
-
Modern authentication:
-
Selected, Office 365 organization will be accessed using the Microsoft Entra ID (formerly Azure AD) app you prepared. Enter:
-
Application ID;
- Application secret.
-
-
See the Using Modern Authentication with Microsoft Entra ID for additional information.
-
Step 3 – Click the Add button.
You can use a single account to collect audit data for different Office 365 services (Microsoft Entra ID, Exchange Online, SharePoint Online); however, Netwrix recommends that you specify individual credentials for each of them.
If you plan to collect and report on the audit data for Exchange Online non-owner mailbox access, consider that the value shown in the "Who" field in reports and search results will be displayed in UPN format (unlike the earlier Netwrix Auditor versions). This refers to the following scenarios:
-
All new installations
-
Upgrade from the previous versions if:
-
Modern authentication is selected in the item settings after the upgrade.
OR
-
Modern authentication has ever been selected in the item settings and reverted back to Basic later
-
Step 4 – Complete the following fields:
| Option | Description |
|---|---|
| Monitor this data source and collect activity data | |
| Configure audit settings | See the Exchange Online configuration topic for additional information about audit settings required to collect comprehensive audit data and the instructions on how to configure them. |
| Collect data for state-in-time reports | Configure Netwrix Auditor to store daily snapshots of your system configuration required for further state-in-time reports generation. See the State–In–Time Reports topic for additional information. |
| Collect data on non-owner access to mailboxes |
Review your data source settings and click Add to go back to your plan. The newly created data source will appear in the Data source list. As a next step, click Add item to specify an object for monitoring. See the Add Items for Monitoring topic for additional information.
See the Microsoft 365 topic for additional information.