Configure a Response Action for Alert
Upon the alert triggering, you can instruct Auditor to perform several actions such as run a command, a script or other executable file that will perform a remediation action, open a ticket with the organization help desk, etc.
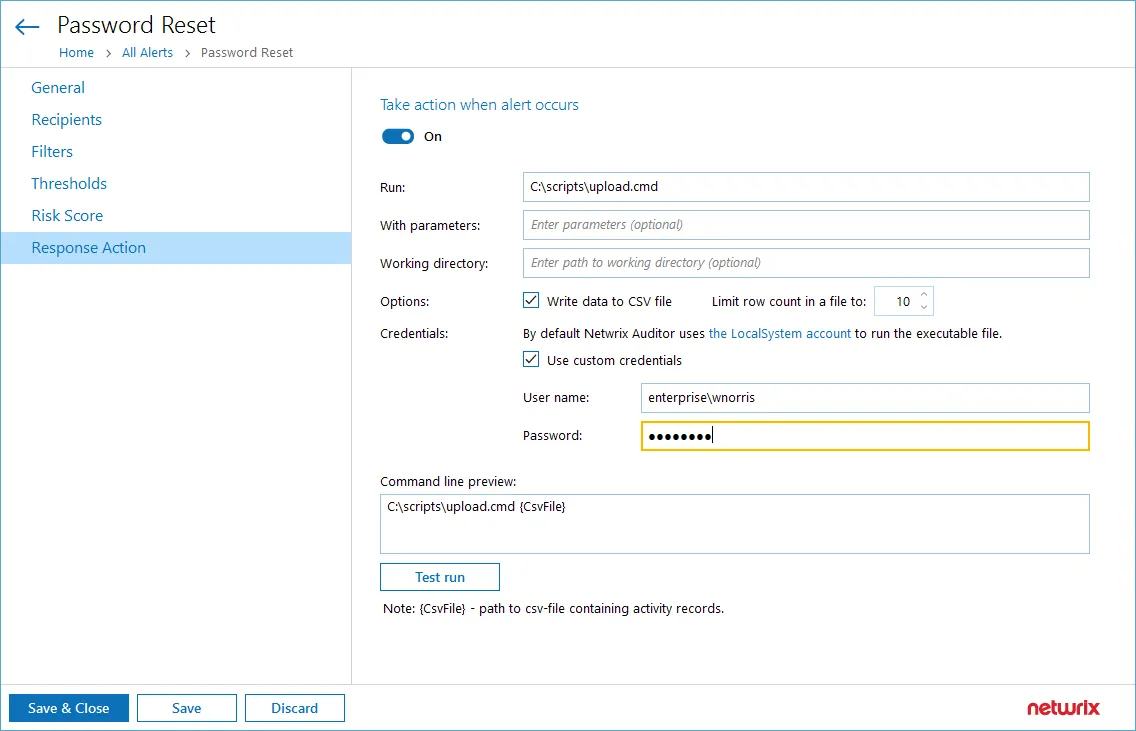
Response Action settings contain the following configuration options:
- Take action when alert occurs - Toggle this setting to On to enable alert responses
- Run – Indicates the location of the script file you want to run as your response action
- With parameters – If your script contains parameters, specify them here
- Working directory – If you need to specify a working directory for your script to perform the operation, insert the path here
- Write data to CSV file – If this checkbox is selected, Netwrix Auditor will save activity records in a CSV file. You can use it to pass information into your response action to receive a more targeted response.
- Limit row count in a file to – Specify the number of rows to include in the file
- Use custom credentials – Enter the username and password if you want the script to be run as an account different from LocalSystem
- Command line preview – Shows a preview of the command line script. Click Test run to test its performance.
-
Turn the switch to On if you want a response action to be taken when the alert occurs.
-
In the Run field, specify the path to the executable file (.exe, .cmd, .bat; for .ps1 files, see step 3 below). The file must be located on the machine where Netwrix Auditor server runs.
-
In the With parameters field, enter the parameters to be used by the executable file. Use a space character as a separator.
-
To run .exe, .cmd, and .bat files, you can enter the path to your command-line or batch file directly in the Run field. For example:

To run the .ps1 files, you will need to enter the path to powershell.exe and path to your script. For example:
- In the Run field, enter C:\Windows\system32\WindowsPowerShell\v1.0\powershell.exe
- In the With parameters field, enter
–File <path_to_your_ps_script>

Unless you select Write data to CSV file, Auditor will also pass the following parameters to the command line:
- AlertID — alert ID
- RecordID — ID of the activity record that triggered the alert
Selecting Write data to CSV file will change this behavior.
-
In the Working directory field, specify the path to the working directory of the executable file on the Auditor server.
-
In the Working directory field, specify the path to the working directory of the executable file on the Auditor server.
If you leave this field empty, the path specified in the Run field will be used as the working directory. As shown in the PowerShell example, this may be a system directory. To avoid system directory clutter, specify the directory where your executable file is located or a dedicated directory. Ensure the directory exists on the Auditor server.
-
Write data to CSV file — Select this option if you want Auditor to locate the activity records associated with the alert and write the record fields and their values to a .csv file. This option is selected by default for new alerts and predefined alerts installed with Auditor.
After an upgrade, all alerts with previously configured response actions will have this option cleared.
-
Limit row count in a file to
<N>— Limit the number of rows (activity records) written to a single .csv file. Enter a value from 1 to 1000.
For more information on these options, see the Response Action settings section below.
By default, the executable file will be launched under the LocalSystem account. If you want to use another account, select the Use custom credentials checkbox and specify user name and password. Make sure this account has Log on as batch job privilege.
The resulting command line including executable file name and execution parameters will appear in the Command line preview.
If you selected to Write data to CSV file, the command line will include
{CsvFile_}, i.e. the file path. Alternatively, the command line will include {AlertID} and _{RecordID}_,
i.e. related IDs
Step 9 – Test run — if you click this button, the executable file will be run with the specified parameters on Netwrix Auditor server. This can be helpful, for example, if you want to ensure script operability before the related alert is triggered.
As there is no actual alert triggering in this case, sample alert ID and sample activity record ID will be passed to the executable file. If you selected to write data to CSV file, a sample file will be created and populated with these sample IDs.
To be able to perform the test run, current user account (logged on to Auditor client) must have local Administrator privileges on Auditor server where the executable file is located.
After the test run, you will get a notification message with the exit code. Typical values are as follows:
- 0 — the response action completed successfully
- Any other value — the response action wasn't a success
RECOMMENDED: Apply similar logic if you plan to use custom exit codes in your response action script.
Same exit codes will be returned by response action regular runs.
If the action isn't a success (exit code isn't 0), the program will try to perform response action again (up to 200 times) with increasing time interval.
Write Data to a CSV File
To pass certain activity record fields to the executable file, you can instruct the program to write the fields and their values in a structured way to a CSV file.
Here is an example of a CSV file structure:

The number of activity records retrieved per every response action launch will be only limited by user (see below for details). If the number of records associated with the alert exceeds this limit, the program will create multiple CSV files, storing data in chunks.
For example, if there are 50 records associated with the alert (e.g., “Scanning threat is detected on network device” alert), and the number of records for one CSV is set to 10, the program will create 5 CSV files, with 10 records in each chunk. Also notice that the response action will be launched once for every such chunk (5 times in this example), and will retrieve multiple activity records per launch (not more than the specified limit, i.e. 10 records in this example).
A CSV file is named using the timestamp and GUID and stored in the subfolder of the Netwrix Auditor working folder (by default, %ProgramData%\Netwrix Auditor\AuditCore\AuditArchive\AlertsToolLauncher\Csv). A CSV file exists only while the executable file is running—after execution completes, the CSV file is deleted. If you need to obtain data from the file for further processing, copy it to a permanent location in a timely manner (for example, using a script).