Deploy the Add-On
Follow the steps to deploy the Add-On:
Step 1 – Prepare Auditorfor data processing.
Step 2 – Configure Syslog message forwarding in CyberArk.
Step 3 – Download the Add-On.
Step 4 – Install Add-on.
Step 5 – Configure Add-on parameters
Prepare Auditor for Data Processing
In Auditor client, go to the Integrations section and verify Integration API settings:
- Make sure the Leverage Integration API is switched to ON.
- Check the TCP communication port number – default is 9699.
See the Prerequisites topic for additional information.
By default, activity records are written to Netwrix_Auditor_API database which is not associated with a specific monitoring plan.
Optionally, you can create a dedicated monitoring plan in Auditor. In this case, data will be written to a database linked to this plan. Target it at Netwrix API data source and enable for monitoring. Add a dedicated item of Integration type to the plan for data to be filtered by item name. See the Integration API topic for additional information.
In such scenario, you will need to specify this monitoring plan in the naplan and naplanitem
attributes of the <AcceptList> ® <Address> configuration parameters. See the
Add-On Parameters topic for additional information.
Configure Syslog Message Forwarding in CyberArk
On the CyberArk side, you need to specify the server that will receive Syslog messages from CyberArk, process them and forward to Auditor Server. This will be the add-on installation server (the machine where SyslogService.exe runs).
Follow the steps to configure Syslog message forwarding in CyberArk.
Step 1 – Log in to your CyberArk system.
Step 2 – On the CyberArk server, locate the %Program Files (x86)%\PrivateArk\Server\Conf folder and open the dbparam.ini file for editing.
Step 3 – Go to the [SYSLOG] section and configure the following parameters:
- SyslogTranslatorFile – relative path to Netwrix.xsl file. You will need to create this file manually and copy the content of SyslogTranslator.sample.xsl file into it. This sample file is provided by CyberArk. By default, it is located in the %Program Files (x86) %\PrivateArk\Server\Syslog folder. Place the Netwrix.xsl file there, too, so that default relative path should be \Server\Syslog.
- SyslogServerPort – communication port of the syslog server (i.e. add-on installation server). Default is 514. Note that if you are using Netwrix Auditor for Network Devices, this port may be already in use, and you should provide another one.
- SyslogServerIP - IP address of the add-on installation server.
- SyslogServerProtocol – communication protocol for data transfer between CyberArk system and the add-on. Specify UDP protocol.
- SyslogMessageCodeFilter - IDs of events to forward. The add-on will only collect and process events you specify in this parameter. For the full list of supported events, see Monitored Events. Use comma as a separator.
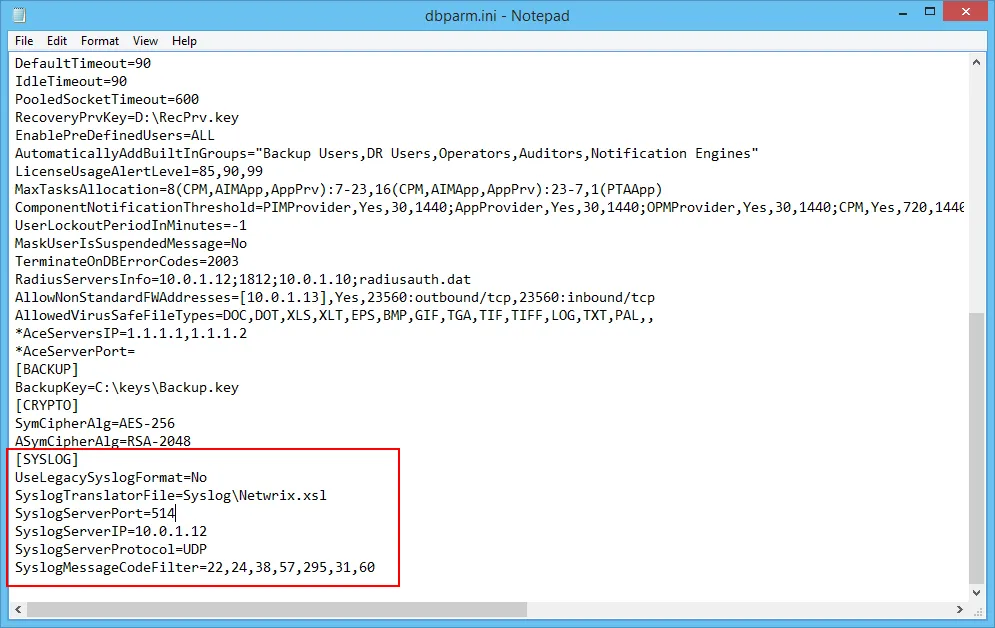
Step 4 – Save the dbparam.ini file.
Download the Add-On
Step 1 – Download the distribution package Netwrix_Auditor_Add-on_for_CyberArk_PAS.zip.
Step 2 – Unpack it to a folder on the computer where you plan to deploy the add-on.
Remember, deploy the add-on on the same machine with the Auditor Server.
Install Add-On
Follow the steps to install the Add-On:
Step 3 – Navigate to your add-on package.
Step 4 – Unzip the Add-On to a desired folder.
Step 5 – Run the installation package.
Step 6 – Accept the license agreement and follow the instructions of the setup wizard.
Step 7 – On the Destination Folder step, specify the installation folder (C:\Program Files (x86)\Netwrix Add-ons<Add-on name> by default).
Step 8 – Click Install.
Step 9 – When done, click Finish.
Configure Add-on Parameters
The configuration wizard opens in the default web browser:
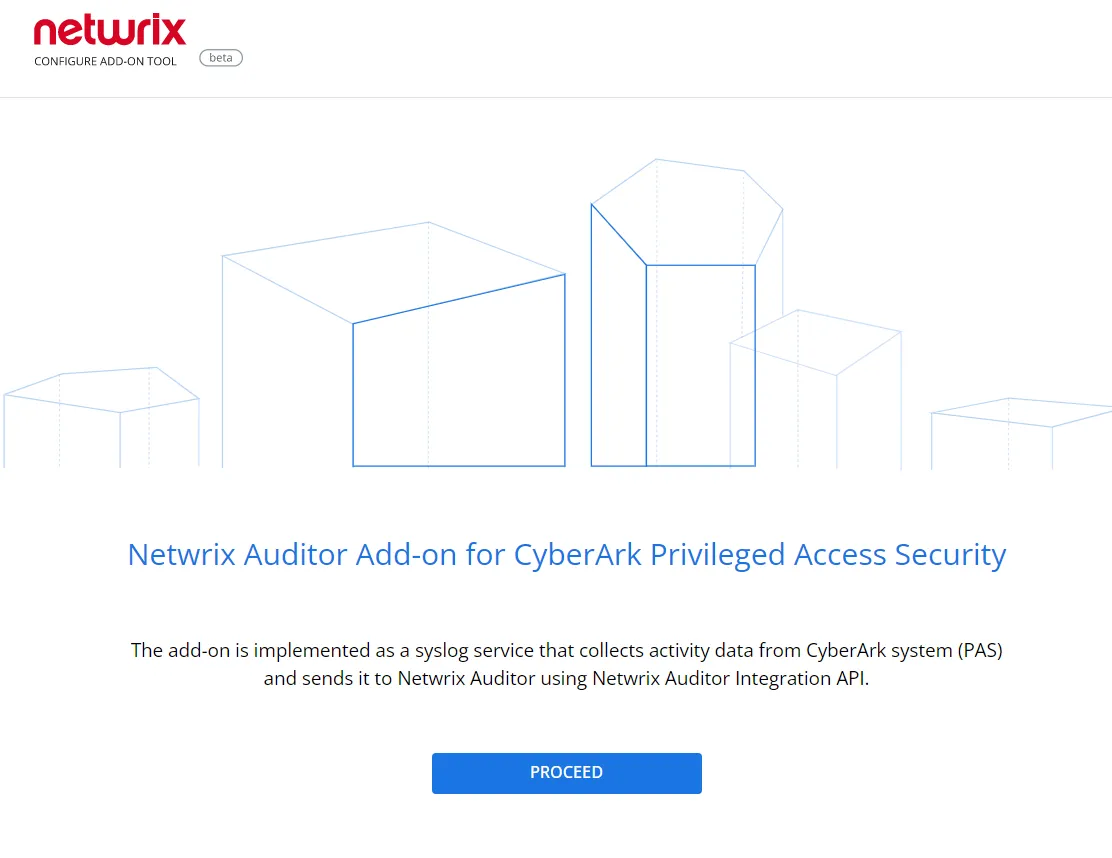
Click Proceed and complete the following fields:
| Option | Description |
|---|---|
| Specify General Settings | |
| Listed UDP port | Specify UDP port for listening incoming events. (514 by default). |
| Auditor Endpoint | Auditor Server IP address and port number followed by endpoint for posting Activity Records. Assumes that the add-on runs on the computer hostingAuditor Server and uses default port 9699. If you want to run the add-on on another machine, provide a name of the computer where Auditor Server resides (e.g., 172.28.6.15, EnterpriseNAServer, WKS.enterprise.local). To specify a non-default port, provide a server name followed by the port number (e.g., WKS.ent erprise.local:9999). Do not modify the endpoint part (/ netwrix/ api ) |
| Certificate Thumbprint | Netwrix Auditor Certificate Thumbprint Property. Possible values: - Empty—Check Auditor certificate via Windows Certificate Store. - AB:BB:CC—Check Auditor Server certificate thumbprint identifier. - NOCHECK—Do not check Auditor certificate. Make sure to select this parameter if you plan to specify servers by their IP. |
| Specify Active Directory credentials | |
| Username | Provide the name of the account under which the service runs. Unless specified, the service runs under the account currently logged on. |
| Password | Provide the password for the selected account. |
| Auditor Monitoring Plan settings | |
| Auditor Plan | Unless specified, data is written to Netwrix_Auditor_API database and is not associated with a specific monitoring plan. Specify a name of associated monitoring plan in Auditor. In this case, data will be written to a database linked to this plan. If you select a plan name in the add- on, make sure a dedicated plan is created in Auditor, the Netwrix API data source is added to the plan and enabled for monitoring. Otherwise, the add- on will not be able to write data to the Audit Database. |
| Auditor Plan Item | Unless specified, data is not associated with a specific plan and, thus, cannot be filtered by item name. Specify an item name. Make sure to create a dedicated item inAuditor in advance. |
| Accept List | |
| Address | Specify a list of IP addresses of syslog events sources. The service will collect and process events from these sources only. Events collected from any other source will be ignored. |
Click Run to start collecting data with the Add-On.