Configure Object-Level Access Auditing
Netwrix Auditor can be configured to audit all access types, review the table below and select options that you want to track:
| Option | Description | |
|---|---|---|
| Changes | Successful | Use this option to track changes to your data. Helps find out who made changes to your files, including their creation and deletion. |
| Failed | Use this option to detect suspicious activity on your file server. Helps identify potential intruders who tried to modify or delete files, etc., but failed to do it. | |
| Read access | Successful | Use this option to supervise access to files containing confidential data intended for privileged users. Helps identify who accessed important files besides your trusted users. Enabling this option on public shares will result in high number of events generated on your file server and the amount of data written to the AuditArchive. |
| Failed | Use this option to track suspicious activity. Helps find out who was trying to access your private data without proper justification. Enabling this option on public shares will result in high number of events generated on your file server and the amount of data written to the AuditArchive. |
Actions reported by Netwrix Auditor vary depending on the file server type and the audited object (file, folder, or share). The changes include creation, modification, deletion, moving, renaming, and copying. To track the copy action, enable successful read access and change auditing. See the File Servers topic for additional information.
Perform one of the following procedures depending on the OS version you are using:
- Configure Object-level Access Auditing on Windows Server 2012 and Above
- Configure Object-level access auditing on pre-Windows Server 2012 versions
Configure Object-level Access Auditing on Windows Server 2012 and Above
Follow the steps to configure Object-level access auditing on Windows Server 2012 and above.
Step 1 – Navigate to the target file share, right-click it and select Properties.
Step 2 – In the <Share_Name> Properties dialog, select the Security tab and click
Advanced.
Step 3 – In the Advanced Security Settings for <Share_Name> dialog, navigate to the
Auditing tab.
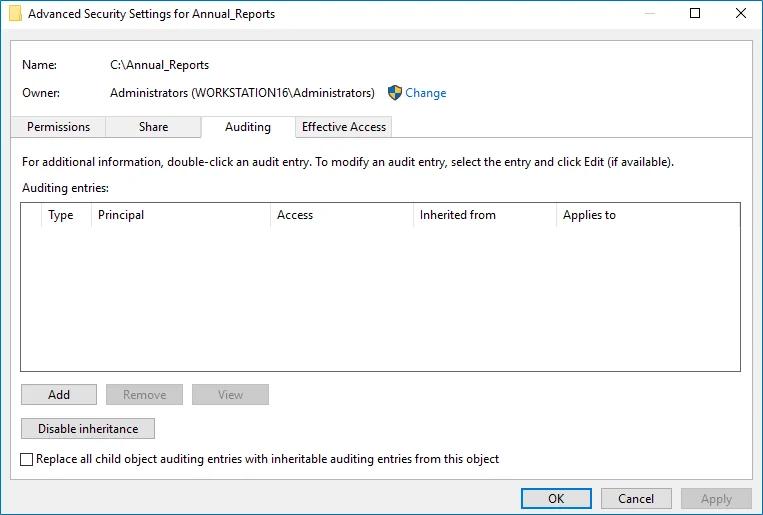
Step 4 – Click Add to add a new principal. You can select Everyone (or another user-defined group containing users that are granted special permissions) and click Edit.
Step 5 – In the Auditing Entry for <Folder_Name> dialog, click the Select a principal link and
specify Everyone.
NOTE: You can specify any other user group, but in this case the emails will be sent with warnings on incorrect audit configuration. The product will audit only user accounts that belong to the selected group.
Step 6 – Apply settings to your Auditing Entries depending on the access types that you want to audit. If you want to audit all access types (successful reads, modification as well as failed read and modification attempts), you need to add separate Auditing Entries for each file share. Otherwise, reports will contain limited data and warning messages.
Review the following for additional information:
| Auditing Entry | |
|---|---|
| Successful reads | |
The Auditing Entry below shows Advanced Permissions for auditing successful reads only: 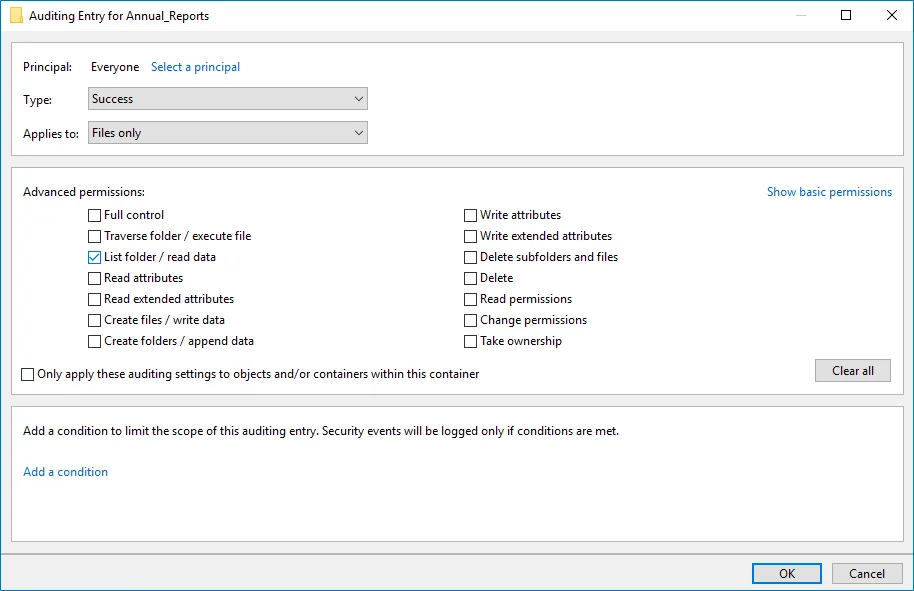 - Type—Set to "Success". - Applies to—Set to "Files only". - Advanced permissions—Select List folder / read data. - Make sure that the Only apply these auditing settings to objects and/or containers within this container checkbox is cleared. - Type—Set to "Success". - Applies to—Set to "Files only". - Advanced permissions—Select List folder / read data. - Make sure that the Only apply these auditing settings to objects and/or containers within this container checkbox is cleared. | |
| Successful changes | |
The Auditing Entry below shows Advanced Permissions for auditing successful changes only:  - Type—Set to "Success". - Applies to—Set to "This folder, subfolders and files". - Advanced permissions: - Create files / write data - Create folders / append data - Write extended attributes - Delete subfolders and files - Delete - Change permissions - Take ownership - Make sure that the Only apply these auditing settings to objects and/or containers within this container checkbox is cleared. - Type—Set to "Success". - Applies to—Set to "This folder, subfolders and files". - Advanced permissions: - Create files / write data - Create folders / append data - Write extended attributes - Delete subfolders and files - Delete - Change permissions - Take ownership - Make sure that the Only apply these auditing settings to objects and/or containers within this container checkbox is cleared. | |
| Failed read attempts | |
The Auditing Entry below shows Advanced Permissions for auditing failed read attempts:  - Type—Set to "Fail". - Applies to—Set to "This folder, subfolders and files". - Advanced permissions—Select List folder / read data. - Make sure that the Only apply these auditing settings to objects and/or containers within this container checkbox is cleared. - Type—Set to "Fail". - Applies to—Set to "This folder, subfolders and files". - Advanced permissions—Select List folder / read data. - Make sure that the Only apply these auditing settings to objects and/or containers within this container checkbox is cleared. | |
| Failed change attempts | |
The Auditing Entry below shows Advanced Permissions for auditing failed change attempts: 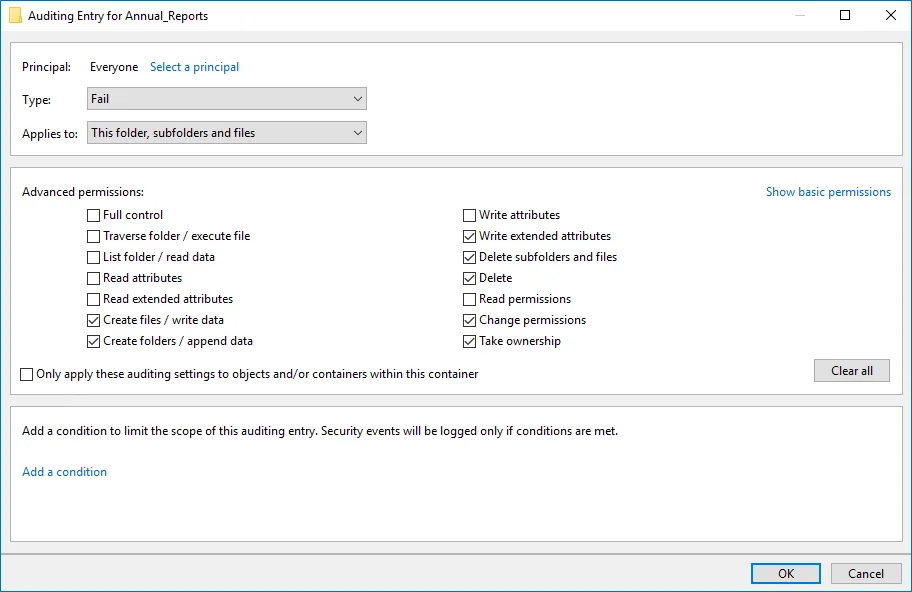 - Type—Set to "Fail". - Applies to—Set to "This folder, subfolders and files". - Advanced permissions: - Create files / write data - Create folders / append data - Write extended attributes - Delete subfolders and files - Delete - Change permissions - Take ownership - Make sure that the Only apply these auditing settings to objects and/or containers within this container checkbox is cleared. - Type—Set to "Fail". - Applies to—Set to "This folder, subfolders and files". - Advanced permissions: - Create files / write data - Create folders / append data - Write extended attributes - Delete subfolders and files - Delete - Change permissions - Take ownership - Make sure that the Only apply these auditing settings to objects and/or containers within this container checkbox is cleared. |
Configure Object-level access auditing on pre-Windows Server 2012 versions
Step 1 – Navigate to the target file share, right-click it and select Properties.
Step 2 – In the <Share_Name> Properties dialog, select the Security tab and click
Advanced.
Step 3 – In the Advanced Security Settings for <Share_Name> dialog, navigate to the
Auditing tab, click Edit.
Step 4 – In a separate Advanced Security Settings for <Share_Name> dialog, click Add to
add a principal. You can select Everyone (or another user-defined group containing users that
are granted special permissions) and click Edit.
Step 5 – You can specify any other user group, but in this case Netwrix Auditor will send emails with errors on incorrect audit configuration. This will not affect the reports or data searches performed in the Auditor client and the product will only audit user accounts that belong to the selected group.
Step 6 – Apply settings to your Auditing Entries depending on the access types that you want to audit. If you want to audit all access types (successful reads and changes as well as failed read and change attempts), you need to add separate Auditing Entries for each file share. Otherwise, reports will contain limited data and warning messages. Review the following for additional information:
- Successful reads
- Successful changes
- Failed read attempts
- Failed change attempts
| Auditing Entry |
|---|
| Successful reads |
| The Auditing Entry below shows Advanced Permissions for auditing successful reads only: - Apply onto—Select "Files only". - Check "Successful" and "Failed" next to List folder / read data. - Make sure that the Apply these auditing entries to objects and/or containers within this container only checkbox is cleared. |
| Successful changes |
| The Auditing Entry below shows Advanced Permissions for auditing successful changes only: - Apply onto—Select "This folder, subfolders and files". - Check "Successful" next to the following permissions: - Create files / write data - Create folders / append data - Write extended attributes - Delete subfolders and files - Delete - Change permissions - Take ownership - Make sure that the Apply these auditing entries to objects and/or containers within this container only checkbox is cleared. |
| Failed read attempts |
| The Auditing Entry below shows Advanced Permissions for auditing failed read attempts only: - Apply onto—Select "This folder, subfolders and files". - Check "Failed" next to List folder / read data. - Make sure that the Apply these auditing entries to objects and/or containers within this container only checkbox is cleared. |
| Failed change attempts |
| The Auditing Entry below shows Advanced Permissions for auditing failed change attempts only: - Apply onto—Select "This folder, subfolders and files". - Check "Failed" next to the following permissions: - Create files / write data - Create folders / append data - Write extended attributes - Delete subfolders and files - Delete - Change permissions - Take ownership - Make sure that the Apply these auditing entries to objects and/or containers within this container only checkbox is cleared. |