Configure Event Categories and Log
Perform the following procedures to configure audit:
- To configure auditing state, event categories and log
- To configure logs retention period
To configure auditing state, event categories and log
Configure audit settings in the context of Cluster or Storage Virtual Machine (SVM). All examples in the procedure below apply to SVM.
To execute commands in the context of Cluster, add -vserver name, where name is your server
name.
-
Navigate to command prompt through the SSH/Telnet connection.
-
Log in as a cluster administrator and switch to the context of SVM from the cluster. For example to switch to the SVM called
svm1:cluster1::> vserver context -vserver svm1After a switch, you will be in the context of SVM:
svm1::> -
Create audit. For more information on audit configuration, refer to NetApp documentation. For example:
svm1::> vserver audit create -destination <path to the volume>In the example above, the
vserver audit create -destination /auditcommand executed on thesvm1SVM creates and enables audit on the volume/audit.Netwrix Auditor accesses audit logs via file shares. Make sure the volume you specified is mounted on SVM and shared (e.g.,
audit$is a share name and its path is/audit). -
Enable audit:
svm1::> vserver audit enable -
Add categories of events to be audited:
-
For ONTAPI 9.0 or later
svm1::> vserver audit modify -events file-ops, file-share -
For ONTAPI 8.3 and below
svm1::> vserver audit modify -events file-ops
-
-
Check the following options:
Option Setting Auditing StatetrueCategories of Events to Auditfile-opsOnly required if you use Clustered Data ONTAP 8.3, ONTAP 9.0, ONTAP 9.1 or later. You cannot select event categories if you use Clustered Data ONTAP 8.2. For ONTAP 9.0 and later, also check the following options:file-ops, file-share, audit-policy-change. For ONTAP 8.3, just checkfile-ops.Log Format "XML" or "EVTX" -
Modify the log file size limit—set to 300 MB. Execute:
svm1::> vserver audit modify -rotate-size 300MB
300MB is the recommended maximum log size proceeding from performance evaluations. Make sure there is enough disk space allocated for the security logs archives. Depending on the file access activity, audit data may grow rapidly, and the location specified for the security log (and security log auto archives) must be large enough to hold data until it is processed by Netwrix Auditor. You can customize your security log by configuring log rotation schedule. For detailed information, review the Planning the auditing configuration section in the Clustered Data ONTAP® 8.3 File Access Management Guide for CIFS.
-
After configuration, double-check your settings.
svm1::> vserver audit show -instanceAuditing State: true Log Destination Path: /audit Categories of Events to Audit: file-ops, cifs-logon-logoff Log Format: evtx Log File Size Limit: 300MB Log Rotation Schedule: Month: — Log Rotation Schedule: Day of Week: — Log Rotation Schedule: Day: — Log Rotation Schedule: Hour: — Log Rotation Schedule: Minute: — Rotation Schedules: — Log Files Rotation Limit: 0
NOTE: For ONTAP 9.0 and later, also check the following settings:
file-ops, file-share, audit-policy-change.
For ONTAP 8.3, just check file-ops.
To configure logs retention period
NOTE: This instruction is only effective for NetApp versions older than 8.2.1.
-
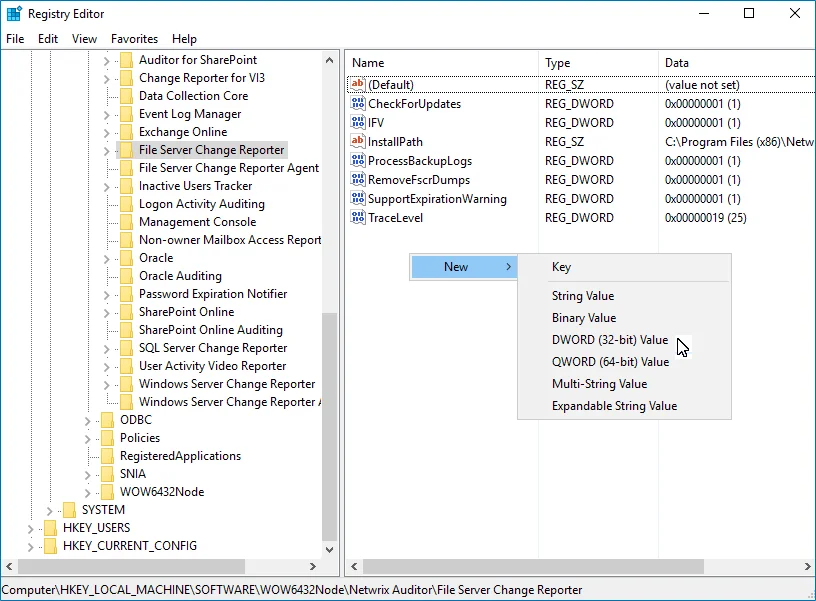
On the computer where Auditor Server resides, open Registry Editor: navigate to Start → Run and type "regedit".
-
Navigate to HKEY_LOCAL_MACHINE → SOFTWARE → Wow6432Node → Netwrix Auditor → File Server Change Reporter.
-
In the right-pane, right-click and select New → DWORD (32-bit Value).
For the backup logs retention functionality to work properly, you need to specify the CleanAutoBackupLogs name for the newly created registry value.
-
Double-click CleanAutoBackupLogs. The Edit DWORD Value dialog will open.
-
This value defines the time period (in hours) after which security event logs archives will be automatically deleted. By default, it is set to "0" (decimal). Modify this value, if necessary, and click OK to save the changes.

-
NOTE: If the CleanAutoBackupLogs registry value is set to "0", you will have to remove the old logs manually, or you may run out of space on your hard drive.