Connection Tab
The Connection tab allows users to modify the agent host server name and the credentials used for installation and communication. The tab varies based on the type of agent selected.
For Activity Agent
The server name can be modified in the text box. Modifying the name value does not move the activity agent to a new server. The credentials can be updated or modified as well.
Remember, Test the credentials before clicking OK to ensure a successful connection.
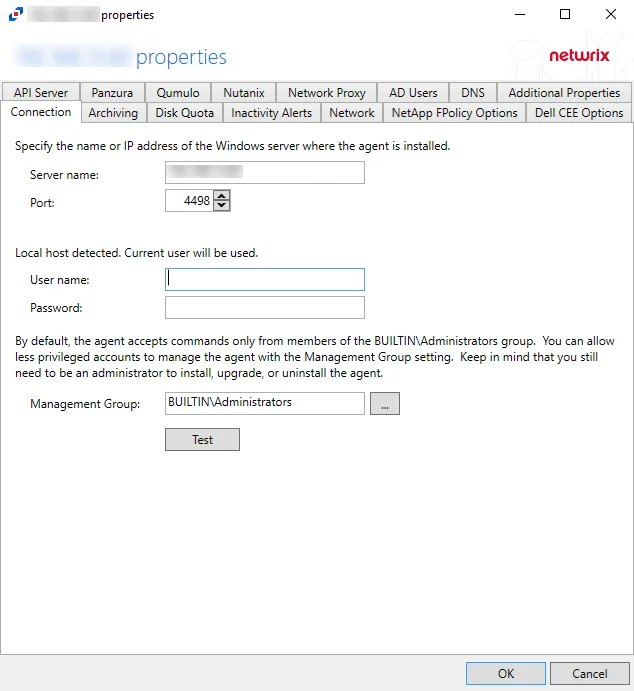
Agent server fields:
- Server name – Name or IP address of the server where the agent is deploy
- Port – Port the agent uses for communication with the application
Credential fields:
- User name – Account provisioned for use by the agent
- Password – Password for the supplied User name
Permissions
This account must be:
- Membership in the local Administrators group
If the user name is not specified, the currently logged in user's account will be used.
Less Privileged Permissions Option
By default, the agent accepts commands only from members of the local Administrators group. You can allow less privileged accounts to manage the agent with the Management Group option. Keep in mind that you still need to be an administrator to install, upgrade, or uninstall the agent. The Management Group applies to the users of the console and API servers. The Management Group does not restrict access to the agents, but grants access to its members in addition to existing members of the local Administrators group.
The Specify account or group window is opened from a field where a Windows account is needed.
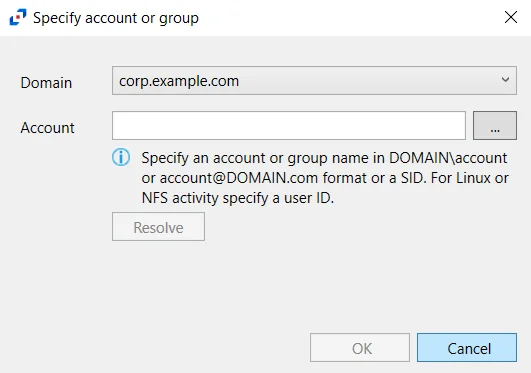
Follow the steps to use this window.
Step 1 – Select the Domain from the drop-down menu.
Step 2 – Enter the Account in the textbox.
- Accounts can be entered in NTAccount format, UPN format, or SID format.
- Use the ellipsis (…) button to open the Select Users, Computers, Service Accounts, or Groups window to browse for an account.
Step 3 – Then click Resolve. A message displays indicating whether or not the account could be resolved.
Step 4 – If successful, click OK.
The Specify account or group window closes, and the account is added to the field where the window was opened.
Click OK to commit the modifications. Click Cancel to discard the modifications. The Agent Properties window closes.
For Linux Agent
The server name can be modified in the text box. Modifying the name value does not move the Linux agent to a new server. The credentials can be updated or modified as well.
Remember, Test the credentials before clicking OK to ensure a successful connection.
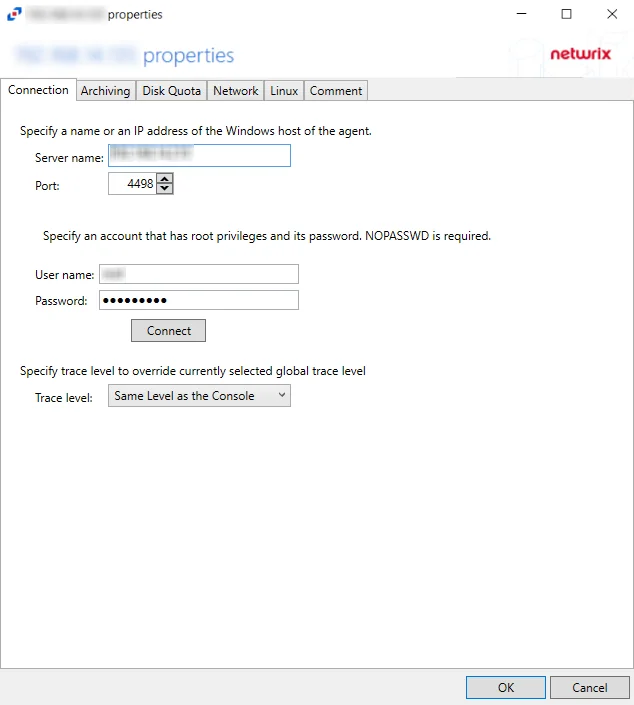
Agent server fields:
- Server name – Name or IP address of the server where the agent is deploy
- Port – Port the agent uses for communication with the application
Credential fields:
- User name – Account provisioned for use by the agent
- Password – Password for the supplied User name
Permissions
This account must be:
- Root privileges with password (or SSH private key)
The Trace level option configures the level for the agent log it includes the following levels:
-
Same Level as the Console (uses the global level selected in the console)
-
Trace (the most verbose) many collection points and can slow down
warningSelecting the Trace option can slow down collection due to the large amount of data points
-
Debug
-
Info (recommended)
-
Warning
-
Error
-
Fatal