FS_TraverseGroups Job
Use the FS_TraverseGroups Job to create and apply permissions for traverse groups based on previous resource based groups. Use this job if the folder with resource based group permissions applied isn't the root share folder, or isn't at the root of the share. This job prevents users from losing the ability to navigate through the directory structure if the folder is nested. The FS_TraverseGroups Job must be installed from the Instant Job library. See the Instant Job Wizard topic for additional information.
Recommended Configurations for the FS_TraverseGroups Job
Dependencies
- The FS_ResourceBasedGroups job must be successfully run before running this job
Targeted Hosts
- None – If targeting all file servers known to Access Analyzer
- Scope the actions to a host list – If targeting specific file servers
Schedule Frequency
This job can be scheduled to run as desired. Throughout this document reference to executing a job refers to either manual execution or scheduled execution, according to the needs of the organization. See the Scheduling the Resource Based Groups Job Group topic for additional information.
History Retention
Not supported
Workflow
Step 1 – Run the FS_ResourceBasedGroups job.
Step 2 – Configure a Host List for the job at the job level.
If a host list isn't configured, this job will analyze and commit actions on every File System server known to Access Analyzer. To scope the actions to target specific servers, configure a host list at the job level to target only those servers.
Step 3 – Configure and execute analysis tasks.
- Configure the Create Groups analysis task
- Execute the analysis tasks
- See the Configure & Execute Analysis Tasks topic for additional information
Step 4 – Configure and execute Active Directory action task.
- Configure & Enable the Create Groups action task
- Execute the Create Groups action task
- See the Configure & Execute Active Directory Action Task topic for additional information
Step 5 – Execute File System action task.
- Allow an appropriate grace period for token refresh before executing File System action task, for example one week
- Disable the Active Directory action task
- Enable the Modify Permissions action task
- Execute the Modify Permissions action task
- See the Execute File System Action Task topic for additional information
Step 6 – Generate and review the List Traverse Group Changes report.
- See the Generate the List Traverse Group Changes Report topic for additional information
Configure & Execute Analysis Tasks
Before executing the action tasks, configure and execute the analysis tasks.
Configure the Create Groups Analysis Task
View the analysis tasks by navigating to the place in the Jobs tree where the Traverse Groups job was installed from the Instant Jobs library. Then go to the FS_TraverseGroups > Configure node and select Analysis. The Create Groups analysis task contains an analysis parameter that should be configured to set the naming convention for list groups.
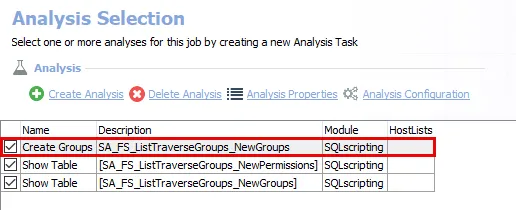
The job has the following analysis tasks:
-
Create Groups – Creates the FS_ListTraverseGroups_NewGroups table accessible under the job’s Results node
- This analysis task contains a configurable parameter: @naming_convention
-
Show Table – Displays the FS_ListTraverseGroups_NewPermissions table accessible under the job’s Results node
-
Show Table – Displays the FS_ListTraverseGroups_NewGroups table accessible under the job’s Results node
| Analysis Task | Customizable Parameter Name | Default Value | Value Indicates |
|---|---|---|---|
| Create Groups | @naming_convention | FS*[HostName]*[ShareName]_[FolderName]_List | Naming convention for list groups |
For instructions on configuring analysis parameters, see the SQLscripting Analysis Module topic.
Execute Analysis Tasks
After you configure the Create Groups analysis task, execute the analysis tasks. The analysis tasks are selected by default. To execute the analysis tasks:
Step 1 – Ensure all of the analysis tasks are enabled.
Before executing the analysis tasks, ensure that all action tasks are disabled. The purpose at this point is only to create the required traversal tables.
Step 2 – In the Configure node, select Actions and ensure that all of the action tasks are disabled.
Step 3 – Right click the FS_TraverseGroups job and select Run Job. This will generate the Change Modeling report.
- Wait for the queued jobs to execute.
The analysis tasks create the required traversal tables accessible under the job’s Results node.
Configure & Execute Active Directory Action Task
The Active Directory action tasks create and populate resource based groups. The Create Groups action tasks must be updated to specify a Target OU for group creation before enabling and executing the actions. Also verify that the action tasks target the same domain controller. View the actions by navigating to the place in the Jobs tree where the Traverse Groups job was installed from the Instant Jobs library. Then go to the FS_TraverseGroups > Configure node and select Actions. The Create Groups action task must be configured to specify the OU for group creation.
It is recommended to execute the actions one at a time and in order as opposed to running the entire job group with the actions enabled.
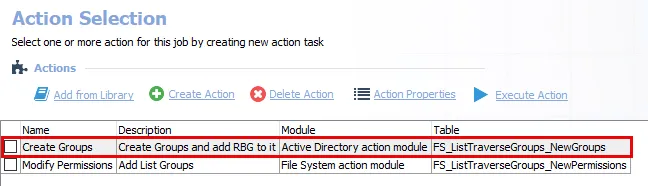
There are the following action tasks:
- Create Groups – Create groups and add resource based groups
- Modify Permissions – Add list groups
It is recommended to review the tables used by the actions before executing the actions. For instructions on configuring action tables, see the Configure & Enable the Create Groups Action Task topic. The actions act upon the data within the following tables:
- FS_ListTraverseGroups_NewGroups
- FS_ListTraverseGroups_NewPermissions
These tables can be viewed under the job’s Results node. The FS_TraverseGroups Job will run analysis tasks against these tables.
Configure & Enable the Create Groups Action Task
To configure the Create Groups action task:
Step 1 – Select the action and click Action Properties.
Step 2 – On the Action Properties page, click Configure Action.
Step 3 – In the Active Directory Action Module Wizard, navigate to the Create Groups page.
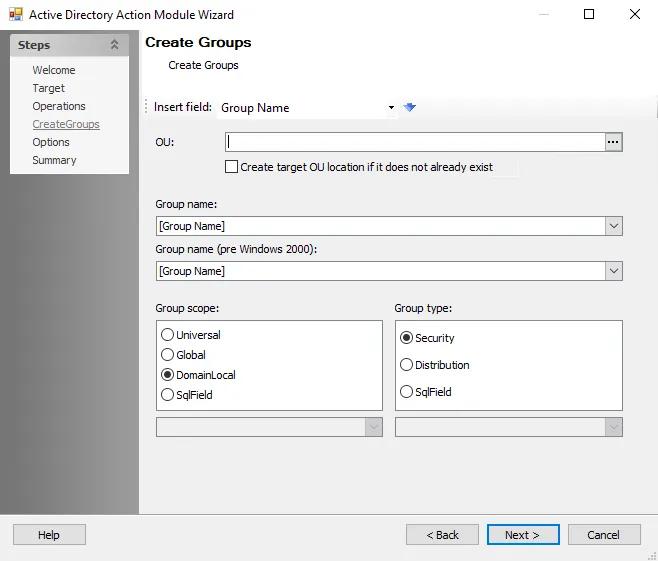
Step 4 – In the OU box, select the OU where the groups will be created.
Step 5 – Navigate to the Options page and verify that the domain controller used to create groups is the same domain controller used in the Update Members action task.
Step 6 – Navigate to the Summary page and click Finish.
Execute Active Directory Action Task
The Create Groups action creates the resource based groups. Enabled action tasks can be manually executed at the Actions node. Action tasks can be scheduled only at the job level. To create the resource based groups:
Step 1 – On the Action Selection page, enable the Create Groups action task.
Step 2 – Right-click the FS_TraverseGroups job and select Run Job.
- Wait for the queued job to execute
The resource based groups are created and populated.
Execute File System Action Task
After you execute the Create Groups action, you can execute the Modify Permissions action. To execute the action:
Before executing the File System action tasks, allow a grace period, for example one week. This is important for token refresh to occur as users log off and log on again.
Step 1 – On the Action Selection page, disable the Create Groups action task.
Step 2 – Enable the Modify Permissions action task.
Step 3 – Right-click the FS_TraverseGroups job and select Run Job.
- Wait for the queued job to execute.
The Modify Permissions action task assigns all of the newly-created groups to File System resources with the configured permissions. All other permissions will have been removed from the resources.
Generate the List Traverse Group Changes Report
The List Traverse Group Changes report displays a list of changes made in the environment by the action modules.
| Report | Description | Default Tags | Report Elements |
|---|---|---|---|
| List Traverse Group Changes | This report shows a list of changes made in the environment by the action modules. | None | This report is comprised of one element:
|
To analyze and report on action history:
Disable all of the action tasks before generating the List Traverse Group Changes report.
Step 1 – On the Action Selection page, disable the Modify Permissions action task. Ensure all of the action tasks are disabled.
Step 2 – On the Analysis Selection page, enable the Create Groups and both Show Table analysis tasks.
Step 3 – Run the job to generate the Action History report and review the actions taken on each share.
The permissions for traverse groups are applied based on the previously created resource based groups. Users retain access to nested folders.