Solution Upgrade Considerations
Consider the following items for upgrades:
Access Information Center
-
Should be upgraded at the same time as Access Analyzer.
noteThe Access Analyzer upgrade should be completed first.
See the Upgrade Procedure for Access Analyzer topic in the Netwrix Access Information Center Documentation for instructions.
Sensitive Data Discovery
-
Access Analyzer 12.0 includes the Sensitive Data Discovery features in the standard installations when your license includes it. If you have the old Sensitive Data Discovery Add-On installed from a previous Access Analyzer version, then you must manually uninstall it from the Access Analyzer Console server, and any File System proxy and SharePoint Agent servers where it is installed, before proceeding with the upgrade.
warningThe new global settings will overwrite any previously configured criteria. Make a note of any configured Sensitive Data Criteria before upgrading Access Analyzer. You must reconfigure Sensitive Data Criteria after an upgrade.
-
You configure Sensitive Data Criteria selection globally, and Access Analyzer uses it by default in all solution sets. See the Configure Global Sensitive Data Settings for additional information.
Active Directory Solution Considerations
- The Active Directory solution by default upgrades as Upgrade in Place. Don't change this
upgrade option. After completing the upgrade, you need to manually add the new Active
Directory > 7. Certificate Authority job group from the
InstantSolutionsdirectory. - For Activity – Ensure the Netwrix Activity Monitor is a compatible version. See the Upgrade Instructions in the Netwrix Activity Monitor Documentation for additional information.
File System Solution Considerations
- For Proxy Mode as a Service – You need to update the File System Proxy Service on the proxy servers. See the Upgrade Proxy Service Procedure topic for instructions.
- For Activity – Ensure the Netwrix Activity Monitor is a compatible version. See the Upgrade Instructions in the Netwrix Activity Monitor Documentation for additional information.
SharePoint Solution Considerations
- For SharePoint Agent – You need to update the Access Analyzer SharePoint Agent on the SharePoint server where you installed it. See the Upgrade SharePoint Agent section for instructions.
- For Activity – Ensure the Stealthbits Activity Monitor is a compatible version. See the Upgrade Instructions in the Netwrix Activity Monitor Documentation for additional information.
The following binary component versions are required for Access Analyzer v12.0:
| Component | Version |
|---|---|
| Access Information Center | 12.0 |
| Netwrix Activity Monitor | 8.0 |
| File System Proxy Service | 12.0 |
| Access Analyzer SharePoint Agent | 12.0 |
File System Solution Upgrade
After upgrading to Access Analyzer 12.0, run the latest version of the File System > 0.Collection > 0-Create Schema job to migrate the File System Solution to the latest database schema.
Perform this database schema migration before running other jobs in the File System Solution after upgrading to Access Analyzer 12.0.
See the File System Solution topic for additional information.
Configure Global Sensitive Data Settings
The new global Settings will overwrite any previously configured criteria. Make a note of any configured Sensitive Data Criteria before upgrading Access Analyzer. You must reconfigure Sensitive Data Criteria after an upgrade.
If you configure Sensitive Data Criteria differently for each solution, re-configure the criteria selection at the solution level. See the topic for the applicable solution for additional information.
If you use the same Sensitive Data Criteria for all solutions, configure the criteria selection at the global Settings > Sensitive Data node, which Access Analyzer then uses by default in all solutions. The Sensitive Data node provides configuration options to manage Sensitive Data Criteria and false positive exclusion filters. See the Sensitive Data topic for additional information.
To configure Sensitive Data Criteria at the global level:
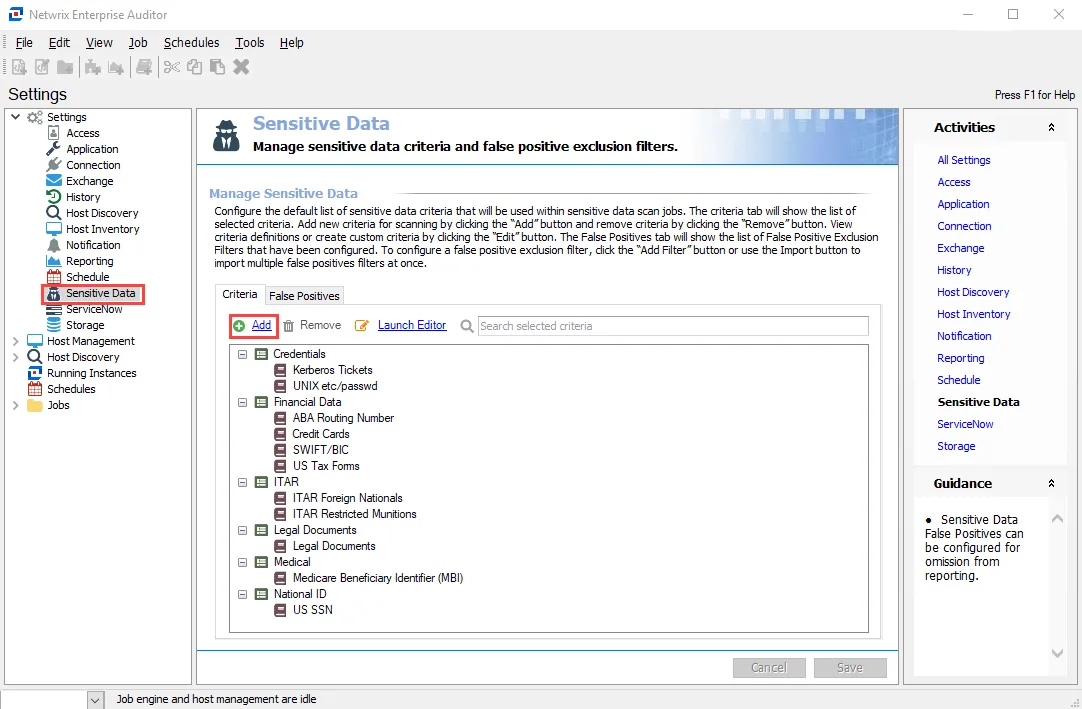
Step 1 – If you use the same Sensitive Data Criteria for all solutions, configure the criteria selection at the global Settings level, which Access Analyzer then uses by default in all solution sets. Navigate to the Settings > Sensitive Data node and click Add to open the Select Criteria window.

Step 2 – Select the criteria you want. Use the Search Criteria text field to filter the list using keywords or expand each category to view and select individual Sensitive Data search criteria, then click OK.
By default, applicable solutions inherit the Sensitive Data Criteria configured at the global Settings level.