CyberArk Integration
For Access Analyzer to retrieve service account passwords from the CyberArk Password Vault, complete the following prerequisites:
-
The Secrets Manager must be installed on the Access Analyzer Console server. The organization’s Vault administrator can provide the Secrets Manager installation package and most likely needs to be present during the installation to provide credentials for the Secrets Manager installation to complete. See the CyberArk Credential Provider (CP) article for additional information.
-
An application must be added to CyberArk for the integration with Access Analyzer. You must then add the Application Id of this application to the
GlobalOptions.xmlfile for Access Analyzer. See the Customize CyberArk Application Id topic for additional information. You can lock down the application by providing an OS User, a Path, or a Hash. See the CyberArk Add applications article for additional information.-
The OS User needs to be the account running Access Analyzer. This could be the account used to launch the Access Analyzer application or an account used as the Schedule Service Account within Access Analyzer. You can add more than one OS User.
-
The Path should be a local path to the
StealthAUDIT.exefile. The path should end with the file name:…\StealthAUDIT.exe. -
Generate the Hash using the AimGetAppInfo tool in the
…\CyberArk\ApplicationPasswordProvider\Utilsfolder on the server where Secrets Manager is installed. Run AimGetAppInfo in an Administrator Command Prompt. Run the following command:..\CyberArk\ApplicationPasswordProvider\Utils\NETAimGetAppInfo.exe GetHash /AppExecutablesPattern <DevInstall>\PrivateAssemblies\Stealthbits.StealthAUDIT.Console.dllinfoPipe the output hash value to a file to copy and paste it to the CyberArk application.
See the CyberArk Generate an application hash value article for additional information.
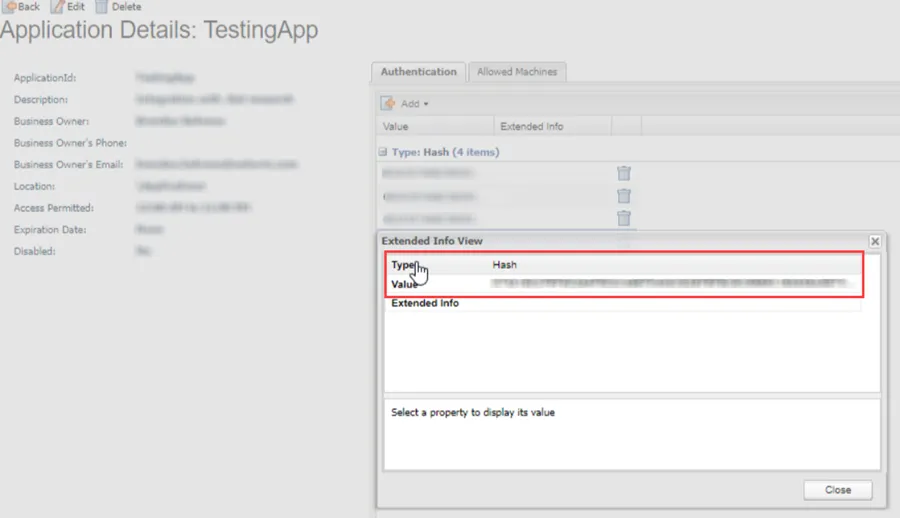
Add the generated hash value in the Authentication tab of the Application Details page for the CyberArk Application.

-
Add the machine name for the Access Analyzer console to the Allowed Machines list for the CyberArk application
-
-
After the Secrets Manager installation completes and you create the Access Analyzer application, give the necessary CyberArk accounts access to the Safes in which the Access Analyzer service accounts are stored. This includes the account CyberArk creates automatically during the Secrets Manager installation, as well as the account created automatically as a result of the application creation.
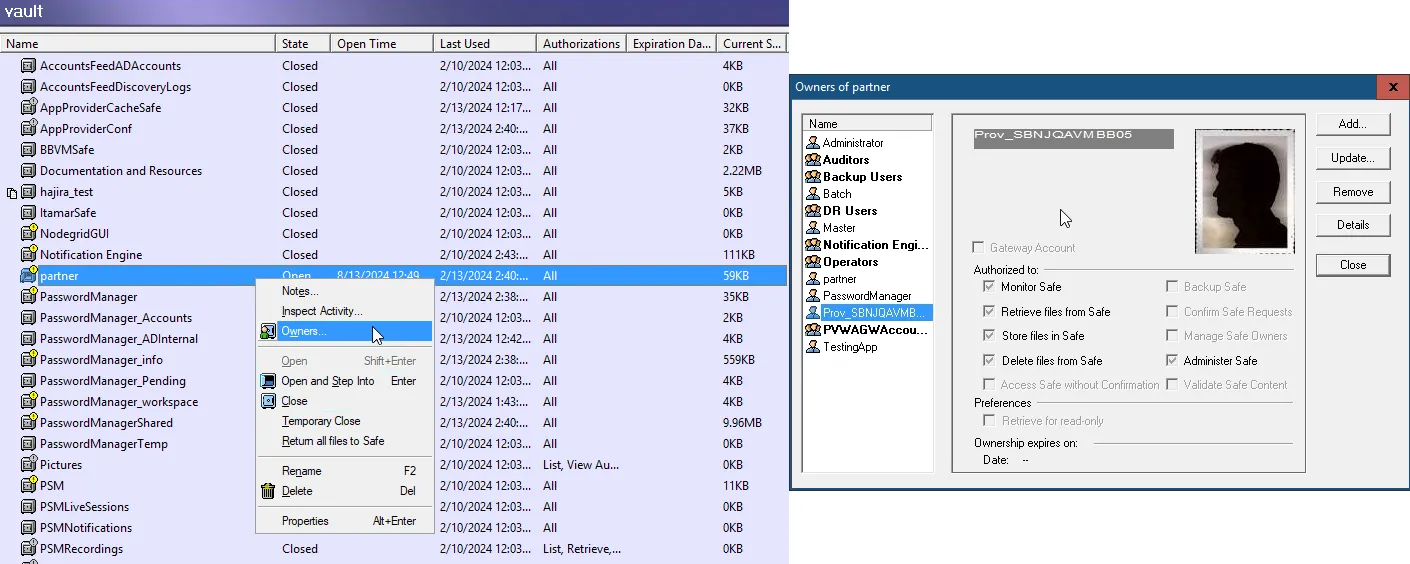
- The account created during the AIM installation is under the naming convention
Prov_[COMPUTERNAME], whereCOMPUTERNAMEis the name of the computer on which AIM is installed. Give this account Retrieve accounts, List accounts, and View Safe Members rights on the Safes it needs to access. - The account created during the application creation has the same name as the application itself. Give it Retrieve accounts rights on the Safes it needs to access
- The account created during the AIM installation is under the naming convention
Customize CyberArk Application Id
You must configure Access Analyzer with the Application id value of the application created within
CyberArk for the integration. You do this in the GlobalOptions.xml file
within the Access Analyzer installation directory. The default location is
…\STEALTHbits\StealthAUDIT\.
Customize the CyberArk Application Id within Access Analyzer:
Step 1 – Navigate to the GlobalOptions.xml file. Open it with a text editor, for example
Notepad.
Ensure Access Analyzer is closed when modifying this file.
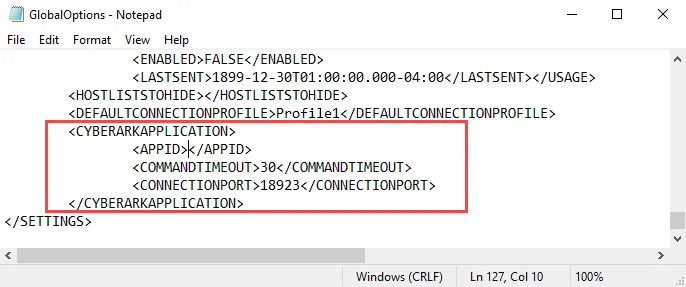
Step 2 – Find the <CYBERARKAPPLICATION> section of the GlobalOptions.xml file. Add the
Application Id of the configured CyberArk application for the integration in the <APPID> tag. If
required, customize the Command Timeout and Connection Port properties.
<CYBERARKAPPLICATION>
    <APPID>CyberArkApplicationID</APPID>
    <COMMANDTIMEOUT>30</COMMANDTIMEOUT>
    <CONNECTIONPORT>18923</CONNECTIONPORT>
</CYBERARKAPPLICATION>
-
AppId – The name of the CyberArk application
-
CommandTimeout – Set to the suggested default of 30
-
ConnectionPort – This is a configurable option found during the installation of the CyberArk Credential Provider. After installation, it is in the configuration file located in the installation folder.
See the CyberArk TCP parameters article for additional information.
Step 3 – Save and close the file.
Access Analyzer now uses the CyberArk Application Id identified in the XML string.
User Credentials Window
In Access Analyzer, the CyberArk option for Password Storage is available on the User Credentials window when configuring an Active Directory Account or Local Windows Account.
The credential information supplied in the User Credentials window must be an exact match to what is in CyberArk as the privileged account for which it is linked. It is case-sensitive.
If you use the Connection Profile with a Local Windows Account credential using CyberArk password storage to target multiple hosts, the local credential on each host needs to have the exact same username and password combination.
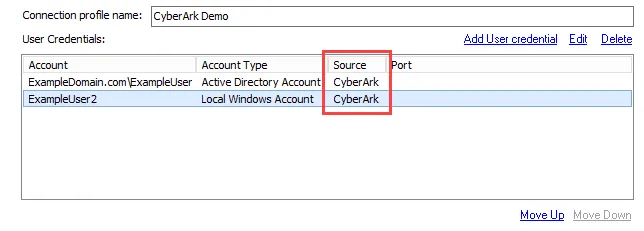
The Connection view displays CyberArk in the Source column of the User Credentials list for the
selected Connection Profile.
Active Directory Account
Match the User Credentials window settings in Access Analyzer with the privilege account properties in CyberArk. These values are case-sensitive, and must be an exact match.

The following table shows the values from your CyberArk configuration that you should use to populate the User Credentials window:
| Access Analyzer | CyberArk Property | CyberArk Description | Example Value |
|---|---|---|---|
| Domain | Address | Domain address | ExampleDomain.com |
| User name | Username | Privilege account | ExampleUser |
| Safe | Safe | Vault managing the privileged accounts | Test |
| Folder | Folder | Folder within Safe | Root |
Local Windows Account
Match the User Credentials window settings in Access Analyzer with the privilege account properties
in CyberArk. These values are case-sensitive, and must be an exact match. The Access Analyzer Domain
value is <HOST> and the CyberArk Address property value is the server address.

The following table shows the values from your CyberArk configuration that you should use to populate the User Credentials window:
| Access Analyzer | CyberArk Property | CyberArk Description | Example Value |
|---|---|---|---|
| User name | Username | Privilege account | ExampleUser2 |
| Safe | Safe | Vault managing the privileged accounts | Test |
| Folder | Folder | Folder within Safe | Root |
Only use one Local Windows Account credential with CyberArk password storage in a Connection Profile. As part of the Access Analyzer to CyberArk integration, the Access Analyzer job stops immediately if the query from Access Analyzer to CyberArk for the credential fails. Therefore, Access Analyzer wouldn't query a second credential within the Connection Profile.