SG_PowerShellCommands Job
The SG_PowerShellCommands job lists suspicious PowerShell commands on all targeted hosts. The list of commands considered can be customized by configuring the Check PowerShell Log query.
Queries for the SG_PowerShellCommands Job
The SG_PowerShellCommands job uses the SmartLog Data Collector for the following queries:
The Check PowerShell Operations log query is preconfigured for this job. Never modify the query.
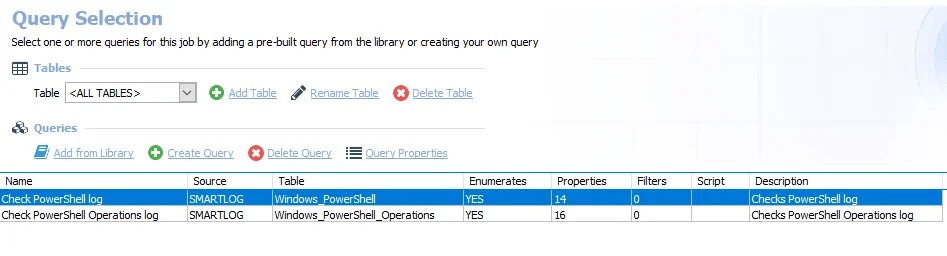
The queries for the SG_PowerShellCommands job are:
-
Check PowerShell log – Checks the PowerShell log
- (Optional) This query can be configured. See the Configure the Check PowerShell log Query topic for additional information.
-
Check PowerShell Operations log – Checks the PowerShell Operational log
Configure the Check PowerShell log Query
The Check PowerShell log query has been preconfigured to run with the default settings. However, you can add new criteria on the Criteria page in the Smart Log Data Collector Wizard.
Step 1 – Navigate to the Jobs > Windows > Security Utilities > SG_PowerShellCommands > Configure node and select Queries. Select the Check PowerShell log query.
Step 2 – In the Query Selection view, click Query Properties. The Query Properties window opens.
Step 3 – Select the Data Source tab, and click Configure. The Smart Log Data Collector Wizard opens.
Step 4 – If the Criteria tab is grayed out, click Next through the windows until the tab is accessible.
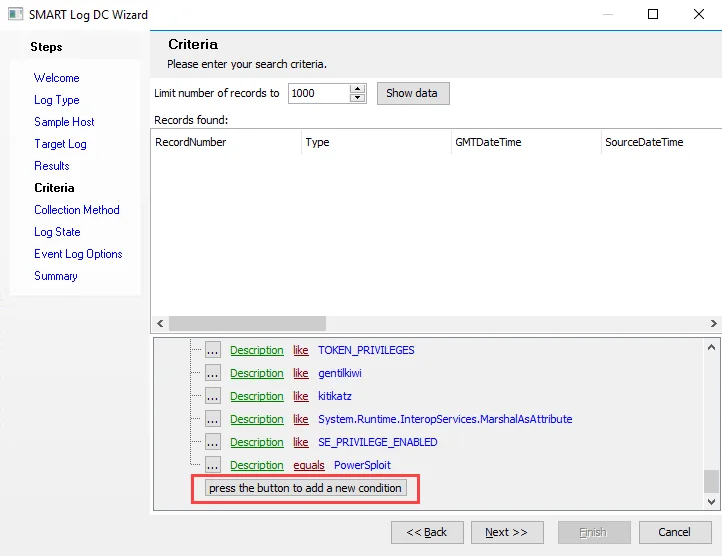
Step 5 – On the Criteria page, click the press the button to add a new condition box.
Step 6 – Enter the conditions you want.
Step 7 – Click Next to navigate to the Summary page and click Finish.
The Check PowerShell log query has now been saved with the new conditions.
Analysis Tasks for the SG_PowerShellCommands Job
View the analysis tasks by navigating to the Windows > Security Utilities > SG_PowerShellCommands > Configure node and selecting Analysis.
Don't modify or deselect the selected analysis tasks. The analysis tasks are preconfigured for this job.
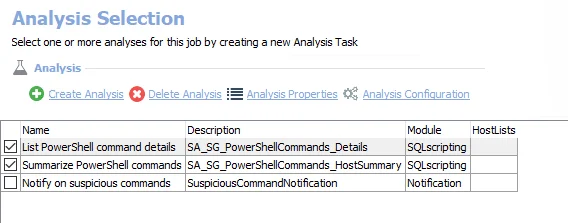
The default analysis tasks are:
- List PowerShell command details – Creates an interim processing table in the database for use by downstream analysis and report generation
- Summarize PowerShell commands – Creates the SA_PowerShellCommands_HostSummary table accessible under the job’s Results node
The optional analysis task is:
- Notify on suspicious commands – Enable this analysis task and the select Analysis Configuration to open the Notification Data Analysis Module Wizard to configure it to send notifications on suspicious commands. See the Configure the Notify on Suspicious Commands Analysis Task topic for additional information.
In addition to the tables and views created by the analysis tasks, the SG_PowerShellCommands job produces the following pre-configured report.
| Report | Description | Default Tags | Report Elements |
|---|---|---|---|
| Suspicious PowerShell Commands | This report highlights suspicious PowerShell commands found in a host's PowerShell log. | None | This report is comprised of three elements:
|
Configure the Notify on Suspicious Commands Analysis Task
To configure the notification analysis task:
Step 1 – Navigate to the Jobs > Windows > Security Utilities > SG_PowerShellCommands > Configure node and select Analysis.
Step 2 – In the Analysis Selection view, select the Notify on suspicious commands analysis task and click Analysis Configuration. The Notification Data Analysis Module opens.
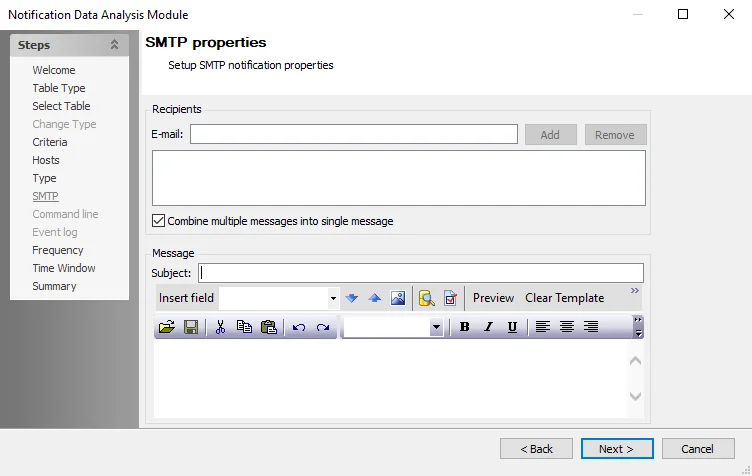
Step 3 – Use the Next button to navigate to the SMTP page. Don't make changes to the preceding pages.

Step 4 – In the Recipients section, provide the email addresses or distribution lists (fully qualified address) for the people who receive this notification. You can provide multiple addresses. You can use the following options:
- Add – Add an email address to the E-mail field
- Remove – Remove an email address from the Recipients list
- Combine multiple messages into single message – Sends one email for all objects in the record set instead of one email per object to all recipients

Step 5 – In the Message section, edit the Subject. Don't remove any parameters. Then, customize the email content in the textbox to provide an explanation of the notification to the recipients.
Step 6 – To save these configuration changes, use the Next button to navigate to the Summary page. Don't make changes to any other pages. Click Finish. The Notification Data Analysis Module window closes.
Step 7 – This notification analysis task is now configured to send emails. In the Analysis Selection view, select this task so that the SG_PowerShellCommands job sends notifications automatically when it runs.
The Notify on suspicious commands analysis task is now configured to send notifications.