Install & Configure Dell CEE
You should install Dell CEE on a Windows or a Linux server. The Dell CEE software isn't a Netwrix product. Dell customers have a support account with Dell to access the download.
Remember, the latest version is the recommended version of Dell CEE.
You can install the Dell CEE package on the Windows server where the Activity Monitor agent will be deployed (recommended) or on any other Windows or Linux server.
Install the Dell CEE.
Step 1 – Obtain the latest CEE install package from Dell and any additional license required for this component. Netwrix recommends using the most current version.
Step 2 – Follow the instructions in the Dell Using the Common Event Enabler on Windows Platforms guide to install and configure the CEE. The installation will add two services to the machine:
- EMC Checker Service (Display Name: EMC CAVA)
- EMC CEE Monitor (Display Name: EMC CEE Monitor)
Netwrix recommends using the latest version of .NET Framework and Dell CEE with the asynchronous bulk delivery (VCAPS) feature.
See the CEE Debug Logs section for information on troubleshooting issues related to Dell CEE.
After Dell CEE installation is complete, proceed to Connect Data Movers to the Dell CEE Server.
Configure Dell Registry Key Settings
There may be situations when you need to install Dell CEE on a different Windows server than the one where the Activity Monitor activity agent is deployed. In those cases, manually set the Dell CEE registry key to forward events.
Step 1 – Open the Registry Editor (run regedit).
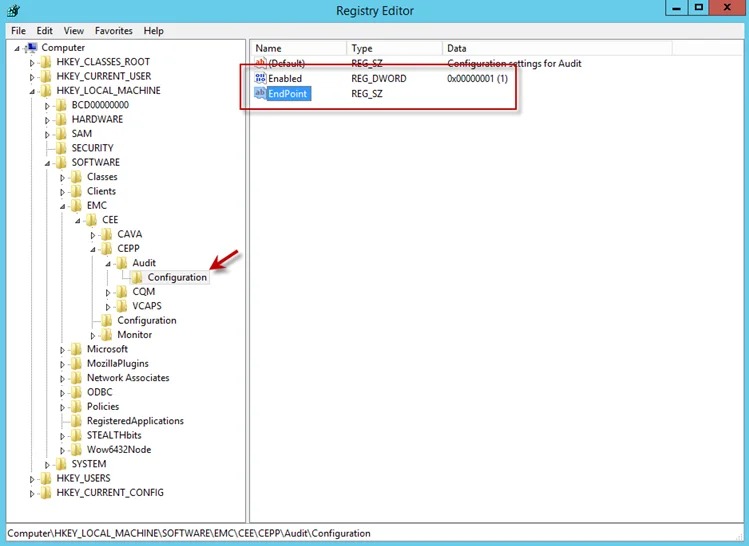
Step 2 – Navigate to following location:
HKEY_LOCAL_MACHINE\SOFTWARE\EMC\CEE\CEPP\AUDIT\Configuration
Step 3 – Right-click Enabled and select Modify. The Edit DWORD Value window opens.
Step 4 – In the Value data field, enter the value of 1. Click OK, and the Edit DWORD Value window closes.
Step 5 – Right-click EndPoint and select Modify. The Edit String window opens.
Step 6 – In the Value data field, enter the StealthAUDIT value with the IP Address for the Windows proxy server hosting the Activity Monitor activity agent. Use the following format:
StealthAUDIT@[IP ADDRESS]
Examples:
StealthAUDIT@192.168.30.15
Step 7 – Click OK. The Edit String window closes. You can close Registry Editor.
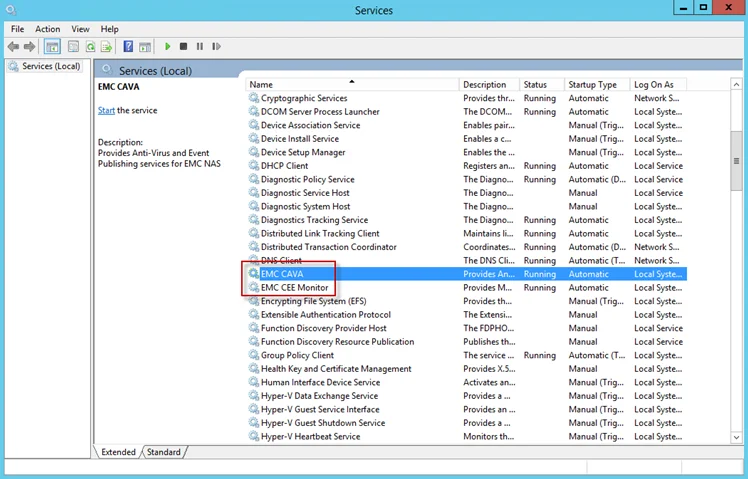
Step 8 – Open Services (run services.msc). Start or Restart the EMC CEE Monitor service.
You've now properly configured the Dell CEE registry key to forward events to the Activity Monitor activity agent.
Connect Data Movers to the Dell CEE Server
The cepp.conf file contains information that is necessary to connect the Data Movers to the Dell
CEE server. An administrator must create a configuration file which contains at least one event, one
pool, and one server. All other parameters are optional. The cepp.conf file resides on the Data
Mover.
Step 1 – Log into the Dell Celerra or VNX server with an administrator account. The administrative account should have a $ character in the terminal.
Don't use a # charter.
Step 2 – Create or retrieve the cepp.conf file.
If there isn't a cepp.conf file on the Data Movers, use a text editor to create a new blank
file in the home directory named cepp.conf. The following is an example command if using the text
editor ‘vi’ to create a new blank file:
$ vi cepp.conf
If a cepp.conf file already exists, you can retrieve it from the Data Movers for modification
with the following command:
$ server_file [DATA_MOVER_NAME] -get cepp.conf cepp.conf
Step 3 – Configure the cepp.conf file. For information on the cepp.conf file, see the Dell
Using the Common Event Enabler for Windows Platforms
guide instructions on how to add parameters or edit the values or existing parameters.
You can add the information to the file on one line or separate lines by using a space
and a ”\” at the end of each line, except for the last line and the lines that contain global
options: cifsserver, surveytime, ft, and msrpcuser.
You must set the following parameters for the Activity Monitor in the cepp.conf file:
-
pool name=- This should equal the name assigned to the configuration container. This container is composed of the servers IP Address or FQDN where the Dell CEE is installed and where the list of events to be monitored is located. It can be named as desired but must be a pool name.
-
servers=- This should equal the IP Address or FQDN of the Windows server where the Dell CEE is installed. If several servers are specified, separate them with the vertical bar (|) or a colon (:).
-
postevents=- The following events are required (separated with the vertical bar):
CloseModified|CloseUnmodified|CreateDir|CreateFile|DeleteDir|DeleteFile|RenameDir|RenameFile|SetAclDir|SetAclFile - If "Directory Read/List" operations are needed, append
OpenDirto the list.
- The following events are required (separated with the vertical bar):
-
msrpcuser=-
This should equal the domain account used to run the Dell CEE Monitor and Dell CAVA services on the Windows server. This parameter is a security measure used to ensure events are only sent to the appropriate servers.
All unspecified parameters use the default setting. For most configurations, the default setting is sufficient.
Example cepp.conf file format:
msrpcuser=[DOMAIN\DOMAINUSER]pool name=[POOL_NAME] \servers=[IP_ADDRESS1]|[IP_ADDRESS2]|... \postevents=[EVENT1]|[EVENT2]|...Example cepp.conf file format for the Activity Monitor:
msrpcuser=[DOMAIN\DOMAINUSER running CEE services]pool name=[POOL_NAME for configuration container] \servers=[IP_ADDRESS where CEE is installed]|... \postevents=[EVENT1]|[EVENT2]|...Example of a completed cepp.conf file for the Activity Monitor:
msrpcuser=example\user1pool name=pool \servers=192.168.30.15 \postevents=CloseModified|CloseUnmodified|CreateDir|CreateFile|DeleteDir|DeleteFile|RenameDir|RenameFile|SetAclDir|SetAclFile -
Step 4 – Move the cepp.conf file to the Data Movers root file system. Run the following
command:
$ server_file [DATA_MOVER_NAME]‑put cepp.conf cepp.conf
Each Data Mover which runs Celerra Event Publishing Agent (CEPA) must have a cepp.conf
file, but each configuration file can specify different events.
Step 5 – (This step is required only if using the msrpcuser parameter) Register the MSRPC user
(see Step 3 for additional information on this parameter). Before starting CEPA for the first time,
the administrator must issue the following command from the Control Station and follow the prompts
for entering information:
/nas/sbin/server_user server_2 -add -md5 -passwd [DOMAIN\DOMAINUSER for msrpcuser]
Step 6 – Start the CEPA facility on the Data Mover. Use the following command:
server_cepp [DATA_MOVER_NAME] -service –start
Then verify the CEPA status using the following command:
server_cepp [DATA_MOVER_NAME] -service –status
After you've configured the cepp.config file, configure and enable monitoring with
the Activity Monitor. See the
Netwrix Activity Monitor Documentation
for additional information.