Securing the Web Console
You can access published reports in the Web Console. There are several options for enhancing security.
Additional configuration options for enhanced security include:
-
Enable SSL – The
BindingUrlparameter shows the port used by the Enterprise Auditor web server for SSL reports. If SSL is enabled, the value will be HTTPS instead of HTTP. -
Enable Multiple Domain Access – The
AuthenticationDomainsparameter allows the Web Console to be accessed from multiple domains. By default this parameter is blank, allowing only domain users from the domain where the Enterprise Auditor Console resides to access the Web Console. -
Enable Single Sign-On – The
WindowsAuthenticationparameter allows domain users to be automatically logged into the Web Console. By default this parameter is set tofalse, which requires domain users to login each time the Web Console is accessed. See the Enable Single Sign-On topic for additional information.noteThe Web Console also supports using Microsoft Entra ID single sign-on. See the Microsoft Entra ID Single Sign-On topic for additional information.
You can configure these parameters within the WebServer.exe.config file in the Web folder of
the Enterprise Auditor installation directory …\STEALTHbits\StealthAUDIT\Web.
Enable SSL for the Web Console
To enable Secure Sockets Layer (SSL) for secure, remote connections to the Web Console, bind a certificate to the port. See the Use a Self-Signed Certificate for SSL topic for more information. Follow the steps on the server where Enterprise Auditor is installed to enable SSL for the Web Console.
The following steps require a certificate to be available. Organizations typically have one or more system administrators responsible for Public Key Infrastructure (PKI) and certificates. Before continuing with this configuration, confer with the PKI administrator to determine which certificate method will conform to the organization’s security policies. Optionally, see Use a Self-Signed Certificate for SSL for an Administrator PowerShell command which will both create and import a self-signed certificate.
Step 1 – Import the certificate to the hosting server using the Certificate Management MMC snap-in.
If you use a self-signed certificate, you'll also need to import it.
Step 2 – Create an SSL binding. Use the certificate's Hash value for the
$certHash value:
You can run the following Administrator PowerShell dir command on the certificate's “drive” to find the Hash value of a certificate that you already created; the output includes the Thumbprint (Hash) value and the certificate name:
dir cert:\localmachine\my
-
Run the following command using Administrator PowerShell to create the SSL binding, with the appropriate
certHashvalue:$guid = "bdd5710f-7cbe-4f85-b8c1-da4bddf485a8"$certHash = "80F78FD2566793D2F39E748CDF6DED09B6F57A82" # the 'Thumbprint' value$ip = "0.0.0.0" # this means all IP addresses$port = "8082" # the default HTTPS port"http add sslcert ipport=$($ip):$port certhash=$certHash appid={$guid}" | netsh
Step 3 – Open the WebServer.exe.config file with a text editor, for example Notepad. It is located within the Web folder of the Enterprise Auditor installation directory.
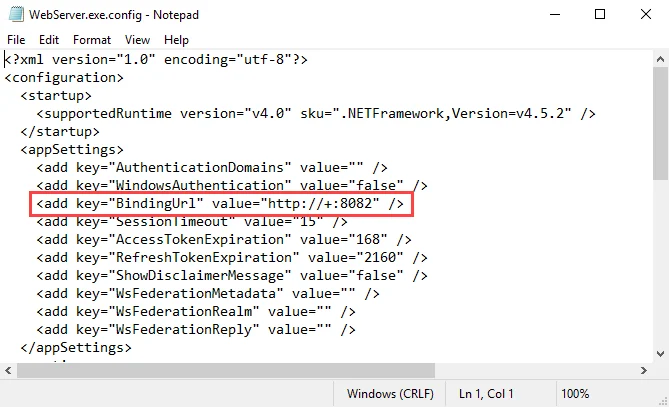
Step 4 – Change the value for the BindingUrl parameter from http to https:
<add key="BindingUrl" value="https://+:8082" />
- After changing the
BindingUrlvalue in the WebServer.exe.config file, you must update the Website URL to match the new value in the following places:- Enterprise Auditor's Settings > Reporting node
- Enterprise Auditor's Published Reports Desktop icon properties
- See the Update Website URLs topic for additional information.
Step 5 – Save and close the file.
Step 6 – Navigate to Services (services.msc). Restart the Netwrix Enterprise Auditor Web
Server service.
If you also use the AIC, you need to enable SSL for the AIC using this certificate. See the Securing the AIC section of the Netwrix Access Information Center Documentation for additional information.
You have now enabled the Web Console for SSL communication. Access it using the server’s fully
qualified domain name and the HTTPS port (https://[hostname.domain.com]:8082). If you used a
self-signed certificate, client-side access to the Web Console will generate a Certificate error. See the
Add the Certificate for Client-Side Access topic for
additional information.
Update Website URLs
If you update the Binding URL value in Enterprise Auditor's WebServer.exe.config file, you must update the Website URL to match the new value in the following places:
- Enterprise Auditor's Reporting node (Settings > Reporting)
- Enterprise Auditor's Published Reports Desktop icon properties
Update the Website URL in the Reporting Node
To update the Website URL in the Settings > Reporting node:
Step 1 – Expand Settings and select the Reporting node.
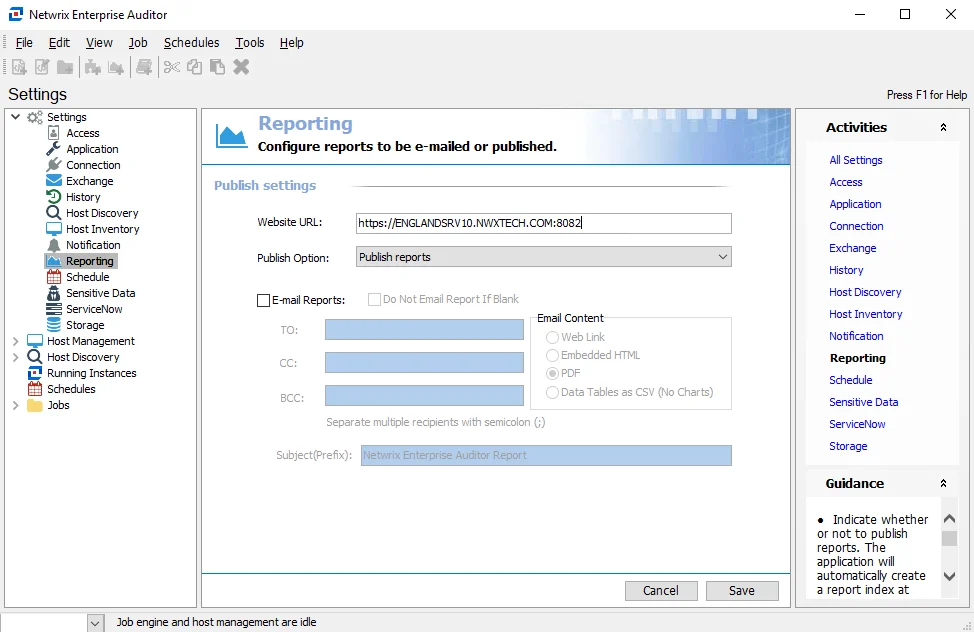
Step 2 – In the Website URL box, update the URL to: https://[hostname.domain.com]:8082
Step 3 – Click Save.
You have now updated the Website URL.
Update the URL in the Published Reports Desktop Icon Properties
To update the URL in the Published Reports desktop icon's Published Report's Properties window:
Step 1 – Right click the Published Reports desktop shortcut and click Properties.

Step 2 – On the Web Document tab, update the URL in the text box to:
https://localhost:8082/
Step 3 – Click Apply and then OK to exit.
You have now updated the URL.
Remove Certificate from the Port
Remove or unbind the certificate from the port by running the following Administrator PowerShell command:
netsh http delete sslcert ipport=0.0.0.0:8082 # ip and port used when binding
List SSL Certificate Bindings
You can run the following PowerShell command to list all SSL certificate bindings and use this to validate which certificates are bound to specific ports:
netsh http show sslcert
Use a Self-Signed Certificate for SSL
If you want to use a self-signed certificate, use the New-SelfSignedCertificate cmdlet, which is
available in Administrator PowerShell 3.0+ to generate and import the certificate:
New-SelfSignedCertificate -DnsName machinename.domain.com -CertStoreLocation Cert:\LocalMachine\My
The output will show this info:
Thumbprint Subject
---------- -------
80F78FD2566793D2F39E748CDF6DED09B6F57A82 CN=machinename.domain.com
The Thumbprint value is the certificate Hash value to be used when binding to the port. The port can be the same as in HTTP (8082). Use this Hash value for Step 2 of the Enable SSL for the Web Console instructions.
You can validate creation and import of the self-signed certificate in Microsoft Management Console. To confirm the certificate is in Microsoft Management Console:
Step 1 – Open Microsoft Management Console (mmc.exe).
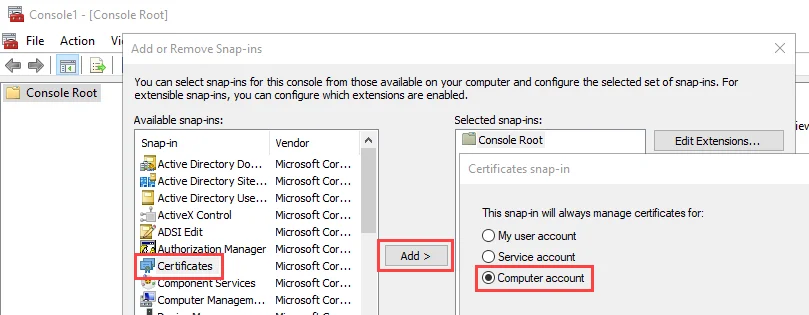
Step 2 – Select File > Add/Remove Snap-in. The Add or Remove Snap-ins window opens. Select Certificates, and click Add. Then select Computer account in the Certificates snap-in window.
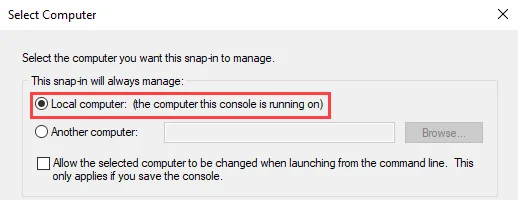
Step 3 – Click Next and select Local computer. Click Finish.
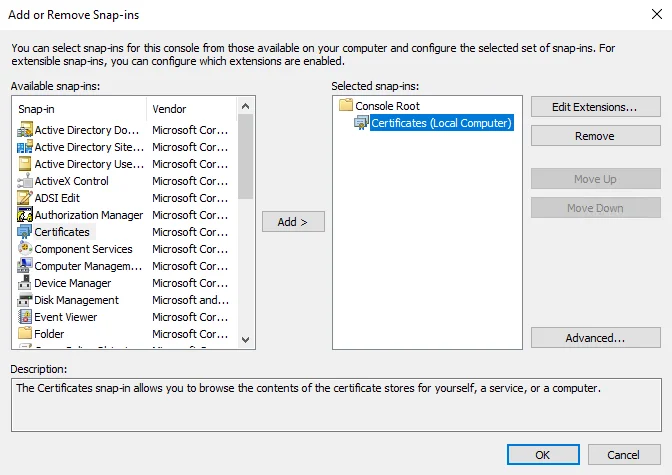
Step 4 – The certificate will appear in the Selected snap-ins list in the Add or Remove Snap-ins window. Click OK to close the window.
Step 5 – Navigate to Certificates > Personal > Certificates. The certificate should show in the pane on the right.
You created and imported the self-signed certificate. Repeat these steps for each client-side host.
Add the Certificate for Client-Side Access
When you open the Web Console with SSL enabled, the web browser shows a Your connection isn't private warning message. You can remove this by importing the certificate onto the client server.
To remove the certificate error:
Step 1 – Open the Web Console in your browser.
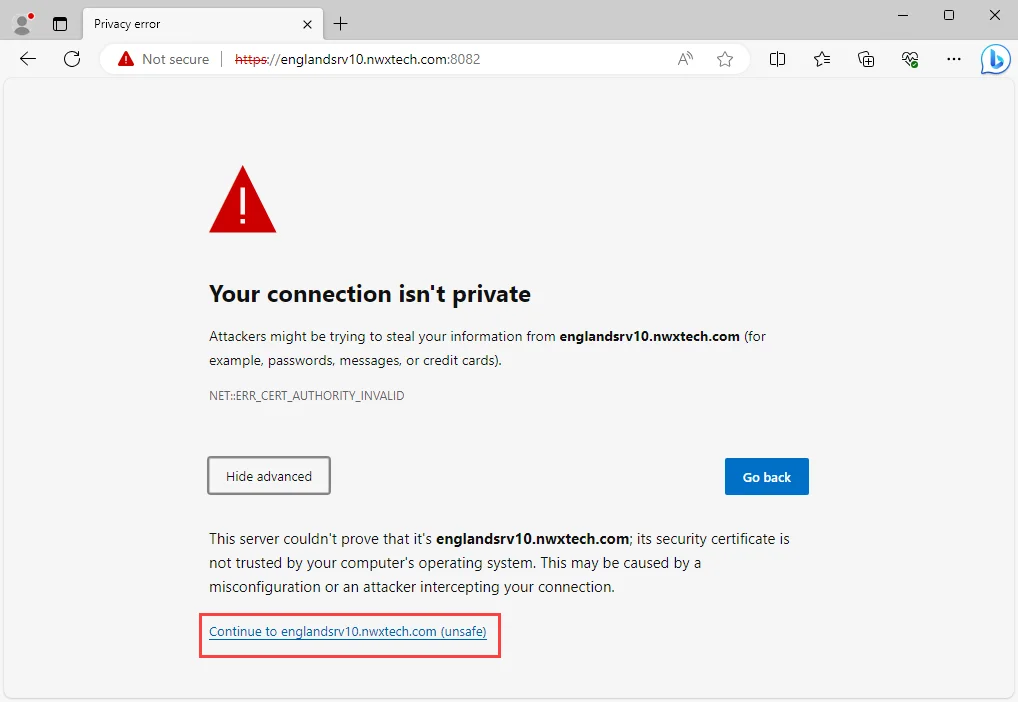
Step 2 – Click Advanced, and then use the link to continue to the site. This loads the main page of the Web Console.
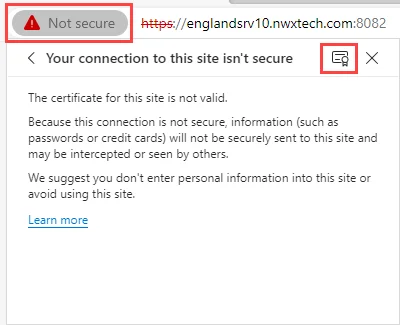
Step 3 – Click the Not Secure warning in the browser's address bar. Open the Certificate Viewer from the warning details.
- In Microsoft Edge, click the Your Connection to this site isn't secure section, and then click the certificate icon.
- In Google Chrome, click Certificate isn't valid.

Step 4 – On the Details tab of the Certificate Viewer, click Export. Save the security certificate and close the Certificate Viewer.
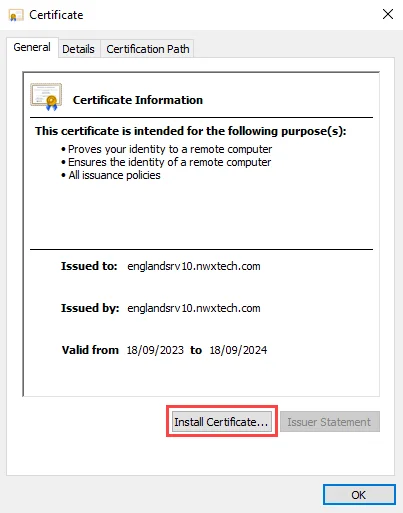
Step 5 – Navigate to the save location from the previous step and open the exported security certificate. On the Certificate window, click Install Certificate. The Certificate Import Wizard opens.

Step 6 – On the Certificate Import Wizard, select the Store Location as Local Machine, and click Next. Keep the default selection of Automatically select the certificate store based on the type of certificate. Navigate through the wizard to save this configuration. A pop-up message should state that the import was successful. Click OK to close out all dialogs.
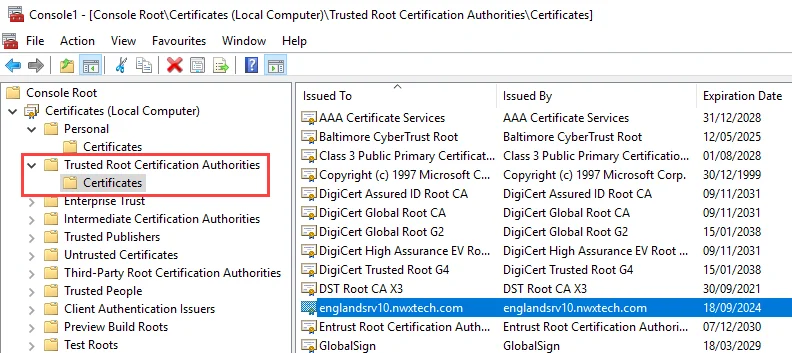
Step 7 – In the Microsoft Management Console, check the Trusted Root Certification Authorities > Certificates. The self-signed certificate should now be listed there.
The client-side access to the Web Console will no longer generate a certificate error. Repeat these steps for each client-side host.