Microsoft Entra ID Single Sign-On
You can configure Microsoft Entra ID Single Sign-On (SSO) for logging in to the Web Console to view reports. When configured, the Web Console directs users to the Microsoft Entra ID login page, where they can log in using their existing Entra credentials.
The following is required to use Microsoft Entra ID SSO:
- SSL must be enabled
- The on-premise Active Directory must be synced with Microsoft Entra ID
To enable Microsoft Entra ID SSO, you must first create a registered application in Microsoft Entra ID, and then configure the Web Console to use it.
Configure an Application in Microsoft Entra ID
You must register an application for the Web Console with your Microsoft Entra ID tenant and configure it with the necessary single sign-on settings. To create and configure the application:
Step 1 – Sign into the Microsoft Entra admin center.
Step 2 – On the left navigation menu, navigate to Identity > Applications > Enterprise Applications. On the top toolbar, click App registrations and then Create your own application.
Step 3 – On the Create your own application page, enter a name for your application and select the Integrate any other application you don't find in the gallery option. Click Create to finish creating the application.
Step 4 – In your application, go to Manage > Single sign-on. Select SAML as the single sign-on method.
Step 5 – On the Set up Single Sign-On with SAML page, click Edit on the Basic SAML Configuration section. Add your Identifier and Reply URL, and then click Save.
-
As the Identifier, enter
https://<FQDN of web server>:<port number>, for example:https://app0190.train90.local:8082 -
As the Reply URL, enter
https://<FQDN of web server>:<port number>/federation, for example:https://app0190.train90.local:8082/federation
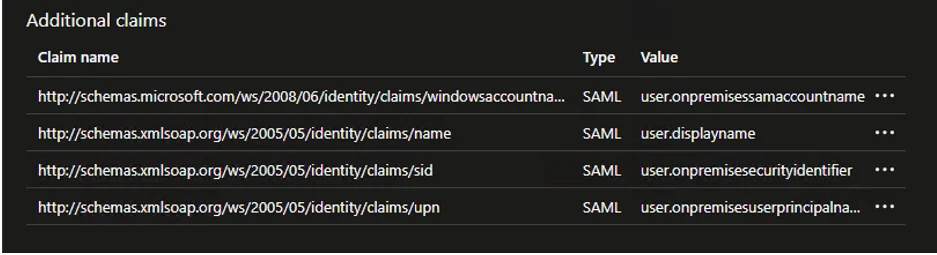
Step 6 – Next, click Edit on the Attributes & Claims section. The four claims in the following table are required. For each of these, click Add new claim, enter the information from the table, and then click Save.
| Name | Namespace | Source attribute |
|---|---|---|
| windowsaccountname | http://schemas.microsoft.com/ws/2008/06/identity/claims | user.onpremisessamaccountname |
| name | http://schemas.xmlsoap.org/ws/2005/05/identity/claims | user.displayname |
| sid | http://schemas.xmlsoap.org/ws/2005/05/identity/claims | user.onpremisessecurityidentifier |
| upn | http://schemas.xmlsoap.org/ws/2005/05/identity/claims | user.onpremisesuserprincipalname |
Once configured, they should show under Additional claims as follows:
Step 7 – In the Manage > Users and groups section for your application, add any required users or groups to give permission to access the application.
You have now configured the application with the necessary settings. The next step is to enable the use of Microsoft Entra ID SSO in the web server config file.
Enable in the Web Server Config File
To enable Microsoft Entra ID SSO for the Web Console, you need to update the web server config file with values from Microsoft Entra ID. To enable the SSO:
Before enabling Entra ID SSO, ensure you've already enabled SSL for the web server. See the Securing the Web Console topic for additional information.
Step 1 – Open the WebServer.exe.config file with a text editor, for example Notepad. It is located within the Web folder of the Enterprise Auditor installation directory.
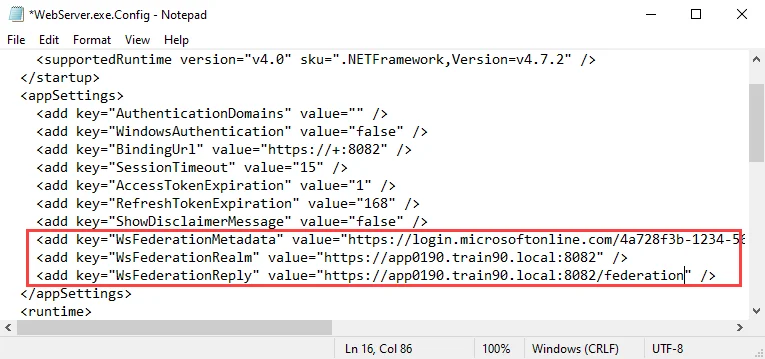
Step 2 – Locate the WsFederationMetaData, WsFederationRealm, and WsFederationReply Parameters in the config file, and add the required values from your Microsoft Entra ID application:
-
WsFederationMetaData – Metadata markup for describing the services provided
- This value can be retrieved from your application in Microsoft Entra ID: Manage > Single sign-on > SAML Certificates > App Federation Metadata Url
-
WsFederationRealm – Maps to the application identifier to Microsoft Entra ID
- This value can be retrieved from your application in Microsoft Entra ID: Manage > Single sign-on > Basic SAML Configuration > Identifier
-
WsFederationReply – This is the endpoint for the configured relying party trust
- This value can be retrieved from your application in Microsoft Entra ID: Manage > Single sign-on > Basic SAML Configuration > Reply URL
For example:
    <add key="WsFederationMetadata" value="https://login.microsoftonline.com/4a728f3b-1234-5678-90ab-cdef13246789/federationmetadata/2007-06/federationmetadata.xml?appid=5d3f1a2e-9876-5432-10ba-fedcba098765" />
    <add key="WsFederationRealm" value="https://app0190.train90.local:8082" />
    <add key="WsFederationReply" value="https://app0190.train90.local:8082/federation" />
Step 3 – Save and close the file.
Step 4 – Navigate to Services (services.msc). Restart the Netwrix Enterprise Auditor Web
Server service.
You have now enabled the Web Console for Microsoft Entra ID single sign-on.