Enterprise Auditor Database
The Enterprise Auditor database is dynamic in nature. There are a handful of required system tables that Enterprise Auditor creates at installation time or when you use individual features for the first time. Enterprise Auditor creates and binds all other data tables in the database to individual jobs that you add to the Enterprise Auditor Console. As you create and modify jobs, Enterprise Auditor creates and modifies corresponding tables in the database. A job can generate one or more tables.
The Enterprise Auditor data collector that collects data and writes results to the table controls the structure and schema of each data table. There is a one-to-one relationship between a task created within a Enterprise Auditor job and the table to which the task writes results. Creating tasks or adding and removing properties within a task modifies the schema of the table on subsequent execution of the job.
Enterprise Auditor offers users the ability to modify its preconfigured jobs or create custom jobs and tasks as needed. Therefore, precise schema information for data tables can't be predicted, restricted, or locked down.
Database Permissions
The account configured in the storage profile to be used by Enterprise Auditor to access the database should have the necessary rights to Add, Alter, Create, Drop, Select, and Update. These rights are critical to normal Enterprise Auditor operations and functionality.
The account used by Enterprise Auditor should have database owner (DBO) level access to the database.
If you can't obtain database owner rights, a database administrator (DBA) can execute the following
SQL script against the Enterprise Auditor database to grant the necessary permissions to
the appropriate users (replacing <SA User ID> and <SA Database> with the appropriate values):
USE [master]GRANT VIEW ANY DEFINITION TO [<SA User ID>]
GO
USE [<SA Database>]
GO
EXEC sp_addrolemember 'db_datareader', '<SA User ID>'
GO
EXEC sp_addrolemember 'db_datawriter', '<SA User ID>'
GO
GRANT CREATE TABLE TO [<SA User ID>]
GO
GRANT CREATE VIEW TO [<SA User ID>]
GO
GRANT CREATE PROCEDURE TO [<SA User ID>]
GO
GRANT CREATE FUNCTION TO [<SA User ID>]
GO
GRANT CREATE TYPE TO [<SA User ID>]
GO
GRANT REFERENCES ON SCHEMA::dbo TO [<SA User ID>]
GO
GRANT ALTER ON SCHEMA::dbo TO [<SA User ID>]
GO
GRANT EXECUTE ON SCHEMA::dbo TO [<SA User ID>]
GO
GRANT INSERT ON SCHEMA::dbo TO [<SA User ID>]
GO
GRANT UPDATE ON SCHEMA::dbo TO [<SA User ID>]
GO
Alter User [<SA User ID>] with DEFAULT_SCHEMA = dbo
Database Sizing
SQL Server storage considerations vary. As Enterprise Auditor is a highly customizable auditing platform, variables such as query scope, the number of hosts, frequency, historical retention, and reporting needs are a few of the factors which affect the database resource consumption by Enterprise Auditor.
- Query Scope – Amount of data configured to be returned from each query (queries are dynamic and can be configured to return one row per host or tens of thousands)
- Number of Hosts – Number of hosts targeted for auditing objectives
- Frequency – How often jobs are run
- Historical Retention – Amount of collected data to be retained in source data tables based on a user-configured time frame
- Reporting Needs – Anticipated data needed to generate reports
The Requirements topics provide recommended SQL Server database sizes for specific solutions. These recommendations are based on environmental factors, the number of target objects within an environment (users, hosts, mailboxes, etc.), and the applicable factors described earlier for the specific solution.
Customer Examples of Database Sizing
An organization's auditing objectives ultimately govern the overall database size. The following examples provide a glimpse into how these objectives combine with the applicable factors described earlier to impact the Enterprise Auditor database resource consumption.
- Example from an Active Directory Solution Customer
- An Active Directory (AD) customer intends to collect AD User/Group/Membership information and run the standard Active Directory Solution within their environment. In an environment of 50,000 Users and 200,000 Groups, the database can be 50 GB in size. The expansion of group information can also require 20 GB of TEMPDB space.
- Example from a Data Access Governance Solution Customer
- A Data Access Governance customer using the File System Solution intends to collect and report on file system permissions, and optionally to profile size, age, extensions, and ownership of files in the organization. The database for a typical mid-sized organization could be anywhere from 60 GB to upward of 240 GB, depending on the number of folders scanned, which can vary greatly in depth and width. Electing to collect content-related information will also impact database size.
- Another Example from a Data Access Governance Solution Customer
- A Data Access Governance customer using the File System Solution intends to inventory 1.3 PB of files spread across 600+ standalone (non-clustered) Windows file servers, collecting information on file permissions and ages (and possibly, ad hoc, information on file system activity) with an overall plan to identify stale data, consolidate active data on a subset of the organization’s file system infrastructure, and to move that active data to a cloud-based platform like SharePoint Online. The customer plans to use Activity monitoring (FSAC) ad hoc against open shares to profile resource ownership and validate the “staleness” of certain resources. The database sizing for a project of this scope could be up to 750 GB for the database, 240 GB for the transaction log, and 380 GB of TEMPDB space.
- Example from an Exchange Solution Customer
- An Exchange customer only intends to collect Mail-Flow Metrics for 100,000 Mailboxes from 10 HUB Servers in the organization. However, the customer would like to keep six months of history on User to User Activity sent internally and externally, as well as one year of Server and User Volume Traffic. This database can grow to around 320 GB.
- Example from a Windows Solution Customer
- A Windows customer intends to audit and retain Success and Failed login events for five member servers retaining the data for twelve months within their environment. The database can be 100 GB in size.
Securing the Enterprise Auditor Database
The typical database configuration assigns the sysadmin Server Role to the ID used to connect to the SQL instance, which allows full control over the instance where the Enterprise Auditor database resides. Administrators typically choose this configuration because Enterprise Auditor requires some interaction with the master database to install and configure the initial Enterprise Auditor database. To secure the Enterprise Auditor database, follow these steps to achieve the minimum SQL security levels without breaking core Enterprise Auditor functionality.
Database Creation & First Level of Security
Use SQL Server Management Studio to create the Enterprise Auditor database and configure the settings for the server roles and user mappings.
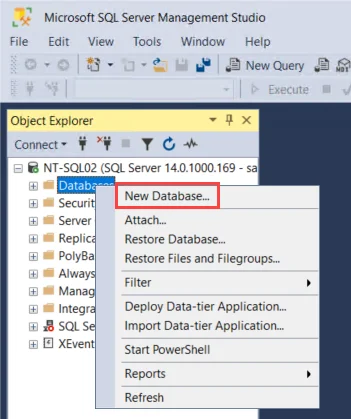
Step 1 – Create a new database for use with Enterprise Auditor. Right-click the Databases node and choose New Database.
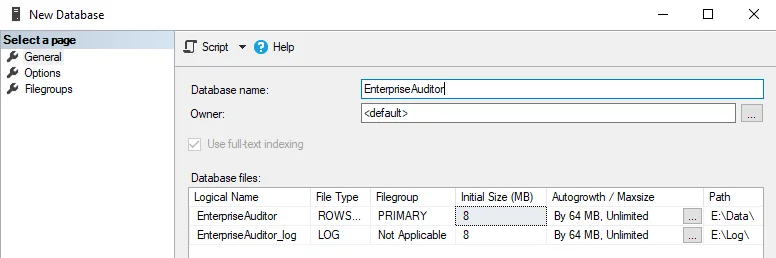
Step 2 – Set the Database name. Set any other desired data files configuration per company standards. Click OK on the New Database window.
Enter Enterprise Auditor as the Database name.
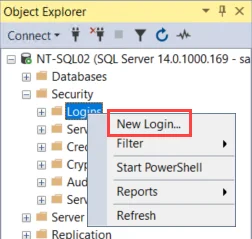
Step 3 – Create a new SQL Login account by right-clicking on the Security > Logins folder and selecting New Login.
Step 4 – Choose the authentication mode as the login type for use with the newly created Enterprise Auditor database. The available options are Windows authentication and SQL Server authentication.
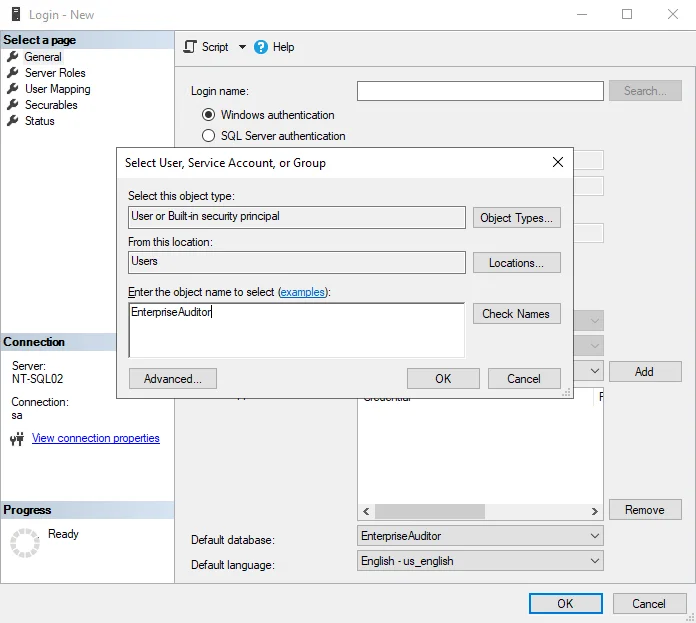
- If you want Windows authentication, click Search and select the Windows account you want, which is set up for use with Enterprise Auditor.
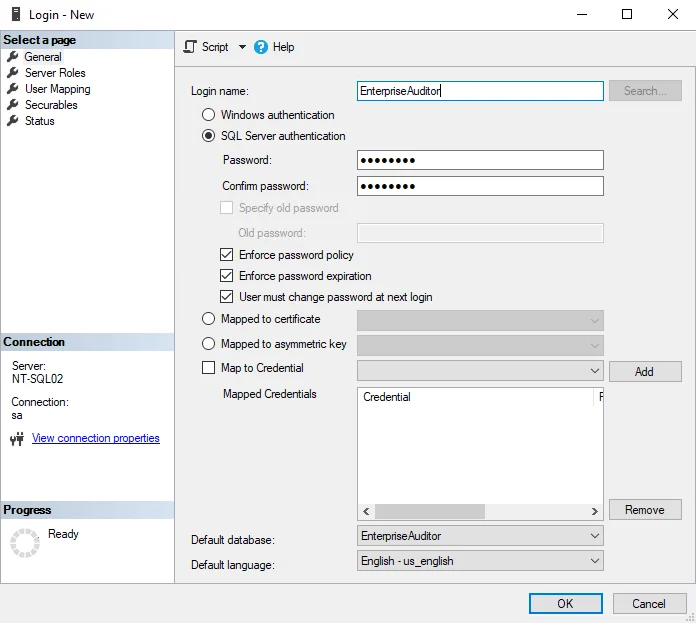
- RECOMMENDED: If you want SQL Server authentication, use a login name called Enterprise Auditor.
Set the Default Database as Enterprise Auditor (or the Enterprise Auditor database you want) and choose English as the Default Language.
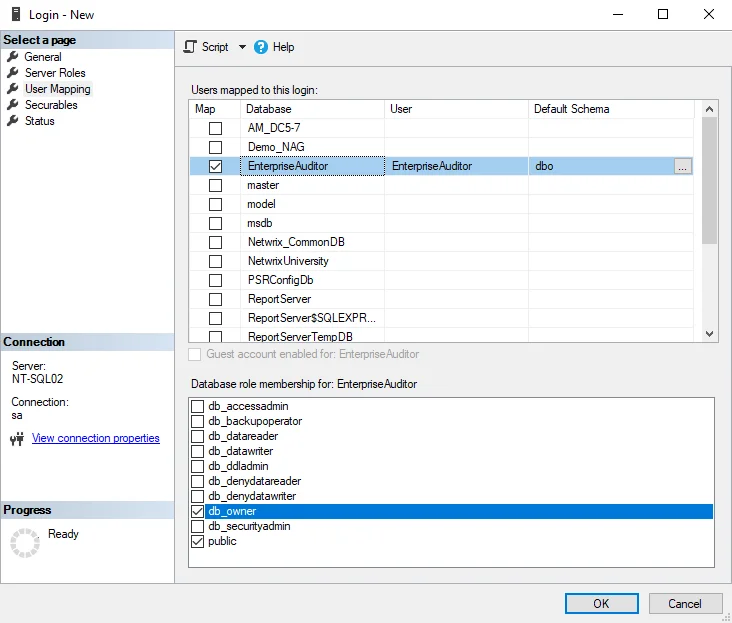
Step 5 – Navigate to the User Mapping menu, select the Enterprise Auditor (or the desired Enterprise Auditor database) database, and set the Default Schema to DBO.
Step 6 – In the Database role membership section, set the role to db_owner. Click OK to save new user configuration information and continue on to configure the Enterprise Auditor Console.
Step 7 – Configure the Enterprise Auditor Console to access the assigned database using the newly secured login account.
This step requires the completion of the Enterprise Auditor installation. See the Enterprise Auditor Core Installation topic for instructions.
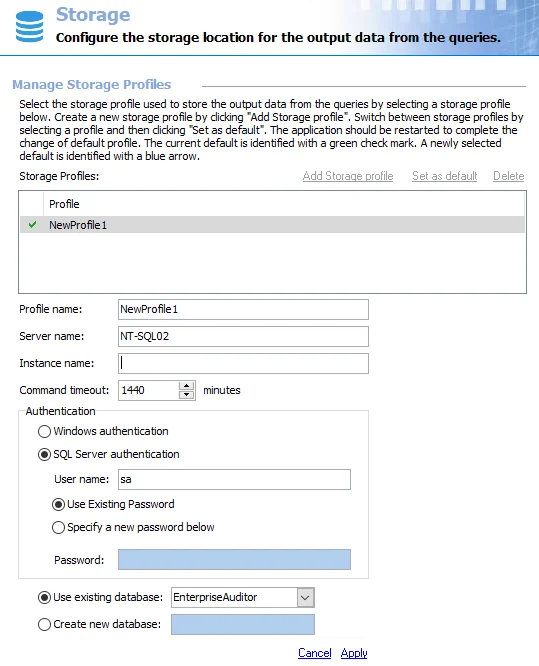
Step 8 – Launch Enterprise Auditor and navigate to Settings > Storage.
- Select the Storage Profile and enter the name of the SQL Server in the Server name field and Instance Name, if applicable.
- Enter the name of the Enterprise Auditor database in the Use existing database field.
- Choose the authentication method which matches the secure login that was created in Step 4, either Windows authentication or SQL Server authentication. If using SQL Server authentication, enter the User name and Password.
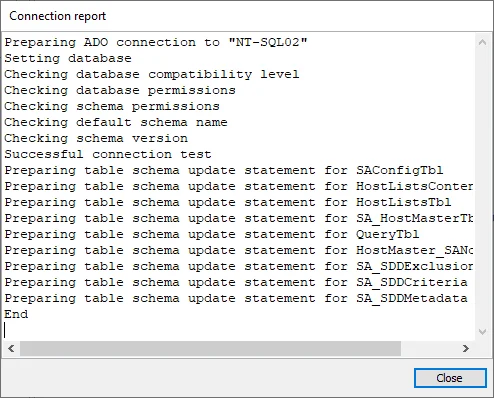
- Click Apply and a Connection report window will open. Verify that Enterprise Auditor performed the connection and test table drop successfully.
- Click Close on the Connection report window and then Save the new Storage Profile.
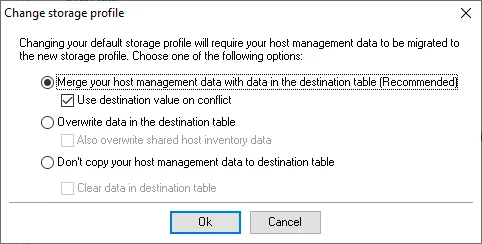
If you previously connected to another database that already had the Enterprise Auditor DB schema applied, a prompt should appear to merge the host management data. Choose the appropriate options and then click OK to migrate data.
Step 9 – Close and reopen the Enterprise Auditor Console before continuing to configure or use Enterprise Auditor if you chose a new database Storage Profile as the default.
The blue arrow signifies that you changed the default profile, but the change doesn't take effect until you restart the Enterprise Auditor Console.
See the Enterprise Auditor Initial Configuration topic to perform these steps during the initial configuration process after installation.
Second Level of Security
For second level security of the SQL Server database, use the script provided in the Database Permissions section.