Configure FPolicy
Activity Monitor relies on the NetApp FPolicy framework for monitoring of file access events on SVMs. FPolicy needs to be configured for each SVM.
There are two ways to configure FPolicy:
- Activity Monitor agent can facilitate the Automatic Configuration of FPolicy for the monitored SVM using the ONTAP API. This mode is simple, but does not allow you to exclude certain volumes or shares of the SVM from being monitored. It also requires additional permissions to create and modify FPolicy.
- Another option is to Manually Configure FPolicy for each SVM. This mode allows you to fine tune FPolicy by excluding certain volumes or shares from being monitored. It also reduces product permissions.
Regardless of the chosen approach for FPolicy configuration, one also needs to perform extra steps if the FPolicy communication has to be secured with TLS.
TLS Authentication Options
There are two TLS FPolicy Authentication options that can be used:
-
TLS, server authentication – Server only authentication
- A certificate (Server Certificate) for the Agent server needs to be generated and copied to a PEM file. The Server Certificate PEM file needs to be saved locally on the Activity Monitor Console server.
- For manual FPolicy configuration, the Server Certificate needs to be installed on the SVM, and then server-authentication set.
- For automatic FPolicy configuration, the Activity Monitor manages installation of the Server Certificate.
-
TLS, mutual authentication – Mutual authentication
- A certificate (Server Certificate) for the Agent server needs to be generated and copied to a PEM file. The Server Certificate PEM file needs to be saved locally on the Activity Monitor Console server.
- A certificate (Client Certificate) for the SVM needs to be copied to a PEM file and saved locally on the Activity Monitor Console server.
- For manual FPolicy configuration, the Server Certificate needs to be installed on the SVM and then mutual-authentication set.
- For automatic FPolicy configuration, mutual-authentication set before the configuration process. The Activity Monitor manages installation of both certificates.
Generate Server Certificate
A certificate (Server Certificate) for the Agent server needs to be generated and copied to a PEM file. This is required for both of the TLS authentication options.
The PEM file must contain both Public Key and Private Key parts. A certificate may be self-signed or issued by a certification authority. Below are the steps for generation of a self-signed certificate using OpenSSL toolkit.
Use the following command on the agent server to create the Server Certificate and copy it to a .pem file:
openssl.exe req -x509 -newkey rsa:2048 -keyout key.pem -out cert.pem -days 365 -nodes -subj "/CN=[ACTIVITY_AGENT_SERVER_NAME]"
copy cert.pem+key.pem [CERTIFICATE_FILE_NAME.pem]
del cert.pem key.pem .rnd
Example:
openssl.exe req -x509 -newkey rsa:2048 -keyout key.pem -out cert.pem -days 365 -nodes -subj "/CN=testagentserver"
copy cert.pem+key.pem agentkey.pem
del cert.pem key.pem .rnd
openssl.exe req x509 newkey rsa:2048 keyout key.pem out cert.pem days 365 nodes subj "/CN=testagentserver"
copy cert.pem+key.pem agentkey.pem
del cert.pem key.pem .rnd
In this example agentkey.pem would be used as the Server Certificate. Save the Server Certificate
locally on the Activity Monitor Console server.
Create PEM File for Client Certificate
A certificate (Client Certificate) for the SVM needs to be copied to a PEM file. This is required for the TLS, mutual authentication option. Follow the steps to create the PEM file for the Client Certificate.
Step 1 – On the SVM , use the following command to show the security certificate details:
security certificate show -vserver [SVM_NAME] -type server instance
Example:
security certificate show -vserver testserver -type server instance
Step 2 – Copy the security certificate details into a text file and copy the public key to a PEM file. The following variables from security details will be needed to set mutual-authentication during Part 6 of manual configuration and prior to automatic configuration:
- SVM
- Common Name
- Certificate Serial
- Public Key Certificate
Step 3 – Copy the value of Public Key Certificate field to a PEM file. The value spans multiple
lines, starts with "----BEGIN CERTIFICATE-----" and ends with "-----END CERTIFICATE-----".
The Client Certificate PEM file has been created.
Manually Configure FPolicy
This section describes how to manually configure FPolicy. Manual configuration of the FPolicy is recommended if the policy needs to be scoped to monitor select volumes or shares. It is necessary to create several FPolicy components and then enable the FPolicy. See the sections corresponding to each part of this list:
-
Part 1: Install Server Certificate on the SVM (only if using TLS authentication)
- This is only needed if using either of the TLS, … authentication options.
-
Part 2: Create External Engine
- The External Engine defines how FPolicy makes and manages connections to external FPolicy servers like Activity Monitor Agent.
-
Part 3: Create FPolicy Events
- An FPolicy event defines which protocol(s) to monitor and which file access events to monitor.
-
Part 4: Create FPolicy Policy
- The FPolicy policy associates the other three FPolicy components and allows for the designation of a privileged FPolicy user
- If running the Access Auditing (FSAA), Activity Auditing (FSAC), and/or Sensitive Data Discovery Auditing scans, then this is the user account credential to be added to the Enterprise Auditor Connection Profile.
-
Part 5: Create FPolicy Scope
- The FPolicy scope creates the filters necessary to perform scans on specific shares or volumes.
-
Part 6: Set TLS Authentication (optional)
- This is only needed if using either of the TLS authentication options.
-
Part 7: Enable the FPolicy
- Once the FPolicy is enabled, the Activity Monitor Agent can be configured to monitor the SVM.
-
Part 8: Connect FPolicy Server / Agent to Cluster Node (optional)
- This is only needed if there is an issue with connection to the Cluster node or for troubleshooting a disconnection issue.
Part 1: Install Server Certificate on the SVM
If using the TLS authentication options, it is necessary to install the Server Certificate on the SVM.
Use the following command to install the Server Certificate:
security certificate install type client-ca -vserver [SVM_NAME]
Example:
security certificate install type client-ca -vserver testserver
The command will ask you to provide a public certificate. Copy the public key from the Server
Certificate PEM file, i.e. the block starting with "-----BEGIN CERTIFICATE-----" and ending with
"-----END CERTIFICATE-----". Paste the block to the terminal window.
Validate Part 1: Server Certificate Install
Run the following command to validate the Server Certificate is installed:
security certificate show -vserver [SVM_NAME] -commonname [ACTIVITY_AGENT_SERVER_NAME] -type client-ca instance
Example:
security certificate show -vserver testserver -commonname testagentserver -type client-ca instance
Part 2: Create External Engine
The External Engine defines how FPolicy makes and manages connections to external FPolicy servers.
IMPORTANT:
-
The
-primary-serversmust be the server hosting the Activity Monitor Agent. -
If intending to use the Activity Monitor with Enterprise Auditor, then the primary server must also be the proxy server from which the Enterprise Auditor Access Auditing (FSAC) scans are running, e.g. the Enterprise Auditor Console server for local mode or the proxy server if running in any of the proxy mode options.
-
The following values are required:
engine-name StealthAUDITEngine, the names of the external engine object can be customized (see below).port 9999, Port number can be customized, but it is recommended to use 9999.extern-engine-type asynchronousssl-option no-authsend-buffer-size 6291456, for ONTAP 9.10+ usesend-buffer-size 8388608
CAUTION: All parameters are case sensitive.
Use the following command to create the external engine:
set -privilege advanced
vserver fpolicy policy external-engine create -vserver [SVM_NAME] -engine-name StealthAUDITEngine -primary-servers [IP_ADDRESS,…] -port 9999 -extern-engine-type asynchronous -ssl-option no-auth -send-buffer-size 6291456
Example:
set -privilege advanced
vserver fpolicy policy external-engine create -vserver testserver -engine-name StealthAUDITEngine -primary-servers 192.168.30.15 -port 9999 -extern-engine-type asynchronous -ssl-option no-auth -send-buffer-size 6291456
Validate Part 2: External Engine Creation
Run the following command to validate the creation of the external engine:
fpolicy policy external-engine show -instance
Verify that the output is displayed as follows:
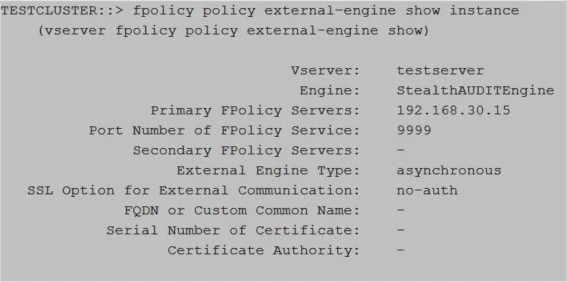
Relevant NetApp Documentation: To learn more about creating an external engine, please visit the NetApp website and read the vserver fpolicy policy external-engine create article.
Part 3: Create FPolicy Event
An event defines which protocol to monitor and which file access events to monitor.
IMPORTANT:
-
The SVM used must be the SVM hosting the CIFS or NFS shares to be monitored.
-
Enterprise Auditor and the Activity Monitor are capable of monitoring both NFS and CIFS. However, it is necessary to create separate events for each protocol.
-
The following values are required:
-
event-name- For CIFS shares –
StealthAUDITScreeningCifsfor successful events;StealthAUDITScreeningFailedCifsfor failed events. - For NFS shares –
StealthAUDITScreeningNfsV3, StealthAUDITScreeningNfsV4for successful events;StealthAUDITScreeningFailedNfsV3, StealthAUDITScreeningFailedNfsV4for failed events.
The names of the event objects can be customized (see Customization of FPolicy Object Names).
- For CIFS shares –
-
volume-operation true -
protocol– one of the followingcifs,nfsv3,nfsv4 -
monitor-fileop-failure–trueorfalse, indicates whether failed file operations are reported.
-
-
Limiting the file operations to be monitored is an excellent way to limit the performance impact the FPolicy will have on the NetApp device. The file operations from which to choose are below with additional filter options:
-
create– File create operations -
create_dir– Directory create operations -
close– File close operations- Enable this operation for NFSv4 to capture all read operations
-
delete– File delete operations -
delete_dir– Directory delete operations -
link– Link operations -
open– File open operations for CIFS protocol-
open-with-delete-intent– Limits notification to only when an attempt is made to open a file with the intent to delete it, according to theFILE_DELETE_ON_CLOSEflag specificationNOTE: File open operations are only supported with the
open-with-delete-intentfilter applied.
-
-
read– File read operationsfirst-read– Limits notification to only first read operations for CIFS protocol. For ONTAP 9.2+, this filter can be used for both CIFS and NFS protocols.
-
rename– File rename operations -
rename_dir– Directory rename operations -
setattr– Set attribute operations and permission changes. The following filters are available for ONTAP 9.0+ to limit events to permission changes only:-
CIFS:
setattr-with-owner-changesetattr-with-group-changesetattr-with-sacl-changesetattr-with-dacl-change
-
NFSv3:
setattr-with-owner-changesetattr-with-group-changesetattr-with-mode-change
-
NFSv4:
setattr-with-owner-changesetattr-with-group-changesetattr-with-mode-changesetattr-with-sacl-changesetattr-with-dacl-change
-
-
symlink– Symbolic link operations -
write– File write operationsfirst-write– Limits notification to only first write operations for CIFS protocol. For ONTAP 9.2+, this filter can be used for both CIFS and NFS protocols.
-
-
For failed/denied events, the list of supported file operations is limited to the following values:
- CIFS:
open - NFSv3:
create, create_dir, read, write, delete, delete_dir, rename, rename_dir, setattr, link - NFSv4:
open, create, create_dir, read, write, delete, delete_dir, rename, rename_dir, setattr, link
- CIFS:
CAUTION: All parameters are case sensitive.
Use the following command to create the FPolicy event for CIFS protocols:
vserver fpolicy policy event create -vserver [SVM_NAME] -event-name StealthAUDITScreeningCifs -volume-operation true -protocol cifs -file-operations [COMMA_SEPARATED_FILE_OPERATIONS] -filters [COMMA_SEPARATED_FILTERS]
Example:
vserver fpolicy policy event create -vserver testserver -event-name StealthAUDITScreeningCifs -volume-operation true -protocol cifs -file-operations create,create_dir,delete,delete_dir,open,read,write,rename,rename_dir,setattr -filters first-read,first-write,open-with-delete-intent,setattr-with-owner-change,setattr-with-group-change,setattr-with-sacl-change,setattr-with-dacl-change
Use the following command to create the FPolicy event for NFSv3 protocols:
vserver fpolicy policy event create -vserver [SVM_NAME] -event-name StealthAUDITScreeningNfsV3 -volume-operation true -protocol nfsv3 -file-operations [COMMA_SEPARATED_FILE_OPERATIONS] -filters [COMMA_SEPARATED_FILTERS]
Example:
vserver fpolicy policy event create -vserver testserver -event-name StealthAUDITScreeningNfsV3 -volume-operation true -protocol nfsv3 -file-operations create,create_dir,delete,delete_dir,read,write,rename,rename_dir,setattr,link,symlink -filters first-read,first-write,setattr-with-owner-change,setattr-with-group-change,setattr-with-mode-change
Use the following command to create the FPolicy event for NFSv4 protocols:
vserver fpolicy policy event create -vserver [SVM_NAME] -event-name StealthAUDITScreeningNfsV4 -volume-operation true -protocol nfsv4 -file-operations [COMMA_SEPARATED_FILE_OPERATIONS] -filters [COMMA_SEPARATED_FILTERS]
Example:
vserver fpolicy policy event create -vserver testserver -event-name StealthAUDITScreeningNfsV4 -volume-operation true -protocol nfsv4 -file-operations create,create_dir,delete,delete_dir,read,write,rename,rename_dir,setattr,link,symlink,close -filters group-change,setattr-with-mode-change,setattr-with-sacl-change,setattr-with-dacl-change
Validate Part 3: FPolicy Event Creation
Run the following command to validate the creation of the FPolicy event:
fpolicy policy event show -event-name [StealthAUDITScreeningCifs or StealthAUDITScreeningNfsV3 or StealthAUDITScreeningNfsV4 or ...] -instance
Example:
fpolicy policy event show -event-name StealthAUDITScreeningCifs -instance
Verify that the output is displayed as follows:
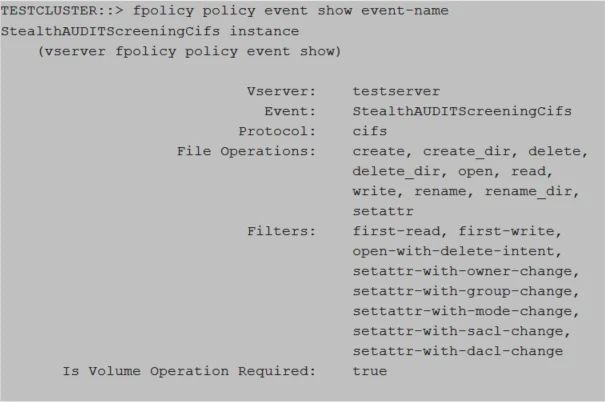
Relevant NetApp Documentation: To learn more about creating an event, please visit the NetApp website and read the vserver fpolicy policy event create article.
Part 4: Create FPolicy Policy
The FPolicy policy associates the other three FPolicy components and allows for the designation of a privileged FPolicy user, or the provisioned FPolicy account. If running the Access Auditing (FSAA), Activity Auditing (FSAC), and/or Sensitive Data Discovery Auditing scans in Enterprise Auditor, then this is also the user account credential to be added to the Enterprise Auditor Connection Profile.
IMPORTANT:
-
To monitor both CIFS and NFS protocols, two FPolicy Event were created. Multiple events can be included in the FPolicy policy.
-
The SVM used must be the SVM hosting the CIFS or NFS shares to be monitored.
-
The External Engine and FPolicy Event used in this command must be the External Engine created in Part 2 and the FPolicy Event created in Part 3 from the previous steps.
-
The following values are required:
policy-name StealthAUDIT, the name of the policy object can be customized (see Customization of FPolicy Object Names).
-
The following values are required for Enterprise Auditor integration:
privileged-user-name, which must be a provisioned FPolicy accountallow-privileged-access yes
CAUTION: All parameters are case sensitive.
Use the following command to create the FPolicy policy to monitor both CIFS and NFS protocols:
vserver fpolicy policy create -vserver [SVM_NAME] -policy-name StealthAUDIT -events StealthAUDITScreeningCifs,StealthAUDITScreeningNfsV3,StealthAUDITScreeningNfsV4 -engine StealthAUDITEngine -is-mandatory false -allow-privileged-access yes -privileged-user-name [DOMAIN\DOMAINUSER]
Example:
vserver fpolicy policy create -vserver testserver -policy-name StealthAUDIT -events StealthAUDITScreeningCifs,StealthAUDITScreeningNfsV3,StealthAUDITScreeningNfsV4 -engine StealthAUDITEngine -is-mandatory false -allow-privileged-access yes -privileged-user-name example\user1
Use the following command to create the FPolicy policy to monitor only CIFS protocols:
vserver fpolicy policy create -vserver [SVM_NAME] -policy-name StealthAUDIT -events StealthAUDITScreeningCifs -engine StealthAUDITEngine -is-mandatory false -allow-privileged-access yes -privileged-user-name [DOMAIN\DOMAINUSER]
Example:
vserver fpolicy policy create -vserver testserver -policy-name StealthAUDIT -events StealthAUDITScreeningCifs -engine StealthAUDITEngine -is-mandatory false -allow-privileged-access yes -privileged-user-name example\user1
Use the following command to create the FPolicy policy to monitor only NFS protocols:
vserver fpolicy policy create -vserver [SVM_NAME] -policy-name StealthAUDIT -events StealthAUDITScreeningNfsV3,StealthAUDITScreeningNfsV4 -engine StealthAUDITEngine -is-mandatory false -allow-privileged-access yes -privileged-user-name [DOMAIN\DOMAINUSER]
Example:
vserver fpolicy policy create -vserver testserver -policy-name StealthAUDIT -events StealthAUDITScreeningNfsV3,StealthAUDITScreeningNfsV4 -engine StealthAUDITEngine -is-mandatory false -allow-privileged-access yes -privileged-user-name example\user1
Validate Part 4: FPolicy Policy Creation
Run the following command to validate the creation of the FPolicy policy:
fpolicy policy show -instance
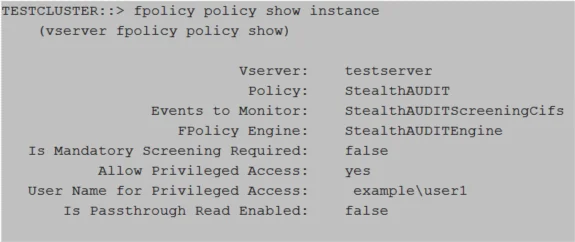
Relevant NetApp Documentation: To learn more about creating a policy, please visit the NetApp website and read the vserver fpolicy policy create article.
Part 5: Create FPolicy Scope
The FPolicy scope creates the filters necessary to perform scans on specific shares or volumes. It is possible to set the scope to monitor all volumes or all shares by replacing the volume/share name variable [SVM_NAME] in the command with an asterisk (*).
IMPORTANT:
- The SVM used must be the SVM hosting the CIFS or NFS shares to be monitored.
- It is not necessary to specify both volumes and shares. One or the other is sufficient.
- If you want to monitor everything, set the "
volumes-to-include" value to "*".
Use the following command to create the FPolicy scope by specifying volume(s):
vserver fpolicy policy scope create -vserver [SVM_NAME] -policy-name StealthAUDIT -volumes-to-include [VOLUME_NAME],[VOLUME_NAME]
Example:
vserver fpolicy policy scope create -vserver testserver -policy-name StealthAUDIT -volumes-to-include samplevolume1,samplevolume2
Use the following command to create the FPolicy scope by specifying share(s):
vserver fpolicy policy scope create -vserver [SVM_NAME] -policy-name StealthAUDIT -shares-to-include [SHARE_NAME],[SHARE_NAME]
Example:
vserver fpolicy policy scope create -vserver testserver -policy-name StealthAUDIT -shares-to-include sampleshare1,sampleshare2
Validate Part 5: FPolicy Scope Creation
Run the following command to validate the FPolicy scope creation:
fpolicy policy scope show -instance
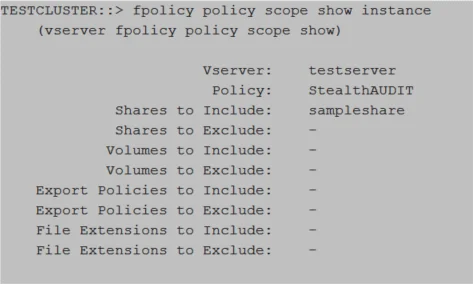
Relevant NetApp Documentation: To learn more about creating scope, please visit the NetApp website and read the vserver fpolicy policy scope create article.
Part 6: Set TLS Authentication
If using the TLS authentication options, it is necessary to set authentication for the type of authentication.
Set Server-Authentication
Use the following command to set server-authentication:
vserver fpolicy policy externalengine modify -vserver [SVM_NAME] -engine-name StealthAUDITEngine -ssl-option server-auth
Example:
vserver fpolicy policy externalengine modify -vserver testserver -engine-name StealthAUDITEngine -ssl-option server-auth
Set Mutual-Authentication
Use the following command to set mutual-authentication:
vserver fpolicy policy external-engine modify ‑vserver [SVM_NAME] -engine-name StealthAUDITEngine -ssl-option mutual-auth -certificate-common-name [COMMON_NAME] -certificate-serial [CERTIFICATE_SERIAL] -certificate-ca [CERTIFICATE_AUTHORITY]
Example:
vserver fpolicy policy external-engine modify -vserver testserver -engine-name StealthAUDITEngine -ssl-option mutual-auth -certificate-common-name testserver -certificate-serial 461AC46521B31321330EBBE4321AC51D -certificate-ca "VeriSign Universal Root Certification Authority"
Validate Mutual-Authentication Is Set
Run the following command to confirm mutual-authentication is set:
vserver fpolicy policy external-engine show -fields ssl-option
Part 7: Enable the FPolicy
The FPolicy must be enabled before the Activity Monitor Agent can be configured to monitor the SVM.
IMPORTANT:
- The SVM used must be the SVM hosting the CIFS or NFS shares to be monitored.
Use the following command to enable the FPolicy:
vserver fpolicy enable -vserver [SVM_NAME] -policy-name StealthAUDIT -sequence-number [INTEGER]
Example:
vserver fpolicy enable -vserver testserver -policy-name StealthAUDIT -sequence-number 10
Validate Part 7: FPolicy Enabled
Run the following command to validate the FPolicy scope creation:
vserver fpolicy show

Relevant NetApp Documentation: To learn more about enabling a policy, please visit the NetApp website and read the vserver fpolicy enable article.
Part 8: Connect FPolicy Server / Agent to Cluster Node
Manually connecting the FPolicy server (or Agent server) to the Cluster Node is only needed if there is an issue with connection to the Cluster Node or for troubleshooting a disconnection issue.
Use the following command to connect the StealthAUDITEngine that belongs to the StealthAUDIT
policy to all Cluster Nodes:
policy engine-connect -vserver [SVM_NAME] -policy-name StealthAUDIT -node *
Example:
policy engine-connect -vserver testserver -policy-name StealthAUDIT -node *
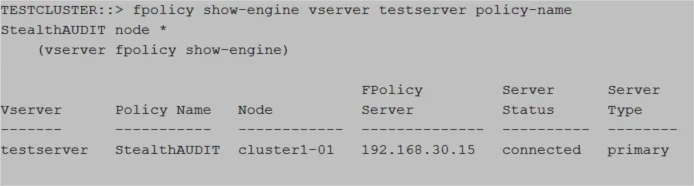
Validate Part 8: Connection to Cluster Node
Run the following command to validate connection to the Cluster Node:
fpolicy show-engine -vserver [SVM_NAME] -policy-name StealthAUDIT -node *
Automatic Configuration of FPolicy
The Activity Monitor can automatically configure FPolicy on the targeted SVM. The FPolicy created will monitor file system activity from all volumes and shares of the SVM. This feature can be enabled using the Configure FPolicy. Create or modify FPolicy objects if needed checkbox in the monitored host's properties in the Activity Monitor.
If using the TLS, mutual authentication option, you will need to create the PEM file for the Client Certification, which is needed during the monitored host configuration in the Activity Monitor. It will also be necessary to set mutual authentication on the SVM.
Set TLS Mutual-Authentication
If using the TLS, mutual authentication options, it is necessary to set authentication.
Use the following command to set mutual-authentication:
vserver fpolicy policy external-engine modify -vserver [SVM_NAME] -engine-name StealthAUDITEngine -ssl-option mutual-auth -certificate-common-name [COMMON_NAME] -certificate-serial [CERTIFICATE_SERIAL] -certificate-ca [CERTIFICATE_AUTHORITY]
Example:
vserver fpolicy policy external-engine modify -vserver testserver -engine-name StealthAUDITEngine -ssl-option mutual-auth -certificate-common-name testserver -certificate-serial 461AC46521B31321330EBBE4321AC51D -certificate-ca "VeriSign Universal Root Certification Authority"
Validate: Mutual-Authentication
Run the following command to confirm mutual-authentication is set:
vserver fpolicy policy external-engine show -fields ssl-option
Customization of FPolicy Object Names
Activity Monitor uses the following FPolicy object names by default:
- Policy name:
StealthAUDIT - External Engine name:
StealthAUDITEngine - CIFS Event name:
StealthAUDITScreeningCifs - NFS v3 Event name:
StealthAUDITScreeningNfsV3 - NFS v4 Event name:
StealthAUDITScreeningNfsV4 - Failed CIFS Event name:
StealthAUDITScreeningFailedCifs - Failed NFS v3 Event name:
StealthAUDITScreeningFailedNfsV3 - Failed NFS v4 Event name:
StealthAUDITScreeningFailedNfsV4
These names can be customized in the monitored host's settings in the Activity Monitor. It can be useful in two scenarios:
- You want the names to match the company policies;
- You want to configure FPolicy manually using your custom names, but also want to leverage the "Enable and Connect FPolicy" feature of the Activity Monitor, so that the product ensures that FPolicy stays enabled and connected at all times.