Data Collectors
This topic covers the configuration wizards that are unique to each data collector. See the Jobs Tree topic for additional information on job configuration.
Query Selection
The Enterprise Auditor data collectors can collect information from a wide range of environments. You assign data collection tasks to jobs at the Configure > Queries node level. See the Queries Node topic for additional information.
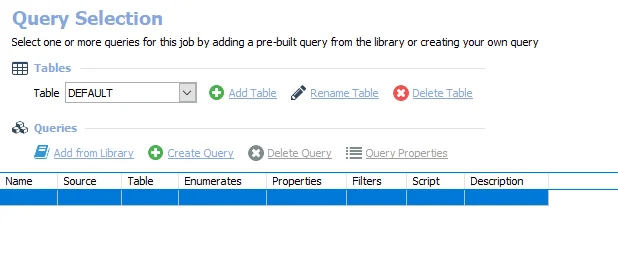
The Query Selection page is split into the Tables and Queries sections. The Tables section has the following options:
- Table – Select a pre-configured table or select DEFAULT to create a new one
- Add Table – Add a new table to the Table dropdown list
- Rename Table – Rename the current table selected
- Delete Table – Delete the current table selected
Use the Queries section to configure the Data Collectors. The Queries section has the following options:
- Add from Library – Opens the Libraries window. Add a pre-built query from the Enterprise Auditor library. See the Add Query from Library topic for additional information.
- Create Query – Click Create Query to add a new query task to a job. See the Create or Modify a Query topic for additional information.
- Delete Query – Delete the selected query
- Query Properties – Select an existing query and click Query Properties to modify its configuration
Add Query from Library
You can add pre-built queries to the Data Collector job through the Libraries window.
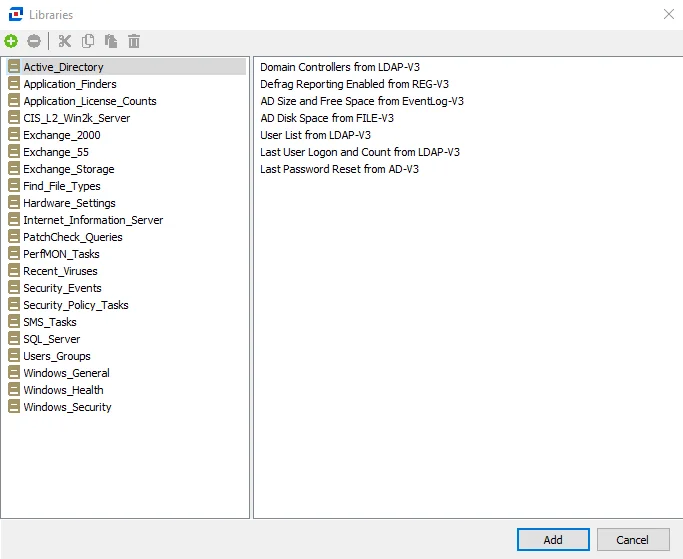
The Libraries window toolbar has the following options:
- Create New Library – Create a new library entry. The new Library appears in the Library dropdown menu.
- Delete Library – Deletes the selected library
- Cut – Cut the selected task in the library to the clipboard
- Copy – Copy the selected task in the library to the clipboard
- Paste – Paste cut or copied item from the clipboard into the selected library
- Delete Selected Task – Deletes the selected task
Click Add to confirm the query selection and add it to the Queries list on the Query Selection page. If no selection is needed or intended, click Cancel to close the Libraries window without adding a pre-built query into the Queries list.
Create or Modify a Query
To open the Query Properties window, click Create Query for a new query or Query Properties for an existing query. The Query Properties window has three tabs where you can configure queries. These tabs are:
To access the XML Text version of the Query Properties window, click View XML. This applies to all three tabs listed.
General Tab
Use the General tab to modify the name or description of the query.

The General tab displays:
-
Name – Name of the query supplied by the creator of the query
-
Description – Description of the query supplied by the creator of the query
-
Table – Name of the native data table for this query
- The table name is supplied by the creator in the Query Selection view
- Tables are named DEFAULT, unless modified
- Within the SQL database, the table name will be prefaced with
SA_[Job Name]_
-
ID – Query GUID generated by Enterprise Auditor for this query task.
-
The SMARTLog Data Collector, ExchangeMetrics Data Collector, and PowerShell Data Collector all reference the query GUID.
-
When using the SMARTLog Data Collector or the ExchangeMetrics Data Collector, you can find the
statefile for the query’s Persist log state feature in the SA_CommonData folder in the Enterprise Auditor installation directory:…/STEALTHbits/StealthAUDIT/Jobs/SA_CommonData/[Data Collector]/[Query GUID]/[Target Host]/state
-
When creating a new query, provide a unique, descriptive Name and Description. This information displays in the table on the Query Selection view. See the Queries Node topic for additional information.
Data Source Tab
Use the Data Source tab to configure the data collector and query.
 |  |
|---|---|
| New Query | Existing Query |
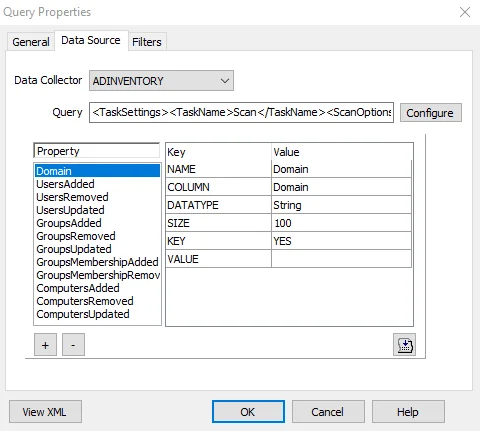
The Data Source tab displays:
- Data Collector – Data collector selected from the dropdown menu.
- Query – Query configuration string.
- Configure – Opens the wizard for the selected data collector. Each Data Collector task has its own Configuration Wizard.
- Properties – Configured query properties.
When creating a new query, expand the Data Collector dropdown menu, which provides a list of all licensed data collectors in alphabetical order. The wizard auto-fills the Query and Property sections according to the configuration. The buttons at the bottom of the Property section are for advanced features to manipulate the query. The + and – buttons manually add or remove individual properties from the query. The script button opens the VBScript Editor window for query manipulation scripts.
Use the Data Collector Configuration wizards for basic query modifications. For more complex modifications, contact Netwrix Support.
See the individual data collector section for configuration wizard page information.
Filters Tab
Use the Filters tab to include filters into the data collection process.
 |  |
|---|---|
| No FIlter | With FIlter |
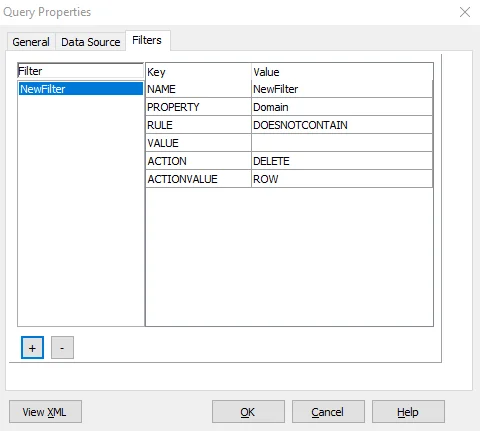
The Filter tab has the following items:
- Filter – Sort through a list of filters that are applied to the current query
- Use the + and – buttons to add and remove filters from the query
- Key – Labels identifying the configurable value in the filter
- Value – When applicable, add a new value to the filter using the dropdown menu. Otherwise, create a new one by typing in the value you want.
Use the default settings for filters. Use filters to substitute or delete data values during data collection. For more information on the impacts of adding filters to queries, contact Netwrix Support.
Click OK to save changes and exist the Query Properties window. If you didn't make or intend any changes, click Cancel instead to exit the Query Properties window without saving unintended changes.