ADInventory: Custom Attributes
The Custom Attributes page lets you add Active Directory attributes that are unique to the environment or that Enterprise Auditor doesn't collect by default. It is a wizard page for the category of Scan Active Directory.
The Standard Reference Tables & Views for the ADInventory Data Collector topic provides information on what Enterprise Auditor collects by default. Enterprise Auditor stores custom attributes added on this page in the SA_ADInventory_ExtendedAttributes table.
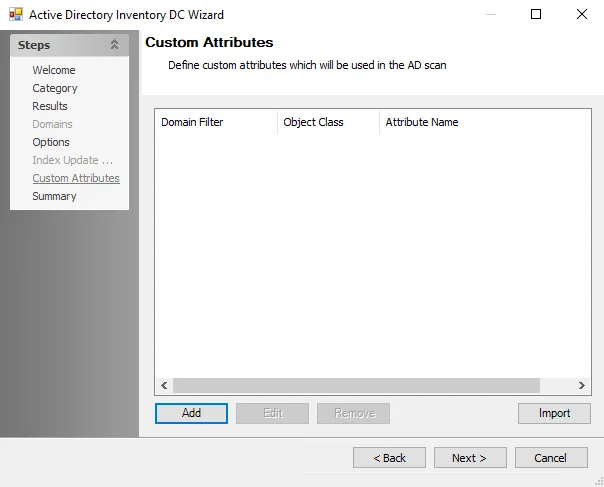
Define the Custom Attribute according to the following three elements:
- Domain Filter – Short or fully qualified name
- Object Class – User, Group, or Computer
- Attribute Name – As listed within Active Directory
Use the Add, Edit, and Remove buttons at the bottom of the window to configure the custom attributes the scan gathers. See the Manually Add Custom Attributes topic for additional information.
The Import button opens the Custom Attributes Import Wizard. See the Custom Attributes Import Wizard topic for additional information.
Microsoft Active Directory Schema is detailed in the Microsoft Active Directory Schema article.
Manually Add Custom Attributes
The Add and Edit buttons on the Custom Attributes page open the Custom Attribute window. To manually add custom attributes:
Step 1 – On the Custom Attributes page of the Active Directory Inventory DC Wizard, click Add. The Custom Attribute window opens.

Step 2 – Enter the Domain Filter. Enter this as either the short domain name or the fully qualified domain name.
Step 3 – Select the checkbox for the Object Class you want.
Step 4 – Enter the Attribute Name as it appears in Active Directory.
Step 5 – Click OK. The Custom Attribute window closes, and Enterprise Auditor adds the specified attribute to the Custom Attributes page.
Repeat this process until you've included all desired Custom Attributes.
Custom Attributes Import Wizard
Use the Custom Attributes Import Wizard to import a list of custom attributes into the ADInventory Data Collector configurations:
Step 1 – On the Custom Attributes page of the Active Directory Inventory DC Wizard, click Import. The Custom Attribute Import Wizard opens.
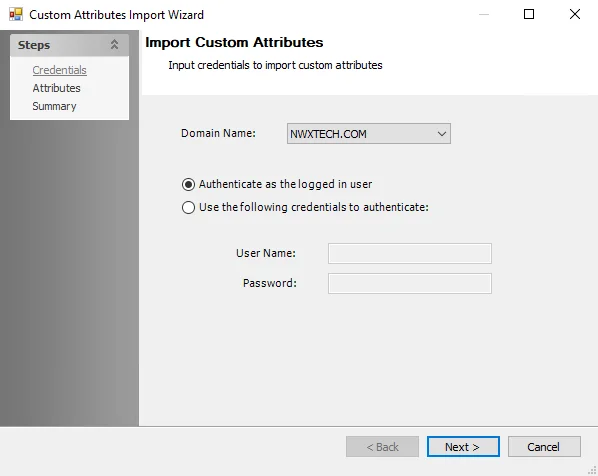
Step 2 – On the Credentials page, identify a domain either by entering one manually or selecting one from the Domain Name dropdown menu which displays a list of domains trusted by the one in which the Enterprise Auditor Console server resides. Then set the credentials for reading the attributes list from the domain:
- Authenticate as the logged in user – Applies the user account running Enterprise Auditor
- Use the following credentials to authenticate – Applies the account supplied in the User Name and Password fields
Click Next to continue.
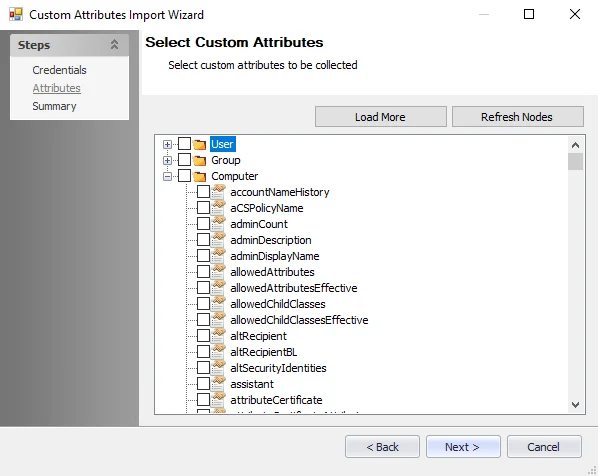
Step 3 – The wizard populates available attributes from the domain specified on the Attributes page. Expand the object class you want and select the checkboxes for the custom attributes you want to import. Then click Next.

Step 4 – On the Summary page, click Finish.
Enterprise Auditor adds the selected attributes to the Custom Attributes page of the Active Directory Inventory DC Wizard.